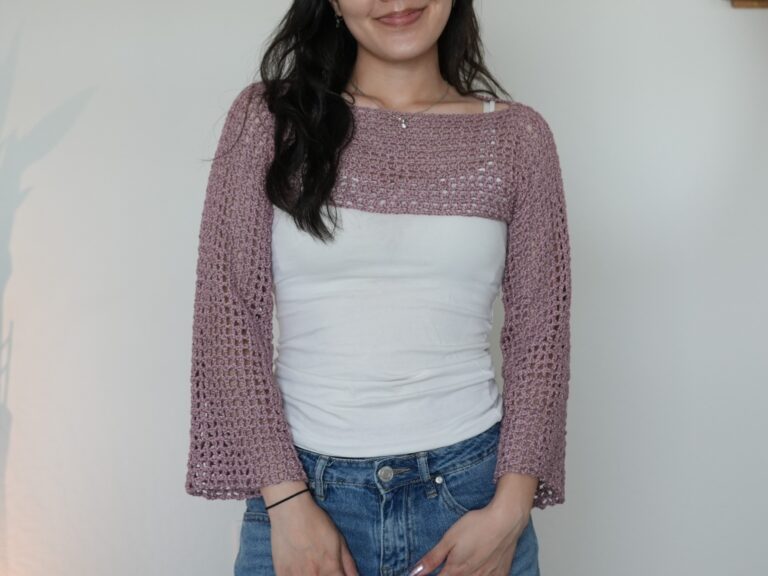
Crochet Wavy Sweater | Free Pattern & Video Tutorial
This crochet wavy sweater is a fun project to do as the weather starts to cool down! Do it all in one color, use a self-striping yarn like I did, or use multiple colors for intentional stripes. You can also skip the mesh rows if you don’t want the sweater to be mesh! With this free written pattern and the tutorial, you can customize your sweater for the perfect look and fit!

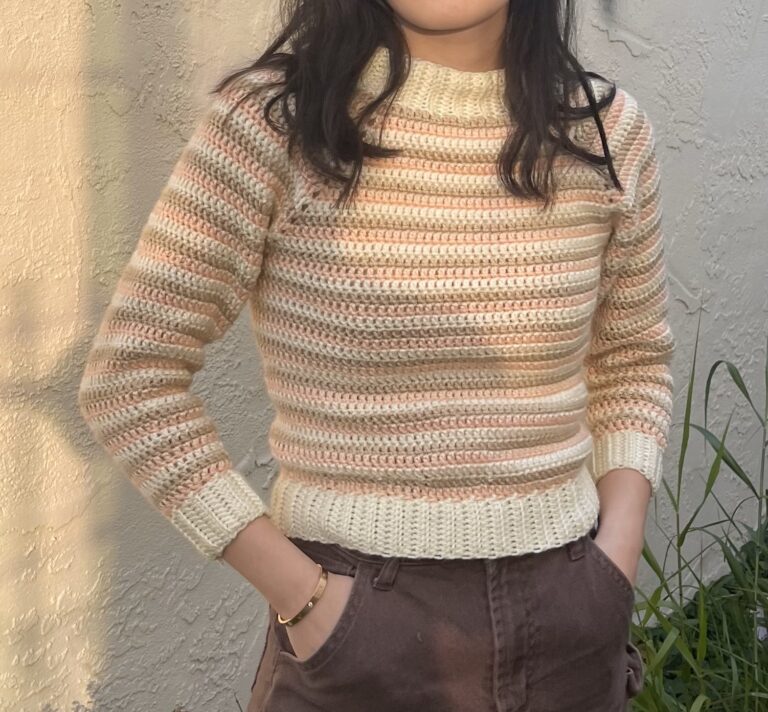
I crocheted a second wavy mesh sweater in white! This one was made with K+C Essential cotton yarn.

Table of Contents
This post may contain affiliate links. I may earn a small commission on qualifying purchases at no additional cost to you!
Crochet Wavy Sweater Video Tutorial
Become a member to get early access to new videos!
You can follow along with my YouTube video to make your own crochet wavy sweater! I have timestamps included to section the video and help you jump to any point you need to!
Pattern Information
Materials
- 360 grams of medium weight yarn (Caron Cotton Cakes in “High Tide“)
- 5mm Clover Amour crochet hook
- Scissors
- Yarn needle
- Stitch markers

Crochet Abbreviations
ch = chain
dc = double crochet
dc3tog = double crochet 3 together
rep = repeat
sc = single crochet
sk = skip
st = stitch
Gauge
9 rows of 19 st in the wave pattern makes a 10 x 10 centimeter (4″ x 4″) square
Dimensions
*includes instructions to adjust sizing
These measurements are before the sweater is assembled.
Body Panels: 45 centimeters wide x 39.5 centimeters long (17.7 x 15.6 inches)
Sleeve Panels: 30 centimeters wide x 46 centimeters long (11.8 x 18.1 inches)
Notes and Tips
- This pattern is written using US crochet terms
- The number in (parentheses) at the end of each row is the stitch count after finishing that row
- Italicized notes tell you what to change to adjust the size
- The chain 3 at the beginning of each row DOES count as a double crochet
- For simplicity, I put dc3tog throughout the written pattern, but I actually skip the middle leg of the dc3tog in the images and in the video tutorial. To do this, put the first leg of the dc2tog in the next chain or stitch, skip over the next chain or stitch, and put the second leg of the dc2tog in the next chain or stitch. It’s a little faster to do and doesn’t change the appearance much
Crochet Wavy Mesh Sweater Pattern
Sleeve Panels
Foundation: Make a slipknot, ch60
Note: The length of this chain will affect the circumference of your sleeve. To make the sleeves less wide, do fewer chains. To make it wider, do more chains. Make sure the number of chains is a multiple of 14, plus 4.
Row 1: dc in 4th ch from hook, *dc in next 5 ch, dc3tog, dc in next 5 ch,** [dc, ch1, dc] in next ch, rep from * across, ending last rep at **, dc2 in last ch (54)

Row 2: ch3, turn, dc in 1st st, *rep[ch1, sk1, dc] 2 times, ch1, sk1, dc3tog, rep[ch1, sk1, dc] 2 times, ch1, sk1,** [dc, ch1, dc] in next sp, rep from * across, ending last rep at **, dc2 in last st (30)

Throughout this pattern, each chain-1-space counts as a stitch.
Row 3: ch3, turn, dc in 1st st, *dc in next 5 st, dc3tog, dc in next 5 st,** [dc, ch1, dc] in next sp, rep from * across, ending last rep at **, dc2 in last st (54)

Rows 4-38: rep[Row 2, Row 3]
This means Row 4 is a repeat of Row 2, Row 5 is a repeat of Row 3, Row 6 is a repeat of Row 2, and so on.
Note: For a shorter sleeve, do fewer rows. For a longer sleeve, do more rows.

Row 39: ch1, turn, sc in next 4 st, rep[dc in next 3 st, sk1, dc in next 3 st, sc in next 3 st, sk1, sc in next 3 st] across until last 4 st, sc in last 4 st (50)
Fasten off with a 65″ long tail end.

Make a second, identical sleeve panel.
Body Panels
Foundation: Make a slipknot, ch88
Note: To make the body panel less wide, do fewer chains. To make it wider, do more chains. Make sure the number of chains is a multiple of 14, plus 4.
Row 1: dc in 4th ch from hook, *dc in next 5 ch, dc3tog, dc in next 5 ch,** [dc, ch1, dc] in next ch, rep from * across, ending last rep at **, dc2 in last ch (80)
Row 2: ch3, turn, dc in 1st st, *rep[ch1, sk1, dc] 2 times, ch1, sk1, dc3tog, rep[ch1, sk1, dc] 2 times, ch1, sk1,** [dc, ch1, dc] in next sp, rep from * across, ending last rep at **, dc2 in last st (44)
Row 3: ch3, turn, dc in 1st st, *dc in next 5 st, dc3tog, dc in next 5 st,** [dc, ch1, dc] in next sp, rep from * across, ending last rep at **, dc2 in last st (80)
Rows 4-28: rep[Row 2, Row 3]
Note: For a shorter sweater, do fewer rows. For a longer sweater, do more rows. Make sure you stop after an even row.

Marking Neckline
Use stitch markers to mark the wave peaks (the space from the dc, ch1, dc) where you want the neckline to start and end. I marked the second peak from the left and the second from the right.

Shaping Neckline
Row 1: ch3, turn, dc in 1st st, *dc in next 5 st, dc3tog, dc in next 5 st,** [dc, ch1, dc] in next sp, rep from * until st marker, ending last rep at **, dc2 in sp with st marker (28)

Row 2: ch3, turn, dc in 1st st, *rep[ch1, sk1, dc] 2 times, ch1, sk1, dc3tog, rep[ch1, sk1, dc] 2 times, ch1, sk1,** [dc, ch1, dc] in next sp, rep from * across, ending last rep at **, dc2 in last st (16)
Row 3: ch3, turn, dc in 1st st, *dc in next 5 st, dc3tog, dc in next 5 st,** [dc, ch1, dc] in next sp, rep from * across, ending last rep at **, dc2 in last st (28)
Row 4: rep[Row 2] (16)

Row 5: ch1, turn, sc in next 4 st, rep[dc in next 3 st, sk1, dc in next 3 st, sc in next 3 st, sk1, sc in next 3 st] across until last 4 st, sc in last 4 st (26)
Fasten off with a 35″ long tail end.

Attach your yarn the the other stitch marker and repeat Rows 1-5 to work the other side of the neckline.

Make a second, identical body panel, but with regular length tail ends.
Assembly
With the 4 panels laid out like the image below, use each of the 4 long loose ends to sew along the four arrows.

Flip your body panel so the long tail ends are on the right side. Place the second body panel upside-down, with the tops of the shoulders lined up. With the long loose ends, whip stitch across the tops of both shoulders to connect them.

Lay the sleeve panels with the last rows touching the body panels. Center the sleeve panels using the neck hole row and use stitch markers to mark the ends of the sleeve panels. With the long loose ends left on the sleeve panels, sew them to the body panels.

Fold the top panel down along the shoulders. Attach 2 separate pieces of 52″ long yarn to the bottom corners of the body panels. Sew in an upside-down L shape to close up the sides of the sweater and the sleeves.

Finished Crochet Wavy Sweater
Weave in your loose ends and your crochet wavy mesh sweater is finished!


Hey Viv! just wanted to ask, what do I do if the sleeves start tapering?
hey viv, just wanted to ask, what do I do if my sleeves start tapering? thanks
This is so pretty! In colours or white, it is quite stunning. Thankyou Viv for sharing. 🤗🌻
I think adding what size (small or medium) the one you made is would help those of us trying to size up the sweater.
Much appreciate this pattern thank you.
If you wanted to make the sleeves in a bell shape, could you just add increase in every second row?
she mentioned in the video that it is S. 🙂
Should adjusting the sizes be a multiple of 14 plus 3 or 4? The written tutorial has 4 but the YouTube video you say 3. Thank you!
It should be 4! Thanks for catching that!
can you say what size you made for you for wavy sweater ????