Crochet Flower Drawstring Pouch | Free Pattern & Video Tutorial
This crochet flower drawstring pouch is made with 2 granny squares and has a drawstring closure. You can make your pouch with a flower on both sides, but I have a solid granny square pattern that will fit perfectly for a plain back! Use this cute crochet pouch to hold smaller things in your bag or to use as a gift bag!

Table of Contents
This post may contain affiliate links. I may earn a small commission on qualifying purchases at no additional cost to you!
Crochet Flower Pouch Video Tutorial
Become a member to get early access to new videos!
You can follow along with my YouTube video to make your own crochet flower pouch! I have timestamps included to section the video and help you jump to any point you need to!
Pattern Information
Materials
- 30 grams of medium weight yarn yarn in 3 different colors
- Flower center color yarn (Red Heart Super Saver in “Gold“)
- Flower petal color yarn (Red Heart Super Saver in “Aran“)
- Base color yarn (Red Heart Super Saver in “Light Sage” or “Pale Plum“)
- 5mm Clover Amour crochet hook
- Scissors
- Yarn needle

Crochet Abbreviations
ch = chain
dc = double crochet
flo = front loop only
hdc = half double crochet
rep = repeat
sc = single crochet
sk = skip
sl st = slip stitch
sp = space
st = stitch
tr = treble crochet
Dimensions
Granny Square: 11 centimeters wide x 11 centimeters long (4.3 x 4.3 inches)
Overall: 11 centimeters wide x 14.5 centimeters long (4.3 x 5.7 inches)
Notes and Tips
- This pattern is written using US crochet terms
- The number in (parentheses) at the end of each row is the stitch count after finishing that row
- Change colors by making a chain with the new color through the loop on the hook
- The chain 2 at the beginning of each round does NOT count as a double crochet
- The slip stitch at the end of each round goes into the first stitch of that round
- The first stitch of every new round goes into the same stitch we slip stitched to in the previous round
Crochet Flower Drawstring Pouch Pattern
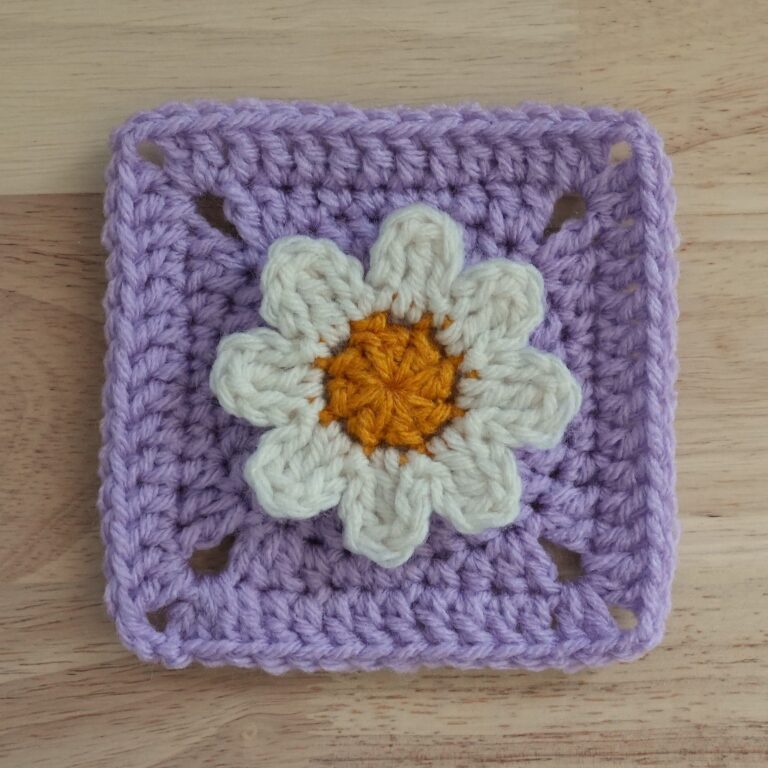
Crochet Daisy Appliqué
Foundation: With yellow yarn, make a magic ring or make a slipknot, ch4, sl st to 1st ch to form a ring
Round 1: ch2, dc8 into ring, sl st (8)
Switch to white yarn and cut off yellow yarn.

Round 2a: rep{ch3, [tr, ch3, sl st] into flo of next st} around, fasten off (8 petals)


Forming Square Around the Daisy
Attach base color yarn to one of the back loops of the stitches from Round 1. We will work into each of these loops for Round 2b.

The ch5 at the beginning of Round 2b counts as the first dc and ch2.
Round 2b: ch5, rep[dc in next st, ch2] around, sl st (8dc, 8 sp)


Round 3: ch2, dc4 into each sp around, sl st (32)


Round 4: rep[ch2, dc2 into next st, hdc, sc in next 4 st, hdc, dc2 into next st] 4 times around, ch2, sl st (40)


In Round 5, the first sp will also be the last sp you work into.
Round 5: ch2, dc2 in sp below, *dc in each of next 10 st, [dc2, ch2, dc2] in sp,* rep between ** 3 more times, but only [dc2, ch2] in last sp, sl st (56)
Fasten off.

If you want the flower on both sides of the pouch, make another flower granny square, but don’t fasten off. If you want a plain, solid back for the pouch, make a solid granny square with the pattern below.
Solid Granny Square
With base color yarn, make a magic ring or make a slipknot, ch4, sl st to 1st ch to form a ring.
Round 1: ch1, sc8 into ring, sl st (8)

Round 2: rep[ch2, dc in next 2 st] around, ch2, sl st (8)

Round 3: ch2, dc2 in sp below, *dc in each of next 2 st, [dc2, ch2, dc2] in sp,* rep between ** 3 more times, but only [dc2, ch2] in last sp, sl st (24)

Round 4: ch2, dc2 in sp below, *dc in each of next 6 st, [dc2, ch2, dc2] in sp,* rep between ** 3 more times, but only [dc2, ch2] in last sp, sl st (40)
Round 5: ch2, dc2 in sp below, *dc in each of next 10 st, [dc2, ch2, dc2] in sp,* rep between ** 3 more times, but only [dc2, ch2] in last sp, sl st (56)

Stitching Squares Together
For this part, we will connect the two squares together with single crochets. You can substitute this stitching method with any other method you want, like slip stitches or sewing.
Place the working square directly on top of the fastened off square, with the flower(s) facing the outside. Now, we will be going through both stitches in both squares for each single crochet.


Round 5: ch1, sc in the sp, *sc in each of the next 14 st,** sc4 in next sp, rep from * 2 more times ending last rep at **, sc in next sp (52)


Extending Pouch
Now, we will be working around the tops of the squares.
Round 1: ch2, dc in sp below, *rep[ch1, sk1, dc] 7 times, ch1, dc in next sp,* flip over, dc in next sp, rep between ** across, ch1, sl st ()


Rounds 2-3: ch2, dc around in each st and sp, sl st ()
Fasten off and weave in loose ends.


Drawstrings
Make a slipknot with a short loose end and ch50 (or however many for double the width + 6 centimeters). Fasten off with a short loose end.
Make one more string.

Pull half of one of your strings behind the second double crochet from the left. Weave it under and over the double crochets.


Flip the pouch and repeat with the other half of the string. If the strings aren’t even, tug on the shorter one to even it out.

Repeat with the other string starting in the opposite end.

Trim the tails until they are about 1 inch long.
Finished Crochet Flower Pouch
Weave in your loose ends, and your crochet drawstring flower pouch is finished!


One Comment