Crochet Hooded Scarf/Scoodie | Free Pattern & Video Tutorial
See the free crochet hooded scarf pattern and video tutorial down below or purchase an ad-free, printable PDF file of this pattern!
This no-sew crochet hooded scarf pattern combines the warmth of a beanie and scarf in this single accessory! And even better, this pattern doesn’t have that point at the back of the hood! Make it solid-colored or make stripes that seamlessly transition from the hood to the scarf without having to cut your yarn every row.

Table of Contents
Choosing Yarn & Hook Size
You can use any yarn and hook you want and just follow along with my detailed measurements to get the same size. For more warmth, you should go with a wool or acrylic yarn over cotton. And although you can use any hook you want, you might want to think about sizing up your hook.
You can see in the images that even though I used a medium-weight yarn, the hooded scarf still drapes nicely. This is because I used a much larger hook than is recommended on the yarn label. The yarn recommends a 5.5mm hook, but I went with an 8mm hook to really loosen my stitches and make them softer.

Other Projects You Might Like
Crochet Hooded Scarf Video Tutorial
Become a member to get early access to new videos!
You can follow along with my YouTube video to make your own crochet hooded scarf! I have timestamps included to section the video and help you jump to any point you need to!
This post may contain affiliate links. I may earn a small commission on qualifying purchases at no additional cost to you!
Materials
- 175 grams of medium weight yarn (Red Heart Super Saver in “Aran” and “Light Sage“)
- 8mm Clover Amour crochet hook
- Scissors
- Yarn needle
- Stitch marker
- Tension ring (optional)
- Yarn bowl (optional)
Crochet Abbreviations
ch = chain
dc = double crochet
fdc = foundation double crochet
inc = increase (2 double crochets worked into one stitch)
rep = repeat
st = stitch
Gauge
*if your gauge doesn’t match mine, you can match the measurements instead
7 rows of 10 double crochets makes a 10 x 10 centimeter (4″ x 4″) square
Dimensions
*includes instructions to adjust sizing
I have a 53-centimeter (20.9-inch) head and I’m 155 centimeters tall (5’1″). View the images above to see how it fits me.
Overall: 26 centimeters wide x 86 centimeters long (10.2 x 33.9 inches)
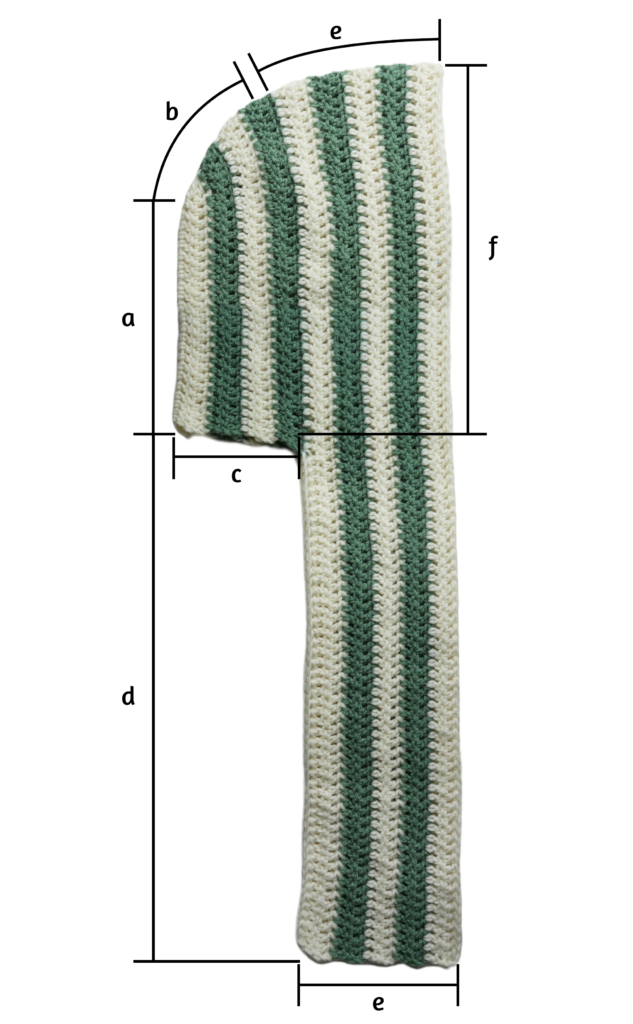
Length a: 23 centimeters (9.1 inches)
Length c: 12 centimeters (4.7 inches)
Length d: 49 centimeters (19.3 inches)
Length e: 15 centimeters (5.9 inches)
Length f: 36 centimeters (14.2 inches)
Notes and Tips
- This pattern is written using US crochet terms
- Italicized notes tell you what to change to adjust the size
- Use a larger hook than recommended to make the hood and scarf less stiff
- The chain 2 at the beginning of each row does NOT count as a double crochet
- Make sure your measurements match mine if your gauge is different (and you want the same size)
How to Change Colors
If you want to learn how I changed colors in this pattern, you can view the video tutorial or follow the photo tutorial below.
Color A = first color (cream)
Color B = second color (green)
If you want to make a striped hooded scarf, start the pattern with either color and change colors with the last stitch of every even row. To change colors at the end of Row 2 and Row 10:
- With color A, yarn over
- Pull up a loop
- Yarn over, pull through 2 loops
- Loop color B onto your hook
- Pull color B through the last two loops
- Tighten both colors and leave a long enough loose end on color B to weave in later


Leave your yarn attached and pick it back up on the last stitch of the next even row:
- With current color, yarn over
- Insert your hook into the last stitch of the even row
- With new color, yarn over (this is to catch the “float,” so the hanging strand of yarn is shorter; see last image)
- With current color, yarn over
- Pull up a loop
- Yarn over, pull through 2 loops
- With new color, yarn over
- Pull new color through the last two loops
- Tighten both colors


Crochet Hooded Scarf Pattern
Foundation: Make a slipknot, ch24+2
Note: The length of the first row will be length a, or the length from the back of your head to the base of your neck. Do fewer chains to make it shorter or more chains to make it longer.
Row 1: dc in 3rd ch from hook, dc in next 22 ch, dc4 in last ch, mark the last dc you made, rotate your foundation chain to work along the underside, dc in next 23 ch (50)


Row 2: ch2, turn, dc across until st marker, inc in next 4 st, mark the last dc you made, dc across, change colors (54)


Row 3: ch2, turn, dc across until st marker, rep[dc, inc] 4 times, mark the last dc you made, dc across (58)


Row 4: ch2, turn, dc across until st marker, rep[dc in next 2 st, inc] 4 times, mark the last dc you made, dc across, change colors (62)

We’ll continue increasing the size of the hood by adding more of these increase rows. You double crochet until the stitch marker, increase 4 times around the curve, and double crochet the rest of the row. The rows and stitch counts are listed below.


Note: For a smaller size, do fewer increase rows until the curve of b in the diagram is the size you want. Then, skip to Row 8.
Row 5: ch2, turn, dc across until st marker, rep[dc in next 3 st, inc] 4 times, mark the last dc you made, dc across (66)
Row 6: ch2, turn, dc across until st marker, rep[dc in next 4 st, inc] 4 times, mark the last dc you made, dc across, change colors (70)
Row 7: ch2, turn, dc across until st marker, rep[dc in next 5 st, inc] 4 times, mark the last dc you made, dc across (74)
Note: For a larger size, continue adding increase rows by repeating the row before, but with an extra dc before the inc. For example, Row 8 would be rep[dc in next 6 st, inc].

Next, we’ll do regular rows to increase the width of the hood. We’ll stop once the width of the scarf you want is equal to the rest of the width of the hood you want (length e).
Note: If your length c is the length you want, you can skip Row 8.
Row 8: ch2, turn, dc across, change colors, cut color B (74)
Note: For a longer length c on the diagram, do more regular rows by repeating Row 8.

The next row will set the foundation for your scarf and determine length d. The number of chains you do at the beginning of the row (minus the +2 turning chain) will make up the length of one side of the scarf. And the number of fdc you do at the end of the row will be the length of the other side of the scarf.
Note: Do fewer chains and fdc for a shorter scarf or more for a longer scarf. To make the length of the scarf equal on both sides, do the same number of fdc as chains in the beginning (minus the +2 turning chain).
Row 9: ch50+2, turn, dc in 3rd ch from hook and in each ch across, dc in next 74 st, fdc50 (174)


How to Foundation Double Crochet (fdc)
- Yarn over
- Insert your hook into the last stitch of the row
- Pull up a loop
- Chain 1
- Yarn over, pull through 2 loops
- Yarn over, pull through 2 loops


To do more fdc, repeat Steps 1-6, but for Step 2, insert your hook into the chain 1 from Step 4 of the previous fdc.


Finally, we just need to do regular rows to add width to our hood and scarf.
Note: Do fewer rows to make the hood and scarf (length e) less wide or more rows to make it wider. Try it on as you add rows.
Rows 10-18: ch2, turn, dc across (174)
Change colors with the last stitch of Rows 10, 12, 14, and 16.
Fasten off.


Finished Crochet Hooded Scarf
Weave in your loose ends and your crochet hooded scarf is finished!





thank you for this teaching.
I think thus item will be appreciated by the charity group I knit and crochet for.
It will be good for the Ukrainian children and adults, I am sure
I think so, too! Thank you for your charity work ❤️
I found this pattern so straightforward and easy to follow. Thank you so much, I not only have a beautiful rounded scared hoodie, but I had no problems with the process. I ended up doing the last rows (to make the scarf length) by crocheting the two rows of double crochet stitches of the same color at the same time. I want to just say thank you again and want you to know how appreciative and in awe I am for your work! Thank you!!
So happy to hear that!! And that sounds super efficient; thanks for sharing that tip!
How do I change colors when I’m at the scarf part? Sorry if it’s a dumb question.
NVM I had a really BIG brain fart. Sorry LOL
lol no problem!
Is there a way to modify this pattern so there are less gaps? I like how simple it is but I feel like the gaps between the stitches make it less warm
I just use a smaller hook. Most patterns are too dense if you go by recommended hook size. Like Viv, I always use larger hook sizes, preferring flexibility to tensity (not density). But adjust for warmth factor desired. If you live in a cold climate like I do, you do not want holes for wind to get through. That’s why I am wearing a head covering to start with. Lol
Hi!
I never made any crochet yet!🤣
but I would really want to set this as my goal!
since I’m a new Japanese Muslim that start wearing Hijab this would be perfect in winter time!
and cant wait to give as a gift to my mother in law in Egypt😍
my only question is is it ok to use like alpaca wool or something natural yarn!?
sorry i literally NEVER made anything yet so I’m super beginner😂
thanks!!!!
Thank you so much. I did white with variegated christmas colors strips, and pockets.
Heyho, first of all: Thank you so much for the pattern! I searched for a free crochet version for quite some time, and this is so great! <3 I know you posted this a while ago and i don't know if you're still active under here, but is there any chance that you still know the length b (diagram)? I couldn't find it anywhere and am not sure if mine is long enough.
sendind love, Liss <3
I’ve been looking for the same thing.