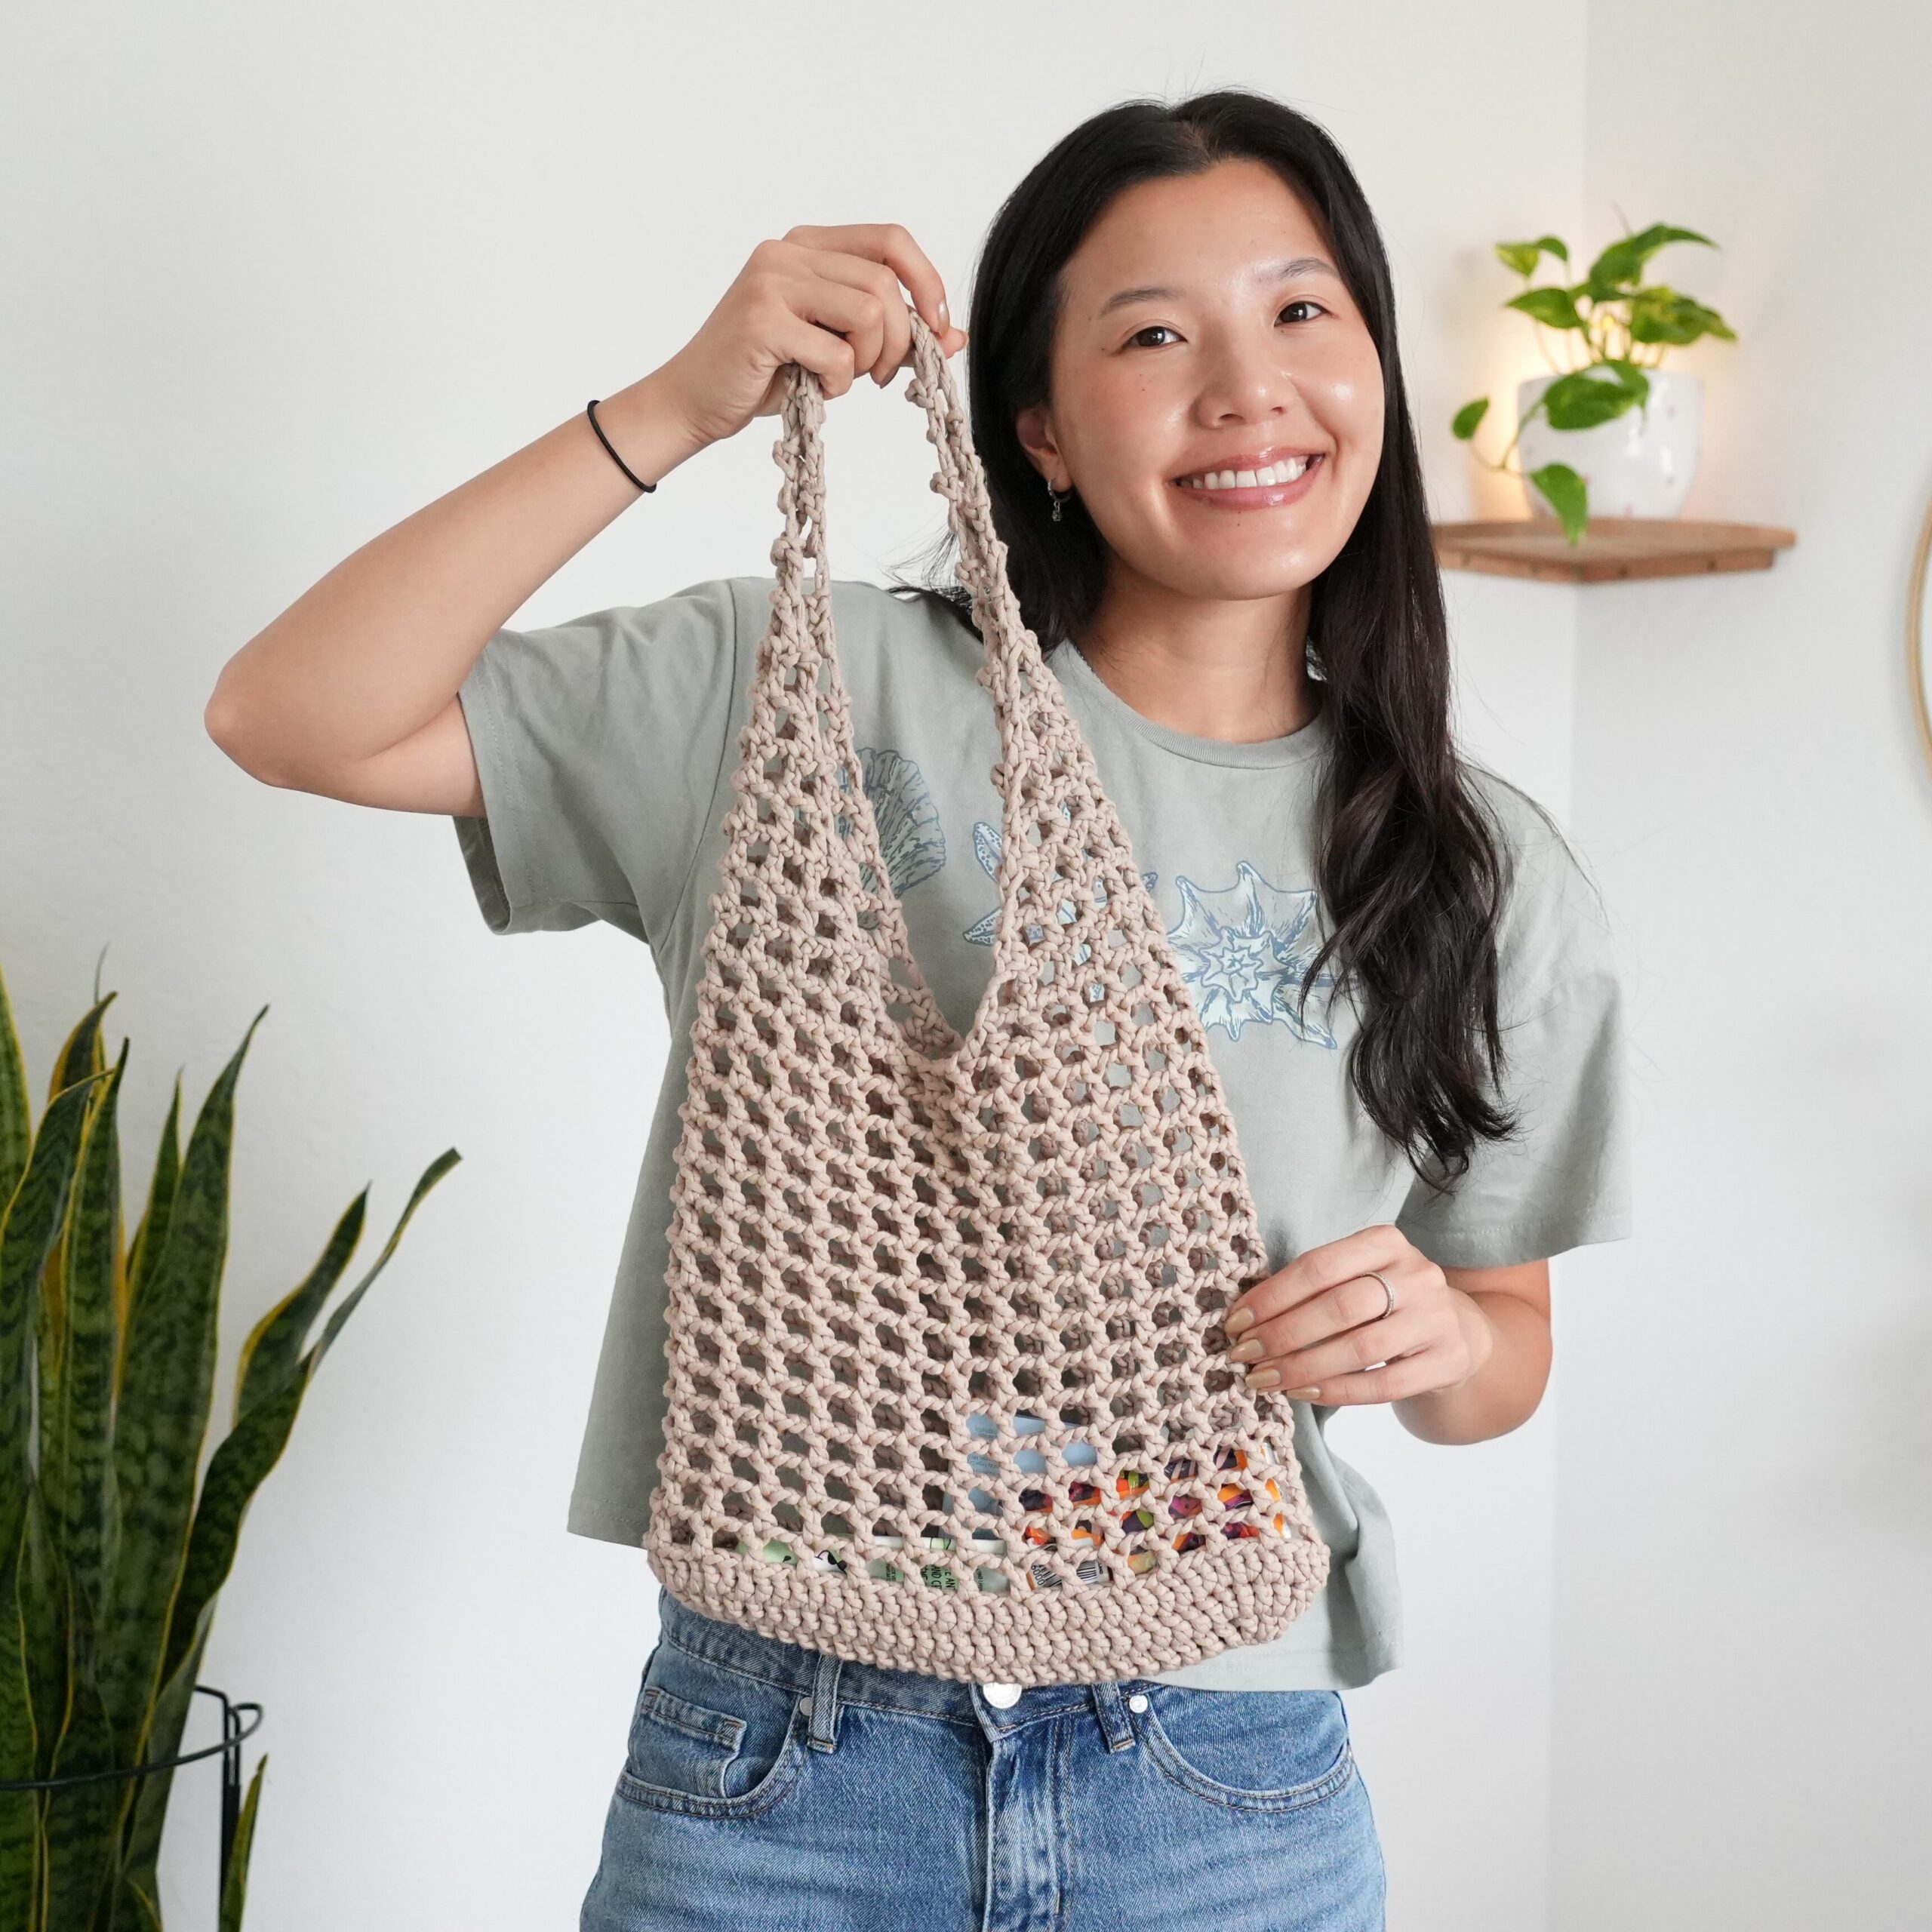
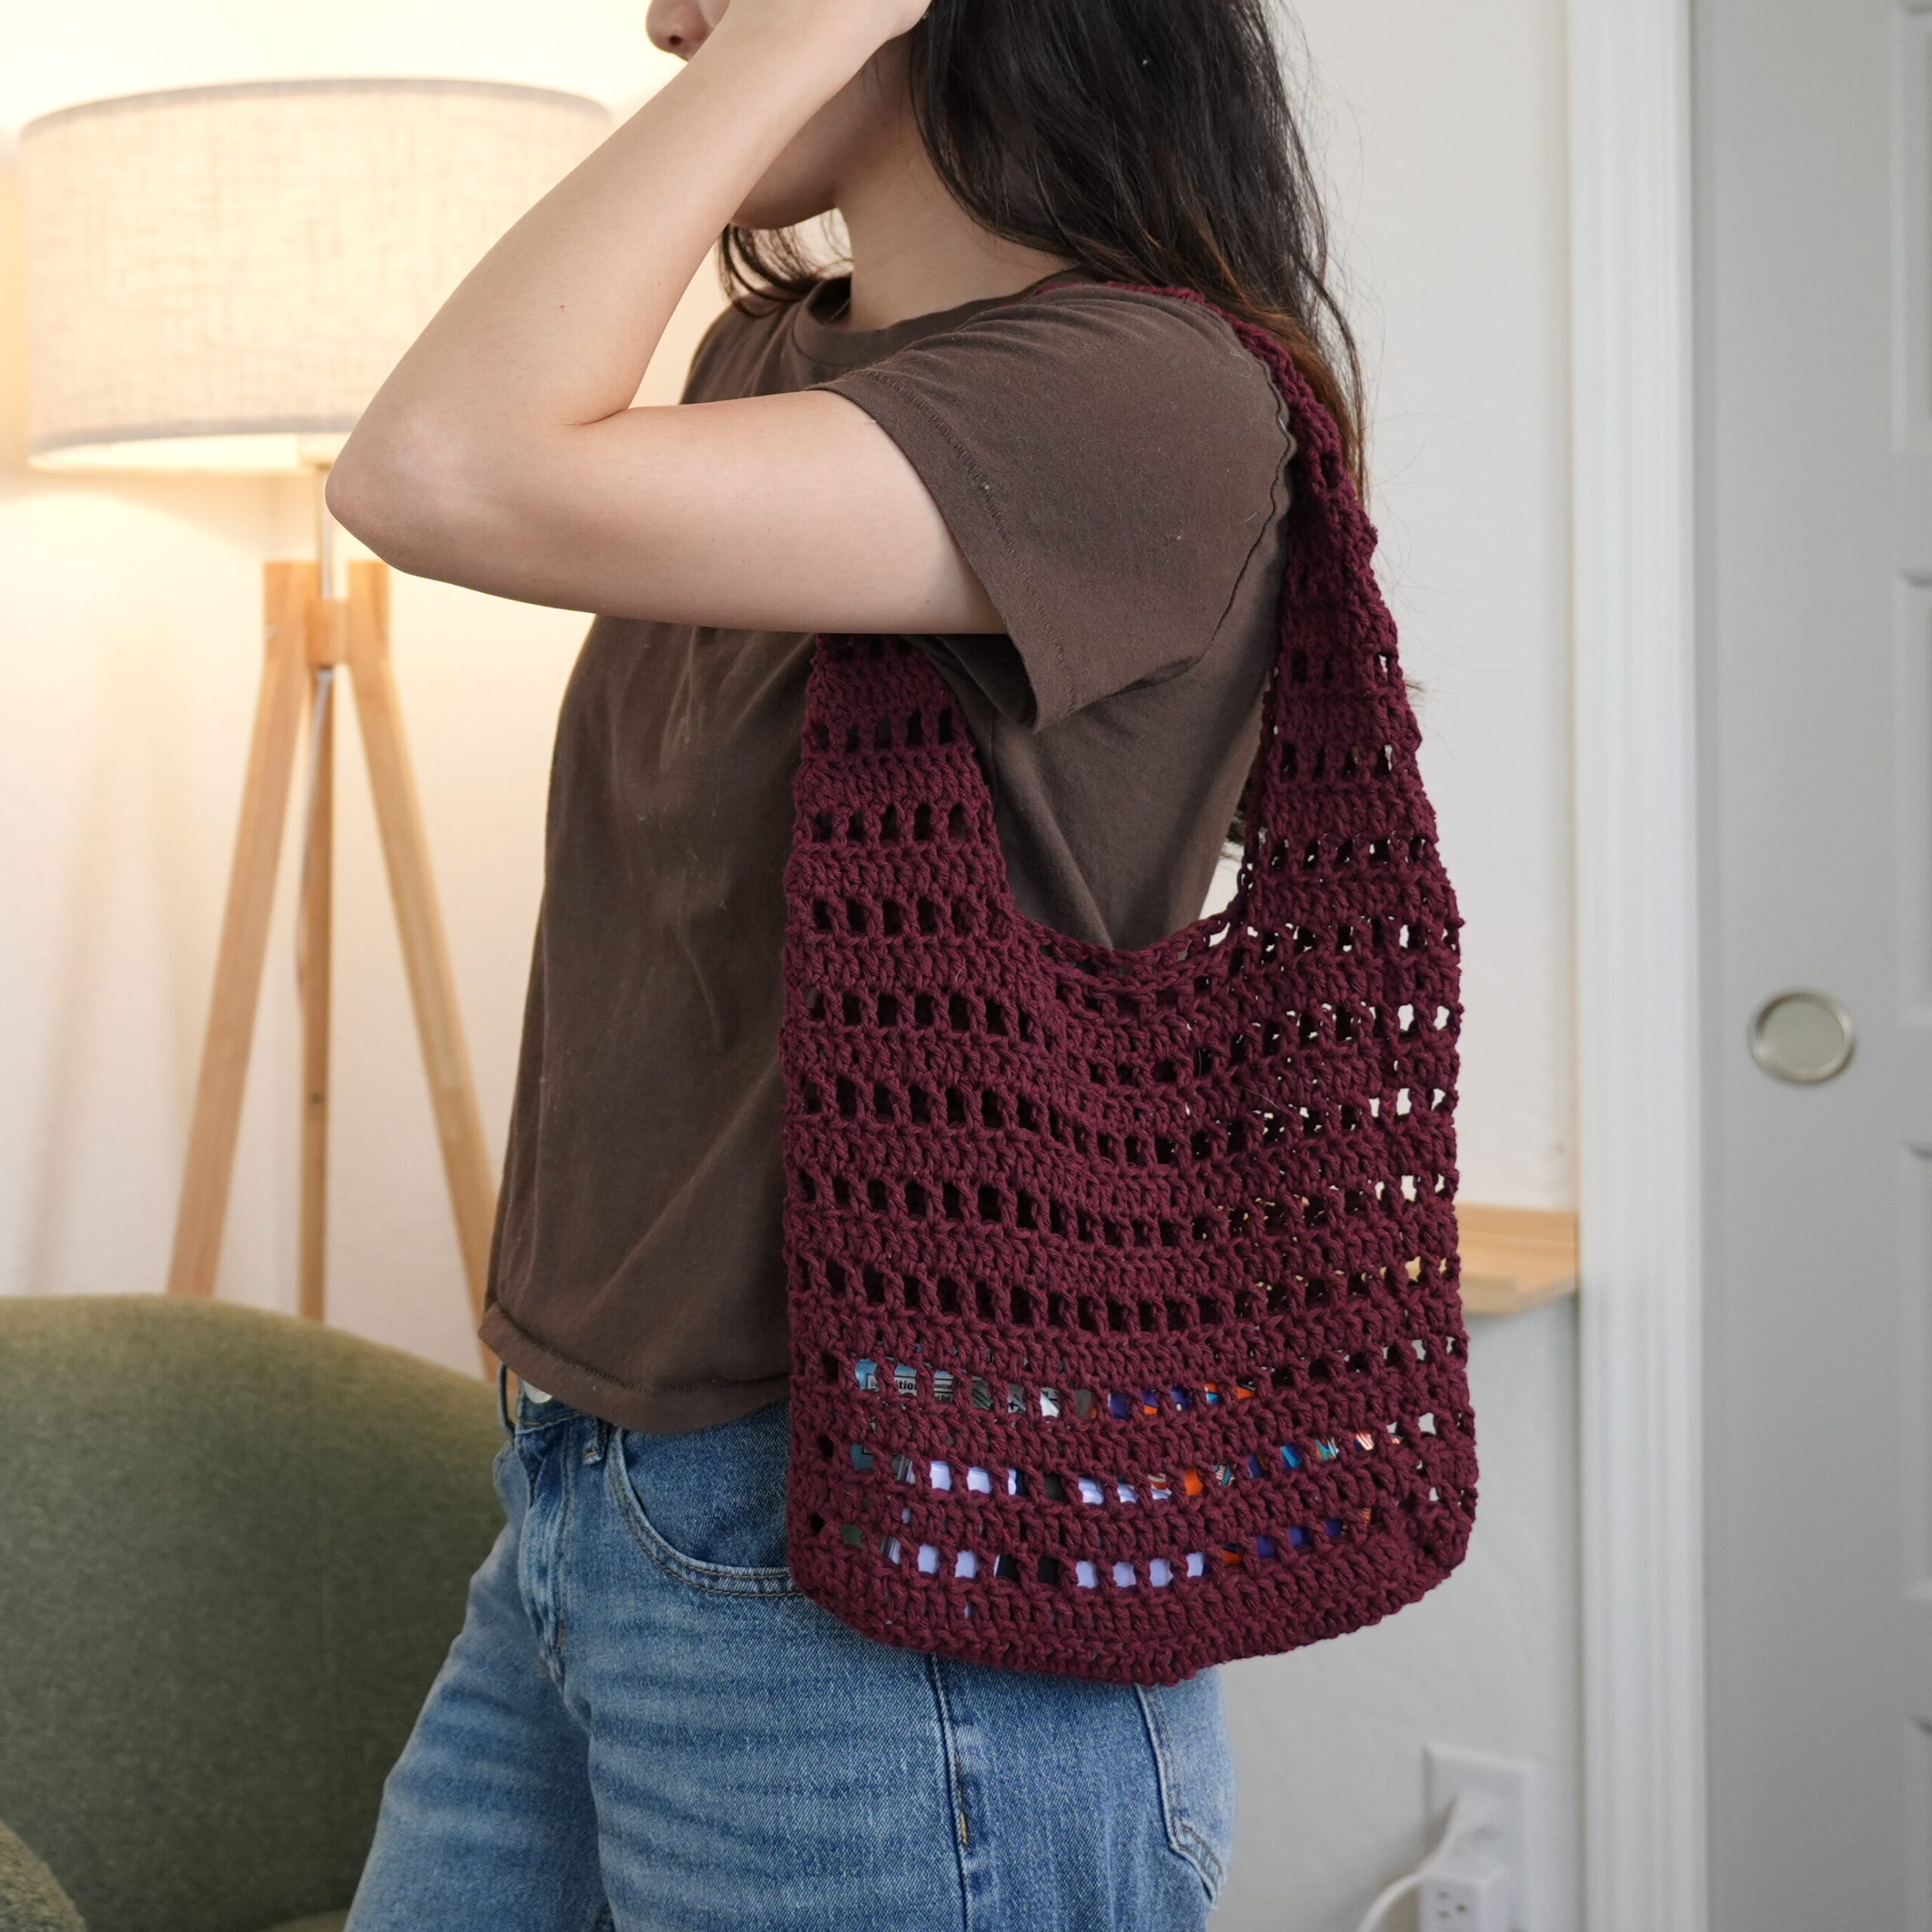
Simple Crochet Tote Bag | Free Pattern & Tutorial
See the free crochet tote bag pattern and video tutorial down below or purchase an ad-free, printable PDF file of this pattern!
Create your own stylish and practical crochet tote bag with this easy-to-follow pattern. Perfect for beginners, this pattern includes clear instructions for the base, height, and sturdy straps. Learn how to crochet this beautiful and functional accessory.

Clean and Simple Design
This basic crochet tote is a combination of simplicity and style. With its clean, basic shape and neutral color, it can easily complement any outfit in your wardrobe, whether you’re running errands or attending a slightly more formal event. This bag’s adaptability makes it a versatile addition to your accessory collection!

No-Sew Crochet Bag
This crochet pattern is super easy to follow! The entire bag is made in one piece, so you won’t need to worry about sewing it all together. This makes it even faster and easier to make, especially if you’re new to crochet! The simplicity of this pattern guarantees a smooth and enjoyable crocheting experience, and you’ll have a beautiful tote bag at the end of it.
Single Crochet Bag
Another reason that this bag is great for beginners is that it uses only one stitch through: the single crochet. This is a very basic stitch that is easy to do. Not only is it an easy stitch, but it also makes for a thick and strong bag!

Customizability
What sets this pattern apart from other crochet bag patterns is its flexibility. You can easily customize the size of the bag and the length and size of the straps. Whether you need a spacious tote for carrying all your essentials or a more compact one for lighter loads, you have the freedom to create the bag that suits your needs.
Pin this for later!

Patterns You Might Like


Simple Crochet Tote Bag Video Tutorial
You can follow along with my YouTube video to make your crochet tote bag! I have timestamps included to section the video and help you jump to any point you need to!
This post may contain affiliate links. I may earn a small commission on qualifying purchases at no additional cost to you!
Materials
- 200 grams of medium weight yarn (24/7 cotton yarn in “Café Au Lait”)
- 4mm Clover Amour crochet hook
- Scissors
- Yarn needle
Dimensions
Base: 26 centimeters long x 4 centimeters wide (10.2 x 1.6 inches)
Body excluding strap: 30 centimeters wide x 25 centimeters tall (11.8 x 9.8 inches)
Gauge
20 rows of 19 double crochets makes a 10 x 10 centimeter square
Notes and Tips
- This pattern is written using US crochet terms
- Italicized notes tell you what to change to adjust the size
- The chain 1 at the beginning of each row/round does NOT count as a single crochet
- Tighten your slip stitches to make the seam smaller and less visible
- Turn when working in rounds to keep the seam straight
Abbreviations
ch = chain
sc = single crochet
sc2tog = single crochet 2 together (a decrease)
sk = skip
sl st = slip stitch
st = stitch
Base
Foundation: Make a slipknot, ch50+1
Row 1: sc in 2nd ch from hook and in each ch across (50)
Rows 2-8: ch1, turn, sc across (50)

Body
Next, we’ll work around this rectangular base, crocheting over the top, sides, and bottom.
Round 1: ch1, sc into side of each row, sc across foundation ch, sc into side of each row, sc across, sl st (116)

Rounds 2-52: ch1, turn, sc around, sl st (116)
Note: Do fewer rounds for a shorter bag or more rounds for a taller bag. Do an even number of rounds before moving onto the straps.

Straps
Refer to the diagram below to understand the stitch numbers.
Note: Change the number of chains in Round 53 to change the length of the straps. Do fewer chains for shorter straps or more chains for longer straps.
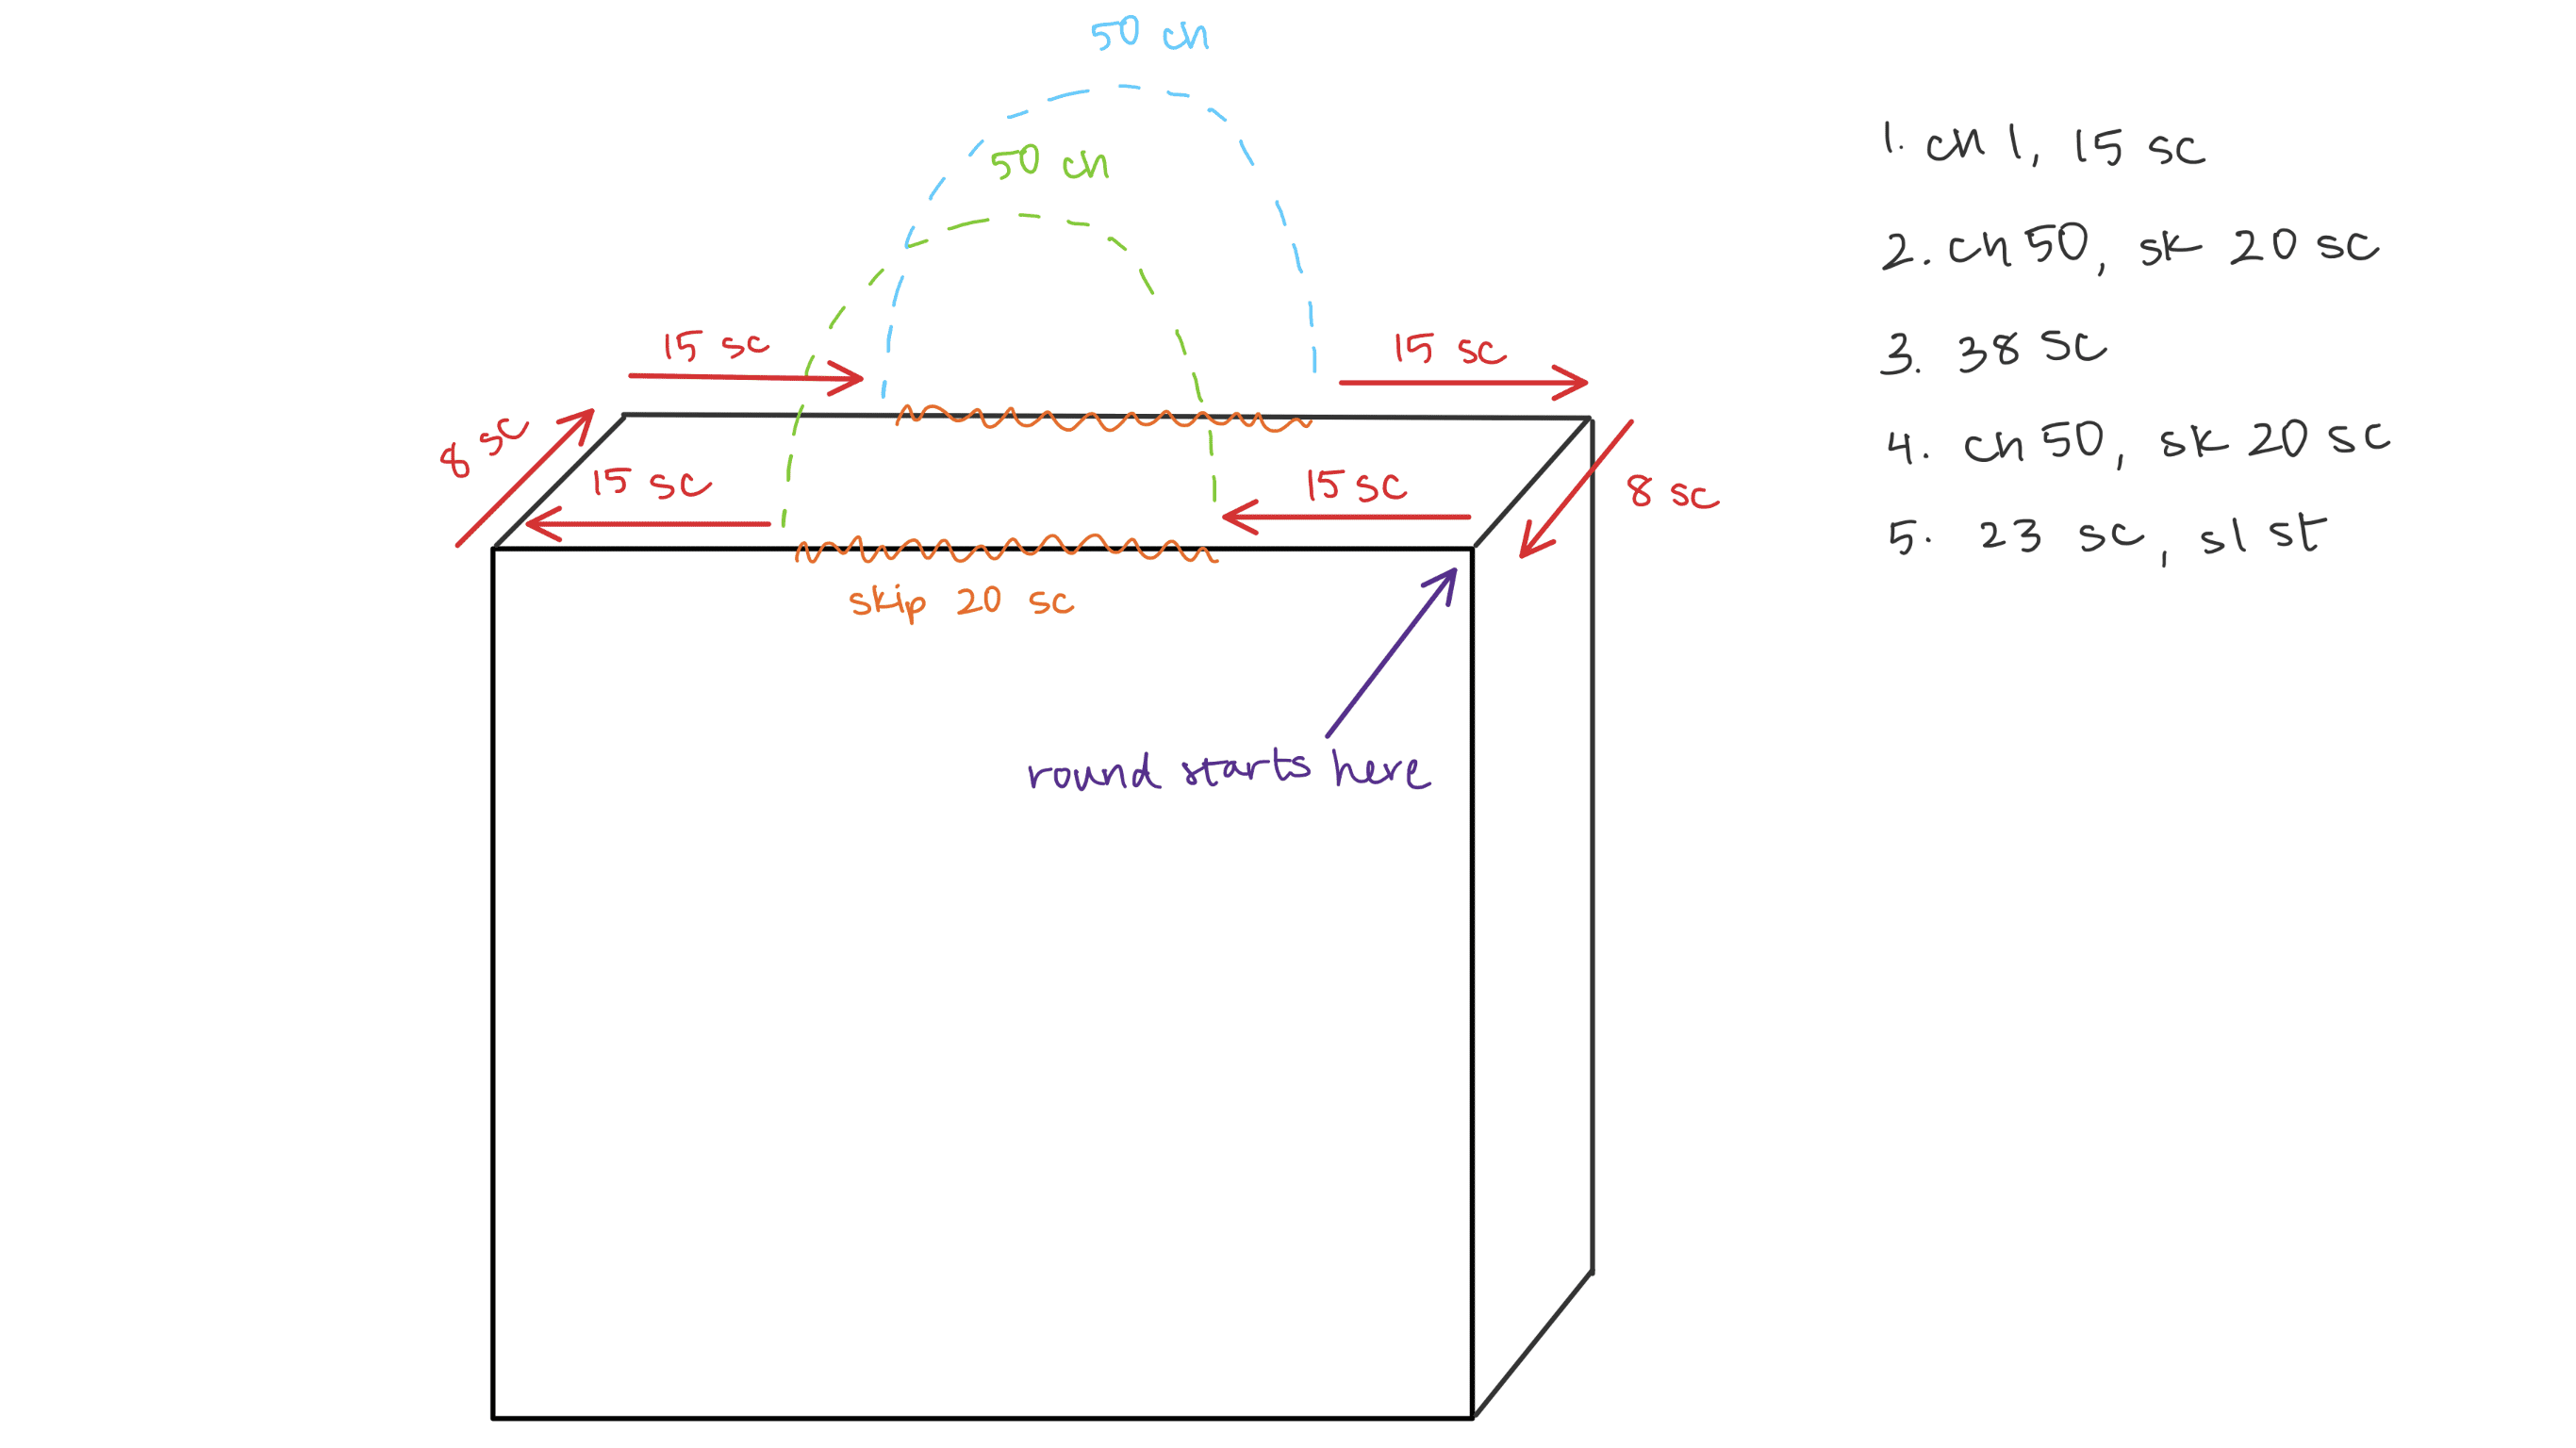
Round 53: ch1, turn, sc in next 15 st, ch50, sk20, sc in next 38 st, ch50, sk20, sc in next 23 st, sl st (76 st, 2-50 ch straps)

Round 54: ch1, turn, sc around in each st and ch, sl st (176)
Rounds 55-58: ch1, turn, sc around with sc2tog at each of the four points the straps meet the bag, sl st (172, 168, 164, 160)

Fasten off.
Finished Simple Crochet Tote Bag
Weave in your loose ends and your basic, everyday tote is finished!


I love this, thank you sooo much for this pattern!
Can it be smaller because of limited wool cuz my foundation chain is 36+1
Can it be smaller because of limited wool cuz my foundation chain is 36+1
Your video is very simple i like it.thank you
I am a beginner, and I found this design simple to do. I love the finish you have got – mine turned out a bit crooked, still, I enjoyed doing it. Your explanation and video are very clear and helpful.
Thank you so much!
Gayathri
Does the slip stitch count as a stitch?
Hi, could I make the base bigger (say 12 rows instead of 8) to make it a little boxier and bigger? I realize it would require quite a bit more yarn. Thanks for the nice looking pattern.
Beautifully put together pattern with pixs and tutorial! Loved every minute in comparison to other tutorials I have tried! I am following along making a tote out of Loops and Threads yarn from Michaels. I have a variegated purple color. I made it to carry my Bible and wallet to Bible Study at church every Wednesday morning!
Could you make this striped?
Yes! Change colors every few round depending on the thickness of the stripes you want. Since we work this bag in rounds, you can carry the yarn up instead of cutting it for every stripe!
Sorry, double comment
I just have a question, can the length be adjusted? Do the number of chains I make have to be odd/even??
I just have a question, can the length be adjusted? Do the number of chains I make have to be odd/even?
Love it!!!!
I making one for myself right now and its great! It’s very easy and looks fantastic!
Interested to hear your thoughts on a zipper. I’d also like to know about lining the bag…
thank you
Is there an easy way to add an zipper to the top to make it more secure? I would love to make one that can be used in the summer and winter.
What a great project! I like the simple, clean look of the single crochets and the style is elegant and clean. Had a blast making it, even with it being a simple pattern. Your designs and instructions are bang on and beautifully elegant. Thanks a million!
Thank you so much!! I’m really happy you liked it!
Once you start the “decrease” on the straps, do you continue with the decrease on each pass until you finish the straps?
Yes, decrease at those four points for all rounds of the strap!
bonjour, je vais faire ce sac. il est magnifique.
par contre
j aimerais ne faire qu une sangle d une extrémité à l autre pour que le sac se replie un peu au milieu. c est l effet que je recherche. est ce adapté à ce modèle ? avez vous une idée pour cela? ou faut il que j achète une sangle spéciale ?
en tous cas merci pour vos tutos tous tres clairs. Ça donne envie.
Yes, I have a few patterns like that! You can use one of those to figure it out. The easiest would be a strap like in the Granny Square Bag!
merci beaucoup pour votre très gentille réponse. alors maintenant j’hésite, je ferai peut être la forme du bobble bag mais avec les mailles du tote bag. tous vos modèles sont tellement beaux. ou les 2.
je vous souhaite une très belle journée !
So many options, so it can be hard to choose! Whatever you do, I’m sure it’ll turn out amazing. I hope you have a wonderful day, too!
How many skeins of yarn do I need? Can’t wait to try this.
I used 2 skeins!
Is it more important to have the 20 stitches in the middle when you adjust the straps or to have the 15 on the ends? I am trying to think about how it would hang if you made the bag wider and had the straps further out by the edge of the bag. Would the bag be more likely to buckle?
The number of stitches under the strap is important. If you skip too many stitches, the bag will fold in when you wear it
Thank you for sharing this amazing video with the instructions, can’t wait to start mine. You are a super good teacher. Greetings from Chile
Is there a way to use the formula for the straps when you make the bag wider (on all sides)? I’m having trouble figuring out the spacing
You can figure out how many stitches you need depending on the size of your base and the size of the strap hole you want. I updated the post with a diagram of how the first round for the straps is worked. I hope it helps!
How long did this take you to make?
It was around 8 hours!
This is so simple!! I made one for my mom for her birthday, and she absolutely loved it! Thank you for such an easy craft!
So happy to hear that!
So cute! I’m going to send this to my mother since she’s looking for a bad to crochet herself🤩 is it UK or US abbreviations?
It’s US terms!
Very pretty. I love the simplicity of this. Can’t wait to make my own. Thanks so much for sharing your pattern. 🙂
Thank you! ☺️