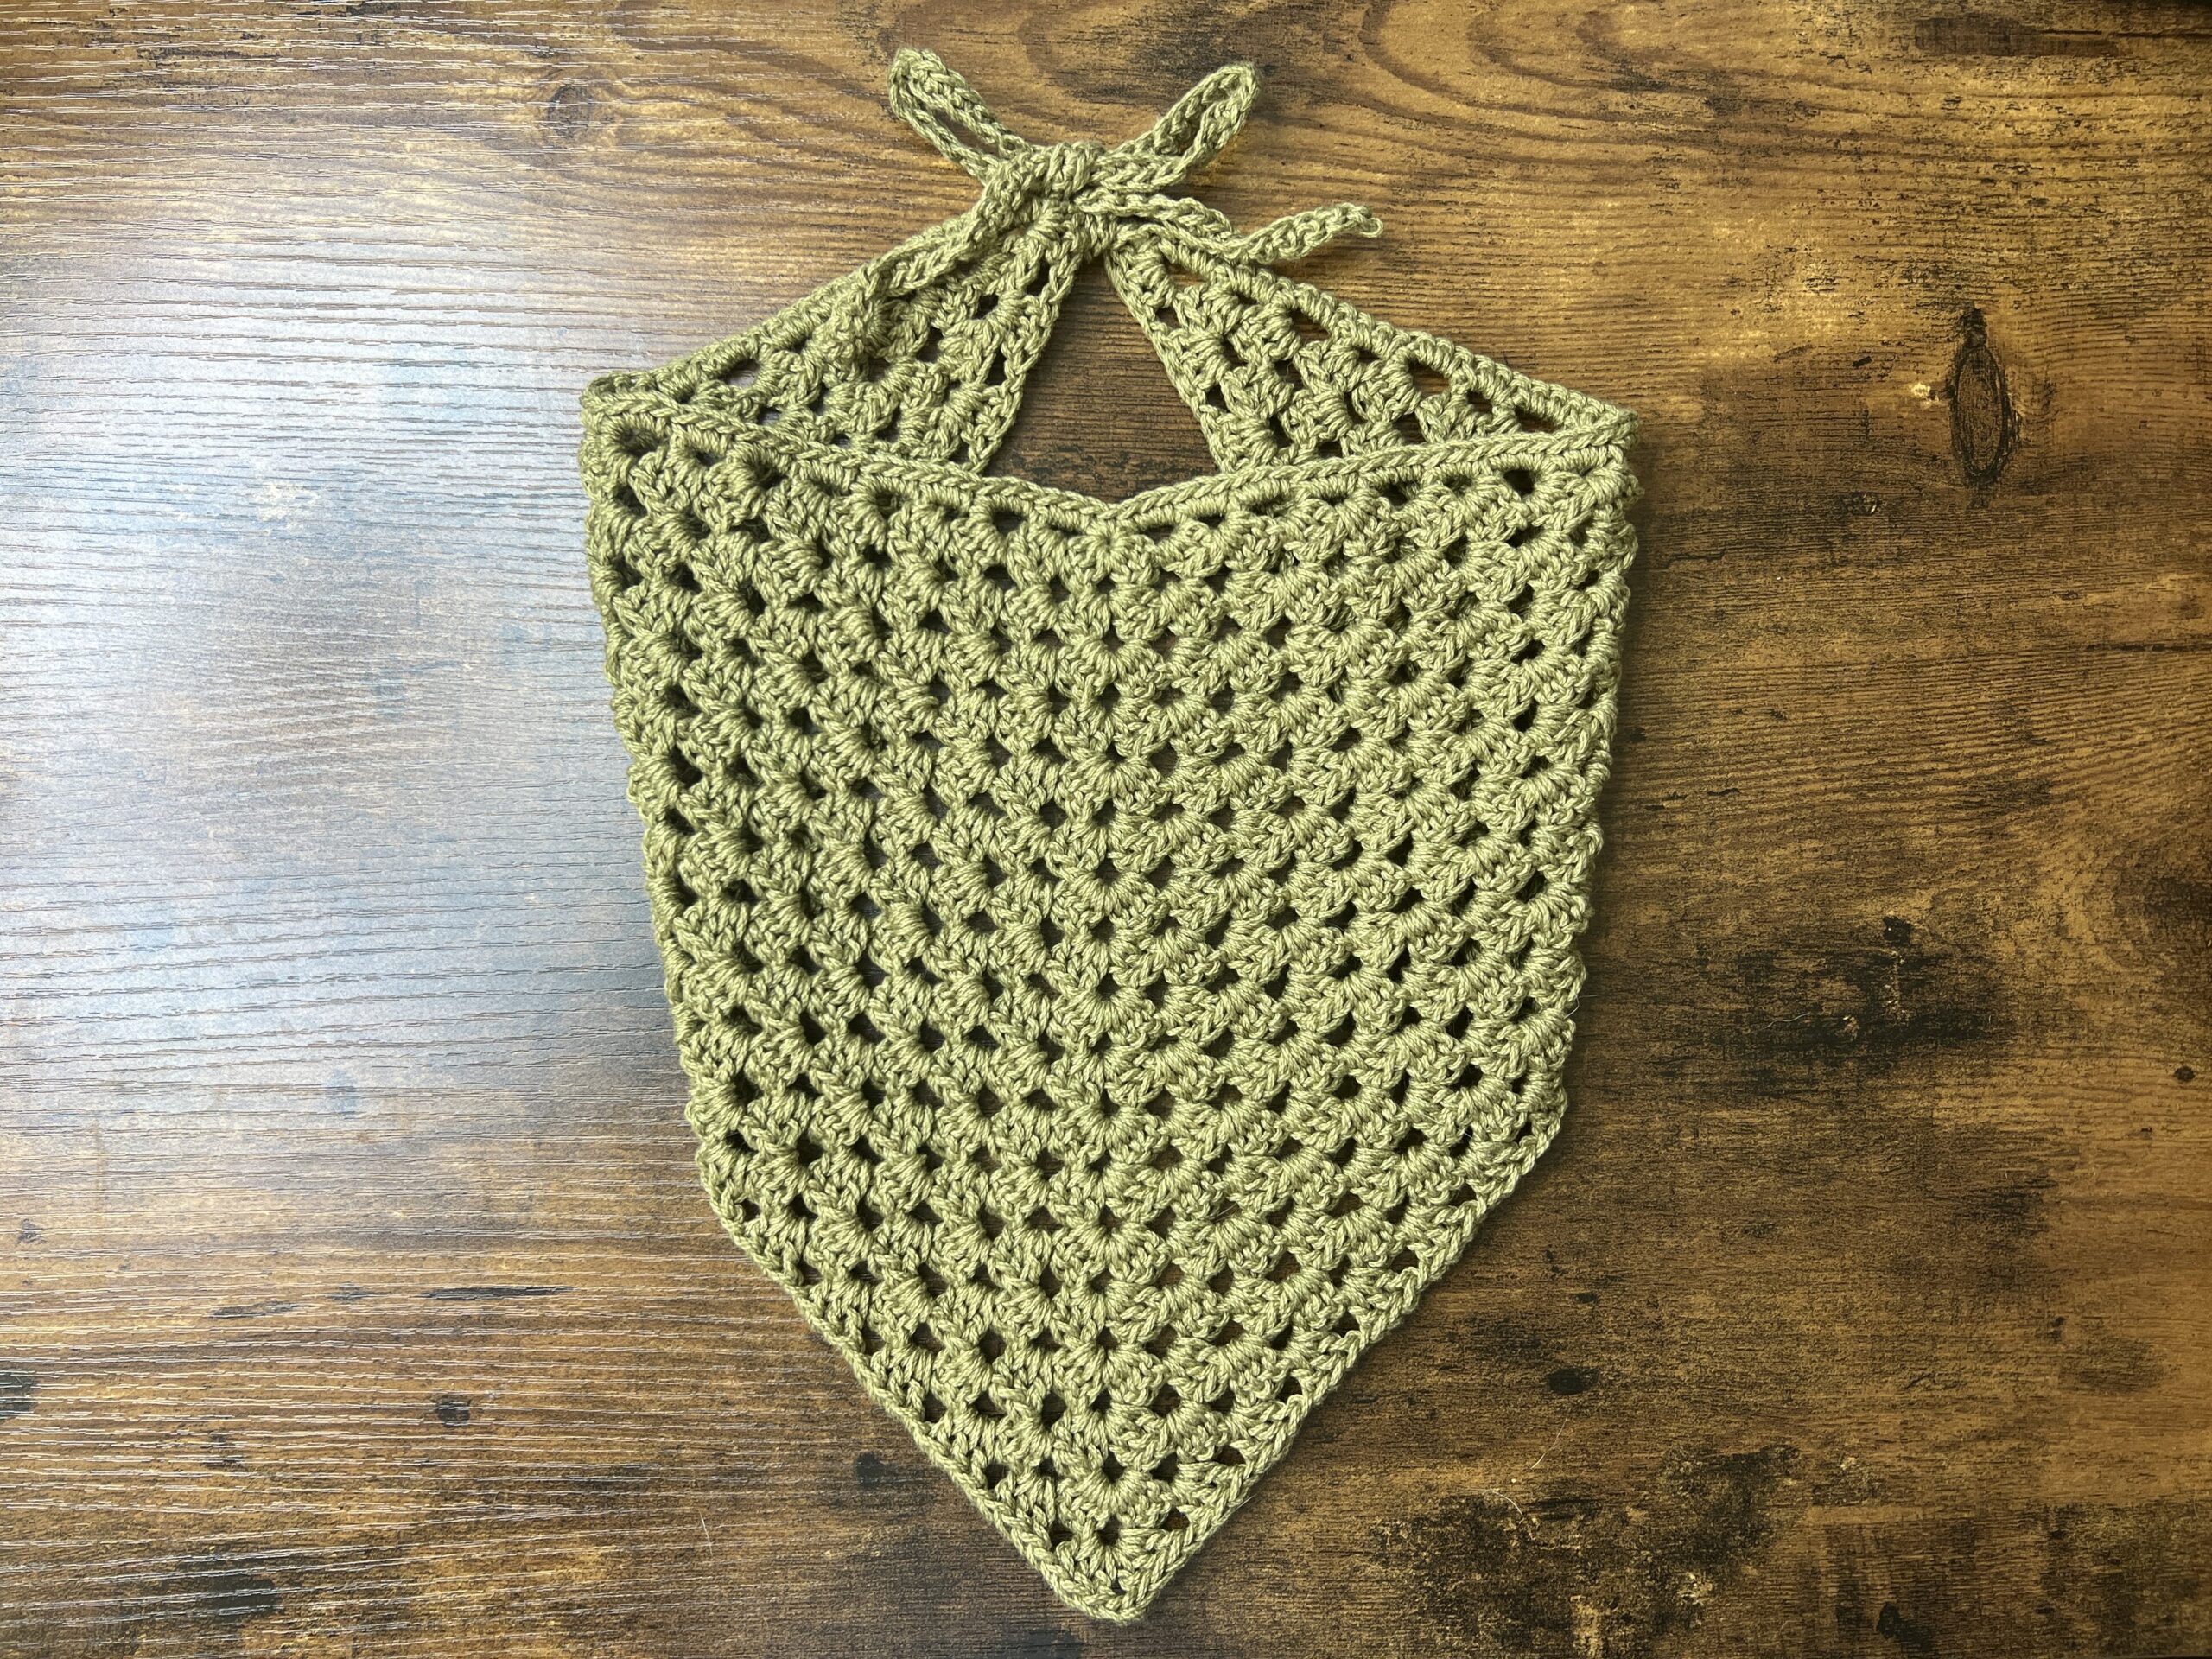
Quick & Easy Crochet Bucket Hat | Free Pattern & Tutorial
Scroll to see the free crochet bucket hat pattern and video tutorial. Or purchase an ad-free, printable PDF file of this pattern! Note: This is an updated pattern and tutorial, so it is slightly different from this one.
This crochet bucket hat is the perfect first crochet project! This pattern is quick to make, uses minimal yarn, and comes with my step-by-step video tutorial to help you make your very own hat!

Straight Brim
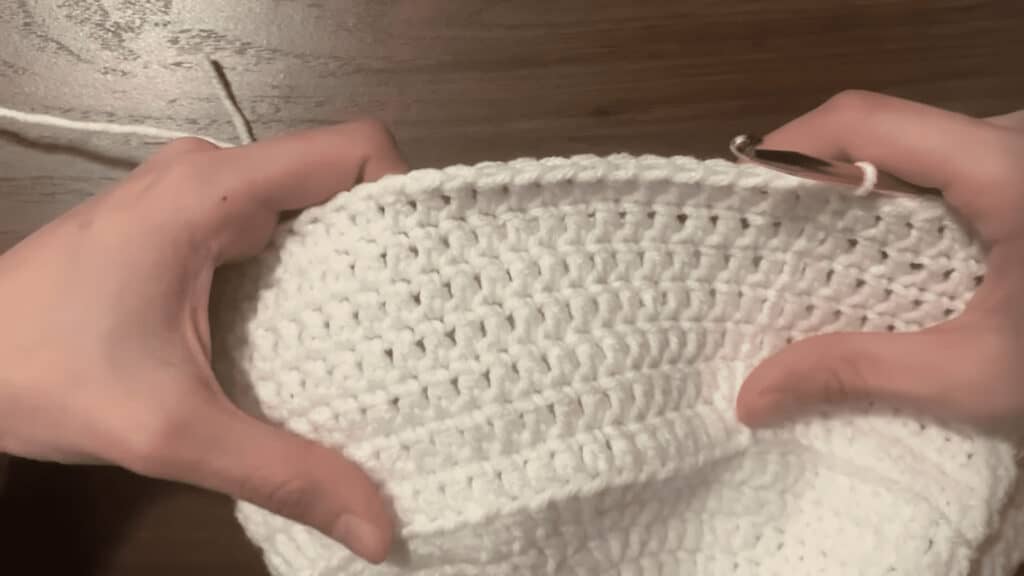
This crochet bucket hat pattern features a straight brim, rather than a wavy brim. I, personally, really like the straight brim look, but if you prefer a wavy brim, you can do more increasing in the brim portion to achieve that look!

Crocheting Bends/Folds
Also, this pattern has minimal adjustments to produce folds where the hat bends for a more structured and less rounded bucket hat.
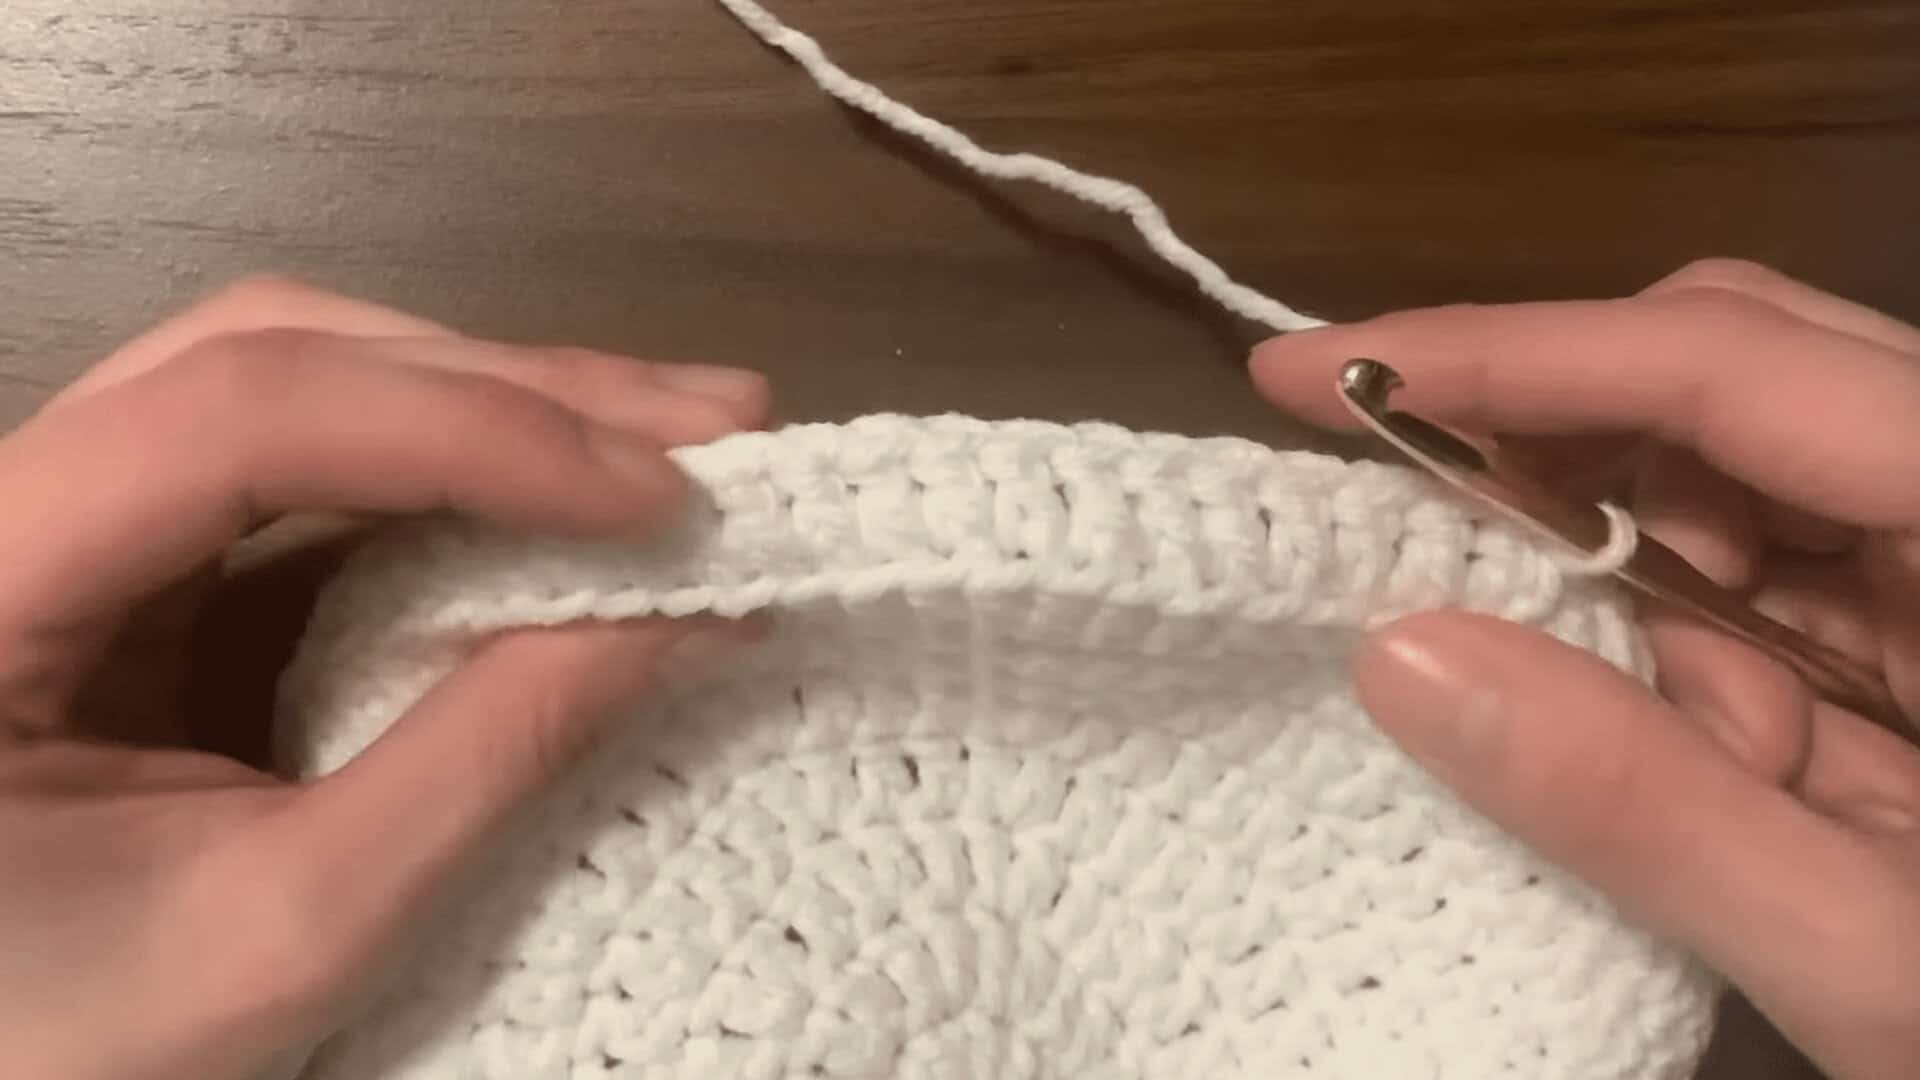
By working in the front or back loops, you can produce bends in crochet. It makes it easier for the fabric to turn a certain way. In this case, crocheting in the back loops helps with the 90 degree bend from the top of the hat to the middle.
It’s a pretty minor adjustment, but it makes a big difference in how the bucket hat looks! Working in the front or back loops is an important technique in crochet. This crochet pattern makes for great practice for beginners learning new techniques.

Blank Canvas
I love that this is such a simple crochet bucket hat pattern. It means that this hat is a blank canvas for whatever you want to add to it!
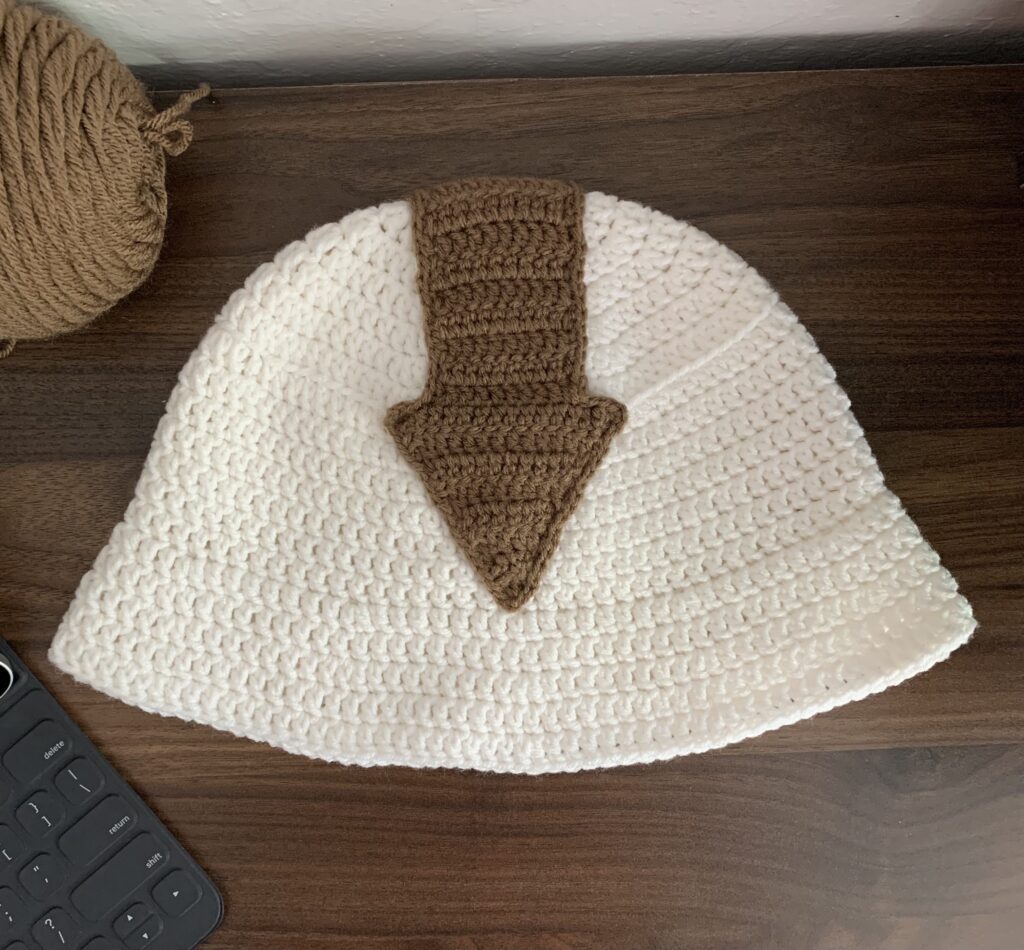
One thing I added to my crochet bucket hat is this brown arrow to make an Appa bucket hat. It resembles the sky bison, Appa, in the show Avatar: The Last Airbender. There is no written pattern for the arrow, but I have an Appa bucket hat video tutorial to go through the arrow crochet pattern and the application onto the bucket hat.
There are so many different things you can add to your bucket hat to make it more unique and your own. You can add appliqués like stars, hearts, or flowers. Or 3-D ones would look cool, too!
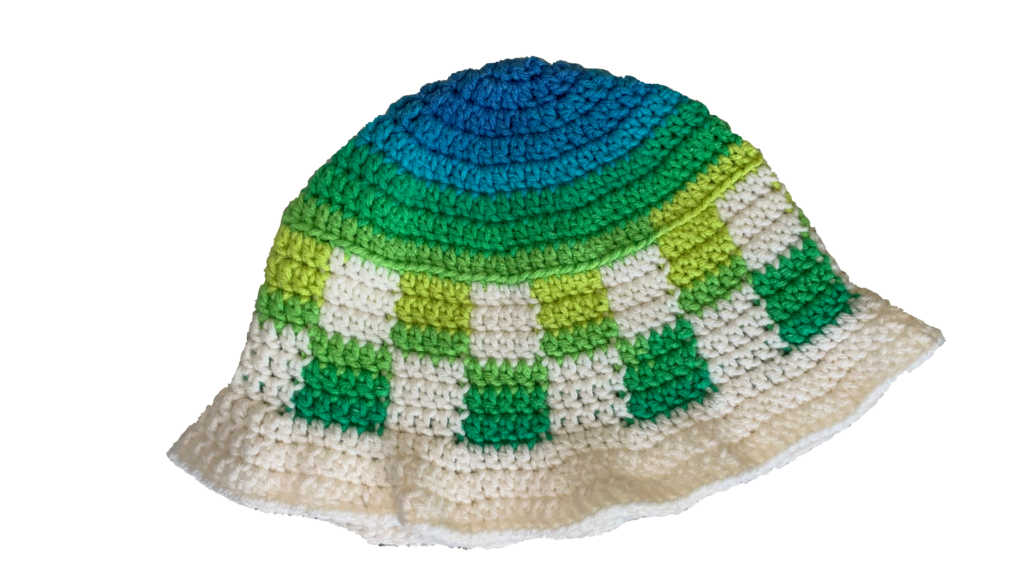
Not only that, but you can edit the colorwork very easily in this pattern. You can make it have stripes or color block it. Or you can make a checkered bucket hat, which is what I did!
My checkered bucket hat uses the same techniques as this bucket hat pattern, but with colorwork and a wavy brim. I don’t have a written pattern for it since it’s so similar, but you can find the crochet checkered bucket hat video tutorial on my YouTube channel.
Pin this for later!

Patterns You Might Like

Video Tutorial
You can follow along with my YouTube video to crochet your very own bucket hat! I have timestamps included to section the video and help you jump to any point you need to!
This post may contain affiliate links. I may earn a small commission on qualifying purchases at no additional cost to you!
Materials
- 80 grams of #4 or medium weight yarn (Red Heart Super Saver yarn in “White“)
- 5mm hook (I recommend Clover Amour crochet hook)
- Scissors
- Yarn needle
Gauge
8.5 rows of 15 double crochets makes a 10 x 10 centimeter square
Notes and Tips
- You can find FAQs and common issues after the written pattern
- This pattern is written using US crochet terms
- The chain 2 at the beginning of each round does NOT count as a double crochet
- Working in the back loops only or front loops only helps to create the bend in the hat
- For the “Middle” and “Brim” portions, the numbers in parentheses() are the different stitch counts for small, medium, and large sizes
Abbreviations
blo = back loop only
ch = chain
dc = double crochet
flo = front loop only
inc = increase
rep = repeat
st = stitch
Top
This part is what determines the size of your bucket hat. The circumference of the circle you make before moving onto the middle portion should match the circumference of your head (or whoever you’re making it for).
To follow the sizing guide, your gauge should match mine.
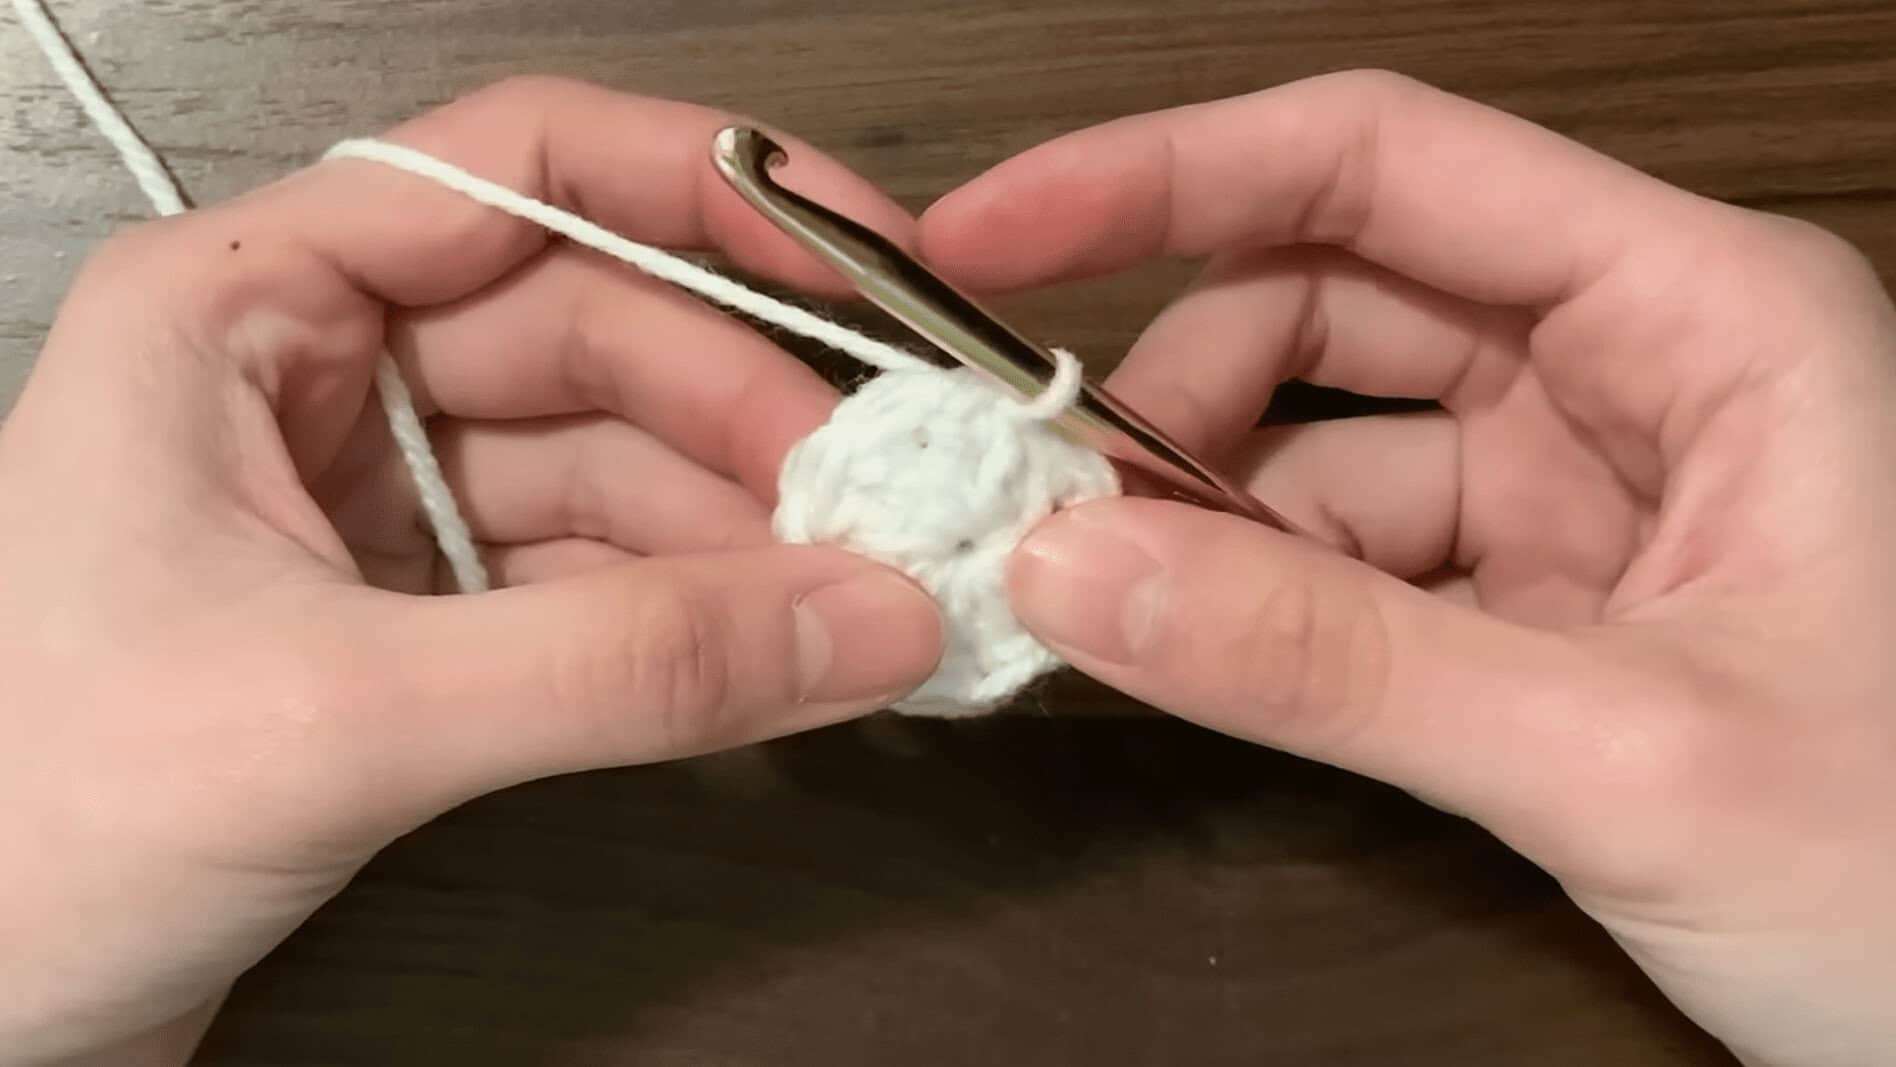
Round 1: Make a magic ring, ch2, dc10 into the magic ring, sl st (10)
Round 2: ch2, inc in each st around, sl st (20)
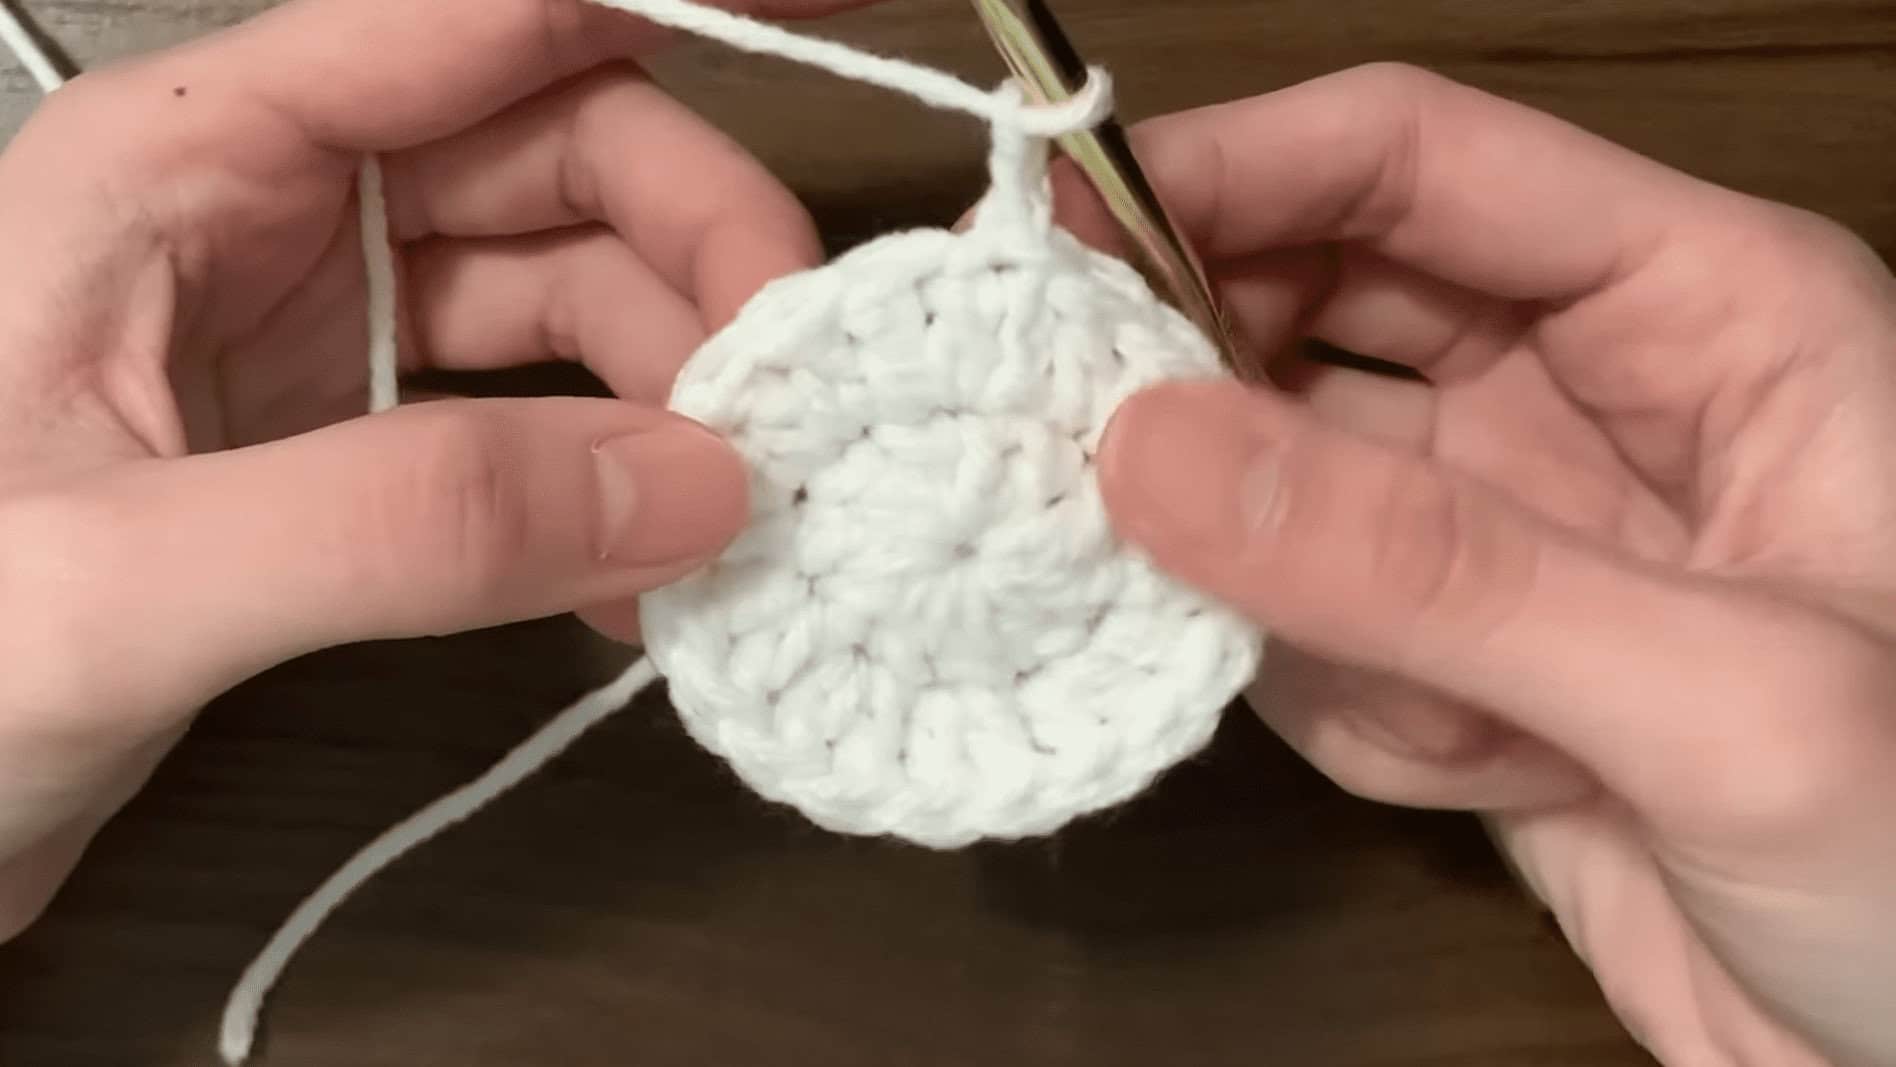
Round 3: ch2, rep [dc in the first st, inc in the next] around, sl st (30)
Round 4: ch 2, rep [dc in the first 2 st, inc in the next] around, sl st (40)
Round 5: ch 2, rep [dc in the first 3 st, inc in the next] around, sl st (50)
Round 6: ch 2, rep [dc in the first 4 st, inc in the next] around, sl st (60)
Round 7: ch 2, rep [dc in the first 5 st, inc in the next] around, sl st (70)
Stop here and move onto the middle for a small sized hat (if your gauge matches mine).
Round 8: ch2, repeat [dc in the first 6 st, inc in the next] around, sl st (80)
Stop here and move onto the middle for a medium sized hat (if your gauge matches mine).
Round 9: ch2, repeat [dc in the first 7 st, inc in the next] around, sl st (90)
Stop here and move onto the middle for a large sized hat (if your gauge matches mine).
If you would like a smaller hat, do less rounds for the top. For a larger hat, add more rounds and continue doing an increase after one additional stitch than the round before.
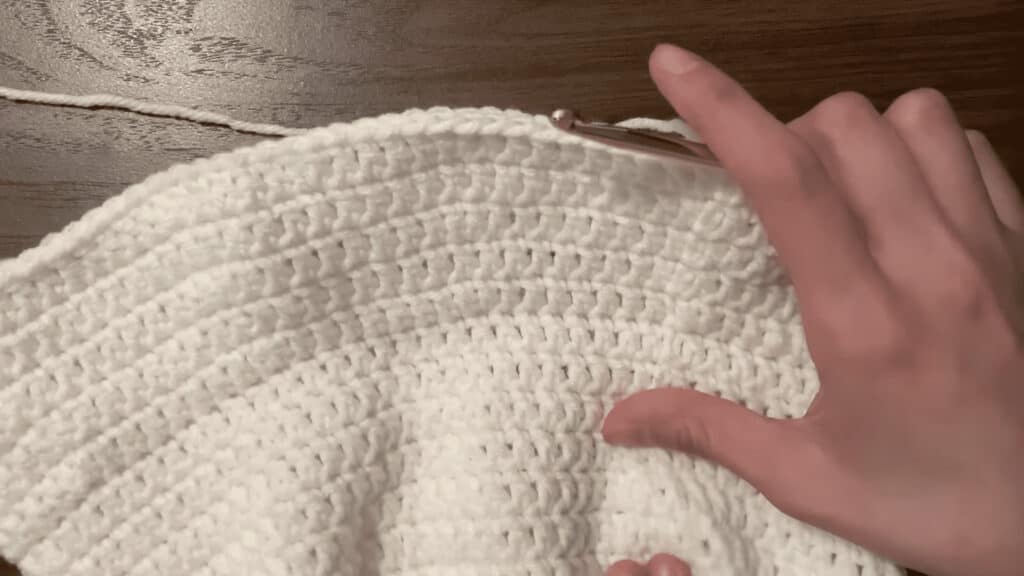
Middle
Do regular double crochet rounds until you get the length of the middle you want. For a shorter middle part of the bucket hat, do less rounds. For a longer middle, do more rounds.
Round 1: ch2, dc in the blo of each st around, sl st (70, 80, 90)
Round 2-7: ch2, dc in each st around, sl st (70, 80, 90)
Brim
This pattern is for a flat, downward-angled brim, which is why we only increase in every other round. If we were to increase every round, the brim would stick out straight, without that downward angle. With no increases, it would drop straight down, as if we were still doing the middle.
Round 1: ch2, rep [dc in the flo of the first (6, 7, 8) st, inc in the flo of the next] around, sl st (80, 90, 100)
Round 2: ch2, dc in each st around, sl st
Round 3: ch 2, rep [dc in the first (7, 8, 9) st, inc in the next] around, sl st (90, 100, 110)
Round 4: ch 2, dc in each st around, sl st
Round 5: ch 2, rep [dc in the first (8, 9, 10) st, inc in the next] around, sl st (100, 110, 120)
Fasten off and weave in loose ends.

FAQs and Common Issues
I received many comments on my YouTube video from people who had similar problems with their project. I compiled this list to answer any questions you might have and help guide you to finding a solution to common problems that beginners had!
If you have a question or problem not addressed here, please leave a comment at the bottom of this post and I will do my best to help you out!
Sizing
For reference, my head is about 53 cm and the medium fits my head loosely!
Increase the top until the circumference of the circle is about the same circumference as your head. Then, start the middle.
Magic Ring
If it’s not working out, try making a slip knot, chaining 4, then slip stitching into the 1st chain (4th chain from the hook). This will give you a little circle to work into.
Or, you can make a slip knot, chain 3, then start double crocheting 10 into the 1st chain (3rd chain from the hook).
Top
If it’s not flat and curling into a bowl instead, you may have missed increases or your tension may be too tight.
If it’s not flat and getting wavy instead, you may have added too many increases or your tension may be too loose.
Middle
There are no increases in the middle portion.
Brim
In the first round, you increase 10 times evenly.
In the second round, you double crochet all around.
In the third round, you increase 10 times evenly.
Then, repeat the second and third round until your brim is at your desired length.

The brim keeps curling up even though I’m pretty sure I followed the instructions correctly. If anyone has a solution please let me know.
Thanks.
How to make so that hat will hold its shape? Mine seems more like a beanie with very droopy brim, even though i crocheted brim with increase
Em, I followed the brim increases, used 2 strands of yarn together and switched to a half double crochet stitch to do the brim. That worked well for stiffening the brim.
Hi! Viv how to increase to the brim? i can’t finish my hot because i don’t get the pattern and video tutorial 😭😭😭😭
please help
hat*
Just listen in that part of the video
Don’t necessarily watch
Hope this helps😁
i cant find the size guide. could someone please point it out?
I made it and the instructions were so clear and easy. Sizing is perfect and now I’m going to be working on some patcher to apply ♥️ thanks for sharing this with us!
How much is the gauge for the stitches ? You have the gauge for the rows but not the stitches.
if l have 8 round on the top, then l will crocret 8 round on the middle and the brim too (sorry for my bad englidh
i have attempted this pattern twice and it was so humongous I had to abort. I don’t know how you could get 8.5 dc rows per 10 cm with a 5 hook. I am using a cotton 4 medium weight and sized down to a 4 mm and cannot get that gauge. You don’t give the stitch gauge only the rows which only helps with the length of the hat. I would have to use a 3 to get your gauge and my yarn is not a fine weight and it would be difficult to use such a small hook. Too bad.
can you use single chorcet stitches instead of DC?
i was wondering the same thing
Thank you for a nice crochet hat.
I have started up my next project 🙂
You are welcome to also try to knit my pattern:
https://knitfreak.com/en/shop/crochet-hat/
Br Pernille
I apologize I misread the instructions after seeing the video!
I am sorry but I have repeated round 3 10 time now and I end up with 31 not 30. Judging from alot of questions here I am wondering if there should be more clarification. If I dc in the first there is no way given the math that alternate 2xdc and single dc will equal 30 if there is a base of 20. The next question is – if I can NEVER get 30 will it make a difference? Thanks
I DON’T KNOW HOW TO DO THE A
BBREVIATIONS WHEN CROTCHETING PLS AM A BEGINNER
Hi Viv I’m 10 and new to crochet is this pattern good for beginners. 🤞🏽
I love how simple this pattern is to follow. I just finished it and I had no problem. I made one little addition to my hat.
When I completed the brim I chained one and then single crochet around to give it a more complete look. I ended with a slip stitch and then I wove in the end.
I wrapped raffla around the middle and tied a bow. it turned out adorable.
I have a very small head and I only did a round of 60. How often would I increase when I start the brim??
I have a very small head and I only did a round of 60 total chains. How often would I increase when I start the brim??
If you’re using a smaller yarn, it’s a good idea to do more frequent increases for the brim to make it stand out more. Otherwise it looks like a continuation of the middle 🙂 hope that helps!
I have made several of these hats now for myself and others, and I am so very happy to have found you! Thank you so much for doing what you do so well, and helping all along the way!
Leave a comment…please can u explain the brim part clearly but i love it a WOW for u
I’m starting the middle and wondering if I should be doing chain 2 beginning on each row. Thanks in advance.
Yes, every single round starts with ch2!
Hi Viv! I’m working this pattern for the second time but every time I end a round the stitch looks off and the join makes an indent. Any advice on what I might be doing wrong?
https://imgur.com/a/1jlFYEu
Hi Kenzie, it looks like you’re slip stitching in the wrong spot. It should go into the top of the first stitch of the that round. You can view the video tutorial to see exactly where to slip stitch!
When doing an increase On the brim, you said to only go in the front loop. do You only go in the front loop on all the rounds on the brim?
No, just for that first round! It helps it bend properly.
Hi! So I personally had to do 6 dc, inc for the top. Does that mean for the brim i should do 5 dc, inc for the brim? Sorry if this is confusing lol.
The first round of your brim should be 7 dc, inc
Im confused why for 80 stitches the increase should be every 6th stitch. If you increase 10 times evenly shouldn’t you increase every 8th stitch as 80 / 10 = 8? Any clarification would help 🙂
Hi, I’m unsure where you see that in the pattern. Yes, if you have 80 stitches and want to increase 10 times, you would increase every 8th stitch.
I include 3 different sizes in this pattern; maybe that’s where it’s confusing?
Thank you for the pattern! Question, if I am using a 4mm hook, should I be using the larger size to compensate for the smaller hook? I am halfway through the top portion already.
It’s hard to say because it depends on your yarn and tension, too! I would just keep adding rounds until the circumference of the top is slightly smaller than your head circumference
I’m done with the 6th round and I have 77 stitches. Am I supposed to skip the 2 that I chain in the beginning of each round? I feel like I might be crocheting in the 2 chain when I’m not supposed to
Yes, the 2 chains is the turning chain, so we don’t work into it! If you need help with where to place your stitches, check out the video tutorial!
I love the hat can this be done in lightweight cotton or #4 cotton thanks
Yes! Just make sure to adjust the number of rounds for the top to make it fit!
I am making a small. When I am doing the increase in the middle, I am coming up with 81 stitches. When I counted the previous row, I had 70 stitches. I also counted the row again. I may have to frog it and start over. It is a simple hat and I don’t understand why I am struggling
The middle doesn’t have any increases, so you should have 70 stitches after your 7th round and for the whole middle part
Thank you so much for the great YouTube video and pattern! Everything was super easy to follow and turned out so nice. But now I’m stuck at the first row of the brim, it’s getting tighter in that row and I don’t know why…
I’m not sure what this means t [dc in the flo of the first (6, 7, 8) st, inc in the flo of the next.
What does the numbers mean?
They are for the (S, M, L) sizes! The number will be different depending on the size you want. So, small is 6th st, medium is 7th, large is 8th.
If your first row of the brim tightens, it means you’re losing stitches. You should be adding increases in the appropriate stitch to make it flare out
Thank you!
When you’re increasing stitches, you do that in both loops or only front loop in this first row?
You’ll do them in the front loops only
Thank you for the great YouTube video and patern! But now I’m stuck at the first row of the brim, it gets smaller when I’m done with the first row and I don’t understand what I’m doing wrong?
Im a little confused by the description of the first row, what does the numbers (7,8,9) mean?
Thank you!
have finished making mine, and it looks soo good!! tysm for this wonderful pattern!!
No problem! Happy to have helped!
omg girl, this is perfect. the video, the clear instructions with the pictures, I’m definitely using this website again, thank you, thank you, thank you, you are a crocheter’s dream.
Thank you so much ☺️
what yarn did you use? isacryclic yarn same with the yarn na milkcotton? and what ply?
You can use any yarn! I used Red Heart Super Saver, which is 4-ply
I am so confused. 1st round of the brim, I get to the last couple stitches, and there’s not enough stitches to end with the increase. Every 8th stitch I increase but im almost at the end and I only have 5 stitches left until the end of the row where I slip stitch but I need 3 more to increase in the 8th stitch. Does that make sense lol? I undid it twice but still end up with not being able to do the 10 rows evenly. Help??
If you’re ending on the fifth stitch, you probably have 77 stitches, but you should have 80! I think you may have missed some stitches in previous rounds.
If it fits well and you don’t want to undo it, you can just put your last increase in the last stitch. Your stitch count will be off for the rest of the brim, but you won’t see it in the final product!
I don’t know if you ever figured this out, but I also just ran into this problem. I’m doing the large size so I have 90 stitches and just divided that number by 10 in order to increase 10 times. so I’m doing every 9th stitch increasing instead of 8 like says in the written pattern.
It agree, very good message
I loved making this hat! Thank you for creating clear instructions. For the brim, would it work to do an increase in the last 4 rows? I want a little more flop. Or is there a way you would suggest to do this. Thanks !!