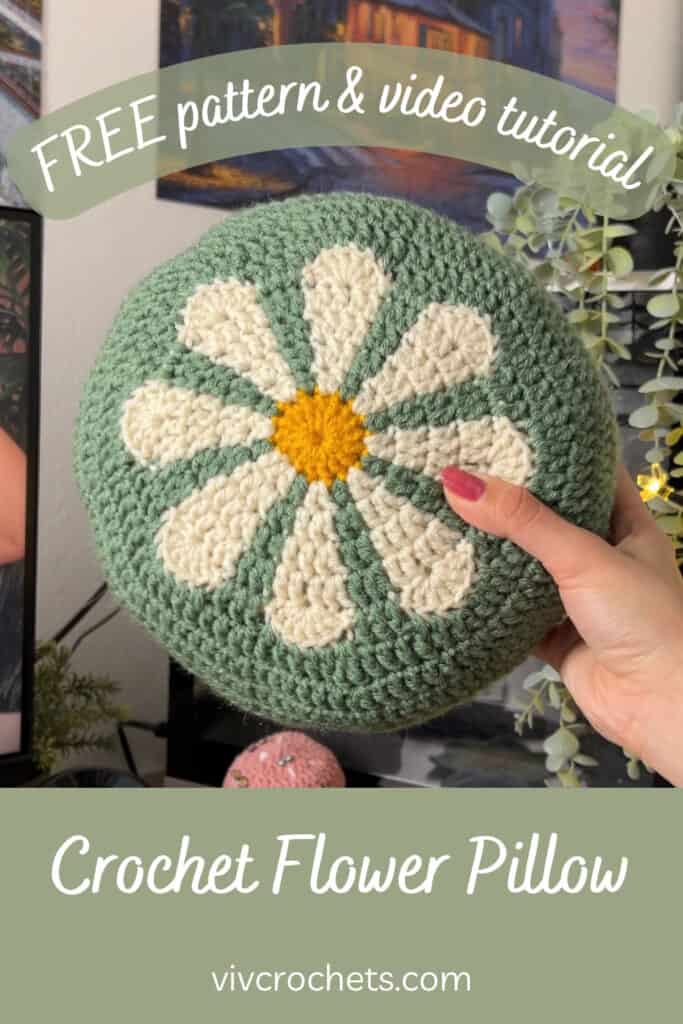
Cute Crochet Flower Pillow/Cushion | Free Pattern & Tutorial
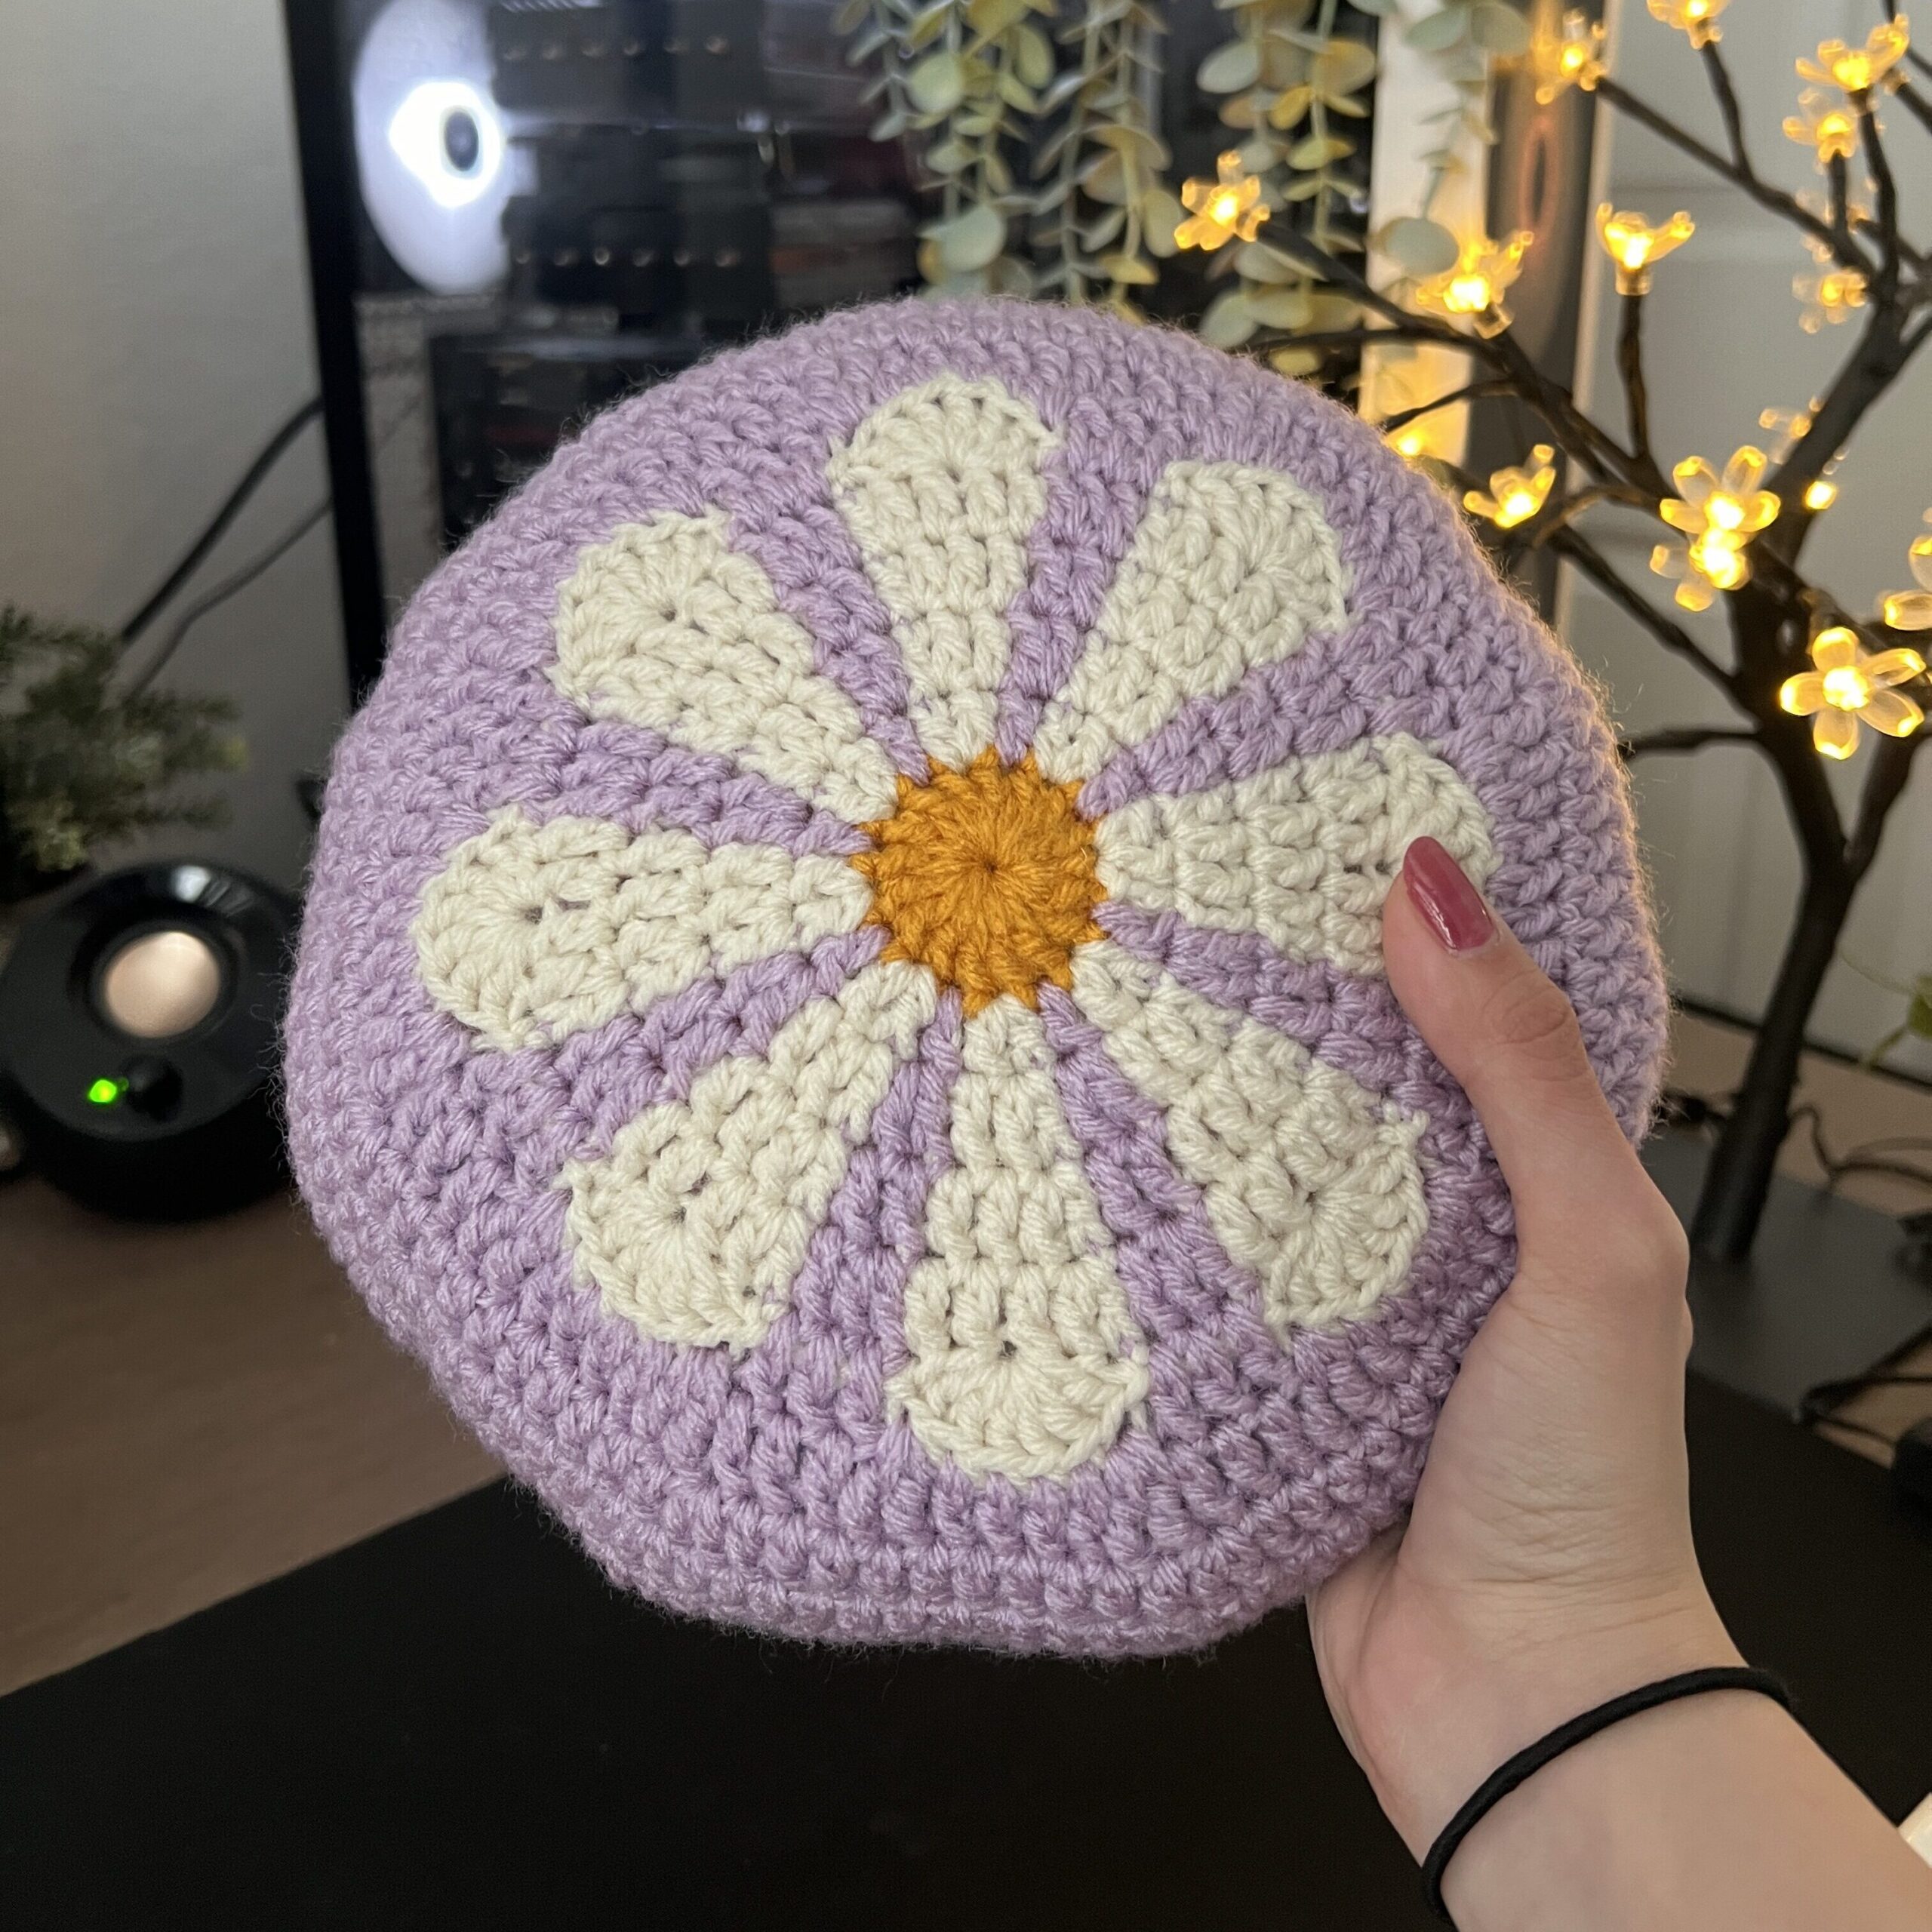
This super cute crochet flower pillow is the perfect addition to your room! This 8-petaled flower, worked in the round, makes for a beautiful motif for a crochet pillow. The simple color scheme allows you to customize it with any color you like.
Skill Level
This crochet project is most suitable for crocheters who have already completed a couple of projects. However, it’s very possible for beginners to undertake this project, especially with the in-depth video tutorial. In the tutorial, I go over how to do each stitch and how to do each step of the process.
Pillow Size
This crochet flower pillow can be made to be any size. The only limiting factor is the size of the flower. The flower motif is six rounds, and you can continue the rounds after that until the pillow is the size you want. But, remember to keep in mind the ratio of the flower design to the overall pillow size.
If you prefer to not change the pattern, you can simply use a thicker yarn and hook to achieve a larger pillow!

Project Overview
For this crochet flower pillow project, we’re going to crochet two circular panels. The front will have the flower and the back will be solid (or another flower if you want). Then, we’ll sew the panels together and stuff it.

Changing Colors & “Floating” Yarn
To do a stitch in a different color, pull through the last two loops of the stitch before it in the new color. If it’s the first stitch in a new color, tie the tail of the new color to the old color to secure it.
Instead of carrying the yarn in your stitches, float the yarn in the back. I find it to be much easier to do color changes this way. Also, the wrong color might peek through with the carrying method. Since the back of the panel will be on the inside of the pillow, floating the yarn will keep the wrong color from being noticeable.

Pin this for later!
Patterns You Might Like

Video Tutorial
You can follow along with my YouTube video to make your very own crochet flower pillow! I have timestamps included to section the video and help you jump to any point you need to!
Materials
- 150 grams of medium weight yarn (Red Heart Super Saver in “Gold,” “Aran,” and “Pale Plum“)
- 4mm Clover Amour crochet hook
- Scissors
- Yarn needle
- Fiber fill
Dimensions
22 centimeters diameter (8.66 inches)
Gauge
9 rounds = 10 centimeters / 4 inches
Notes and Tips
- This pattern is written using US crochet terms
- This pattern is crocheted in joined rounds
- The chain 2 at the beginning of each round does NOT count as a double crochet
- Float the yarn along the back of the panel to change colors easily
Color Notation
A = flower center color yarn (Gold)
B = flower petal color yarn (White)
C = base color yarn (Purple)
Abbreviations
ch = chain
blo = back loop only
dc = double crochet
dc inc = double crochet increase (2 dc in same st)
rep = repeat
sk = skip
sl st = slip stitch
st = stitch
tr inc = treble crochet increase
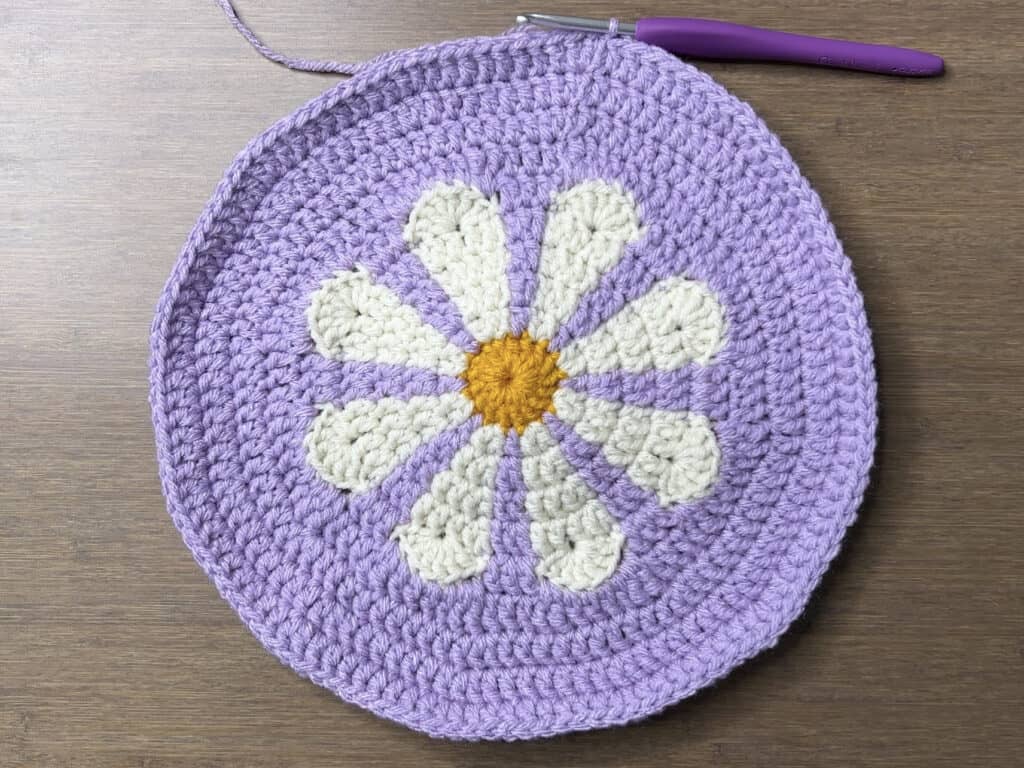
Crochet Flower Pillow Pattern
Flower Front Panel
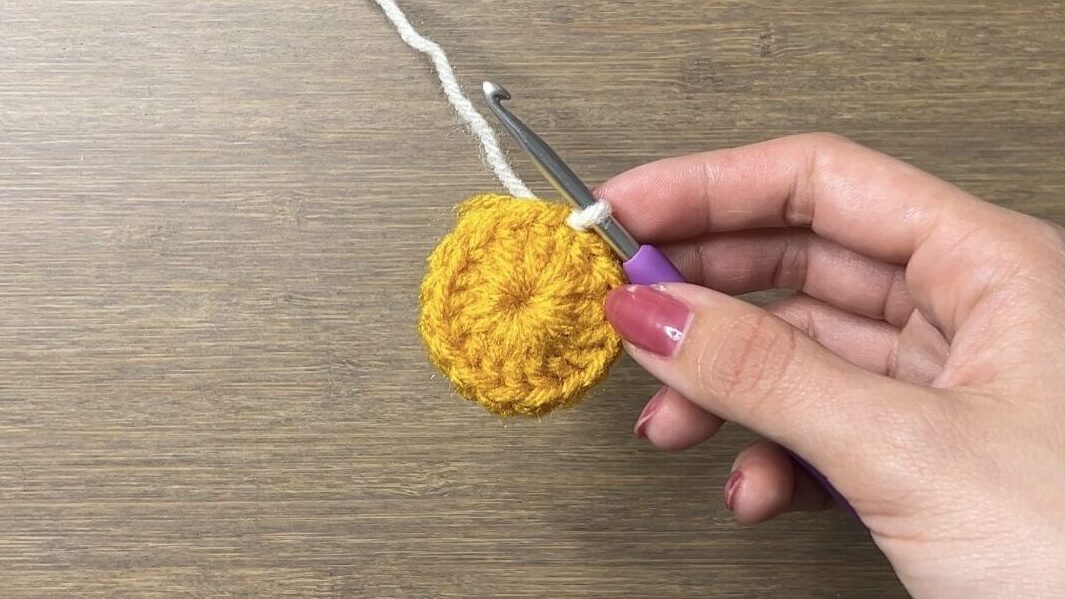
Foundation: With color A, make a slipknot, ch4, sl st to 1st ch [4th from hook] to form a ring
If you’re having trouble fitting all round 1 stitches into the ring, try chaining 5 instead of 4 or substitute it with a magic ring.
Round 1: ch2, dc16 into ring, switch to color B, sl st (16)
Secure every new yarn’s tail with a double knot to the previous color. Cut color A, leaving a short tail.
For the next round, we will be working with both color B and color C. You can carry the yarn in your stitches or float them along the back, which is what I did.
Round 2: ch2, rep[dc inc, switch to color C, dc, switch to color B] 8 times around, sl st (24)

Round 3: ch2, rep[dc, dc inc, switch to color C, dc inc, switch to color B] 8 times around, sl st (40)

Round 4: ch2, rep[dc in next 2 st, dc inc, switch to color C, dc in next 2 st, switch to color B] 8 times around, sl st (48)

Round 5: ch2, rep[dc in next 3 st, dc inc, switch to color C, dc, dc inc, switch to color B] 8 times around, sl st (64)
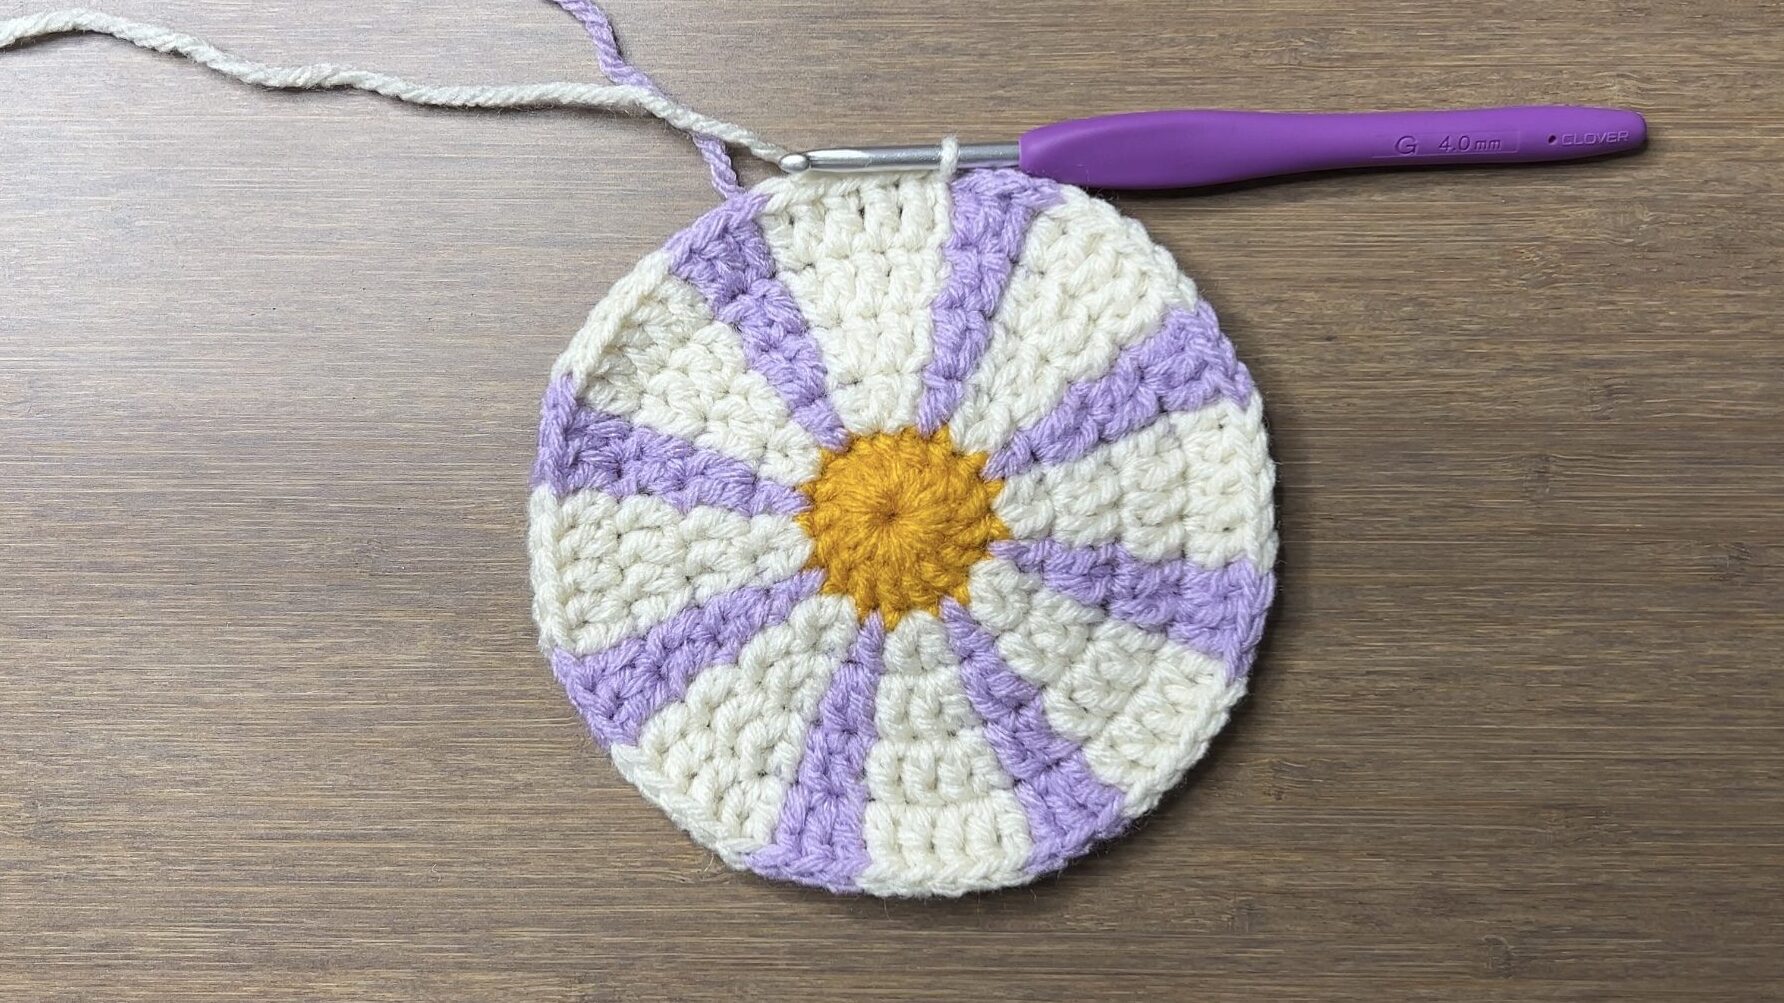
For the next round, we will work around the circle twice, using only color B, then only color C.
Round 6 – Part 1/2: With color B and without ch, sk2, dc6 in 3rd st, rep[sk1, sl st, ch3, sk3, sl st, sk1, dc6 in next st] 7 times around, sk1, sl st, sl st with color C (48)
Cut color B, leaving a short tail.
For this next part, make sure to catch the color B ch3 in your stitches. If you don’t, there will be a gap where the fiberfill can come out.
Round 6 – Part 2/2: With color C, ch2, rep[dc in next 3 st, ch6, sk petal] 8 times around, sl st (24)

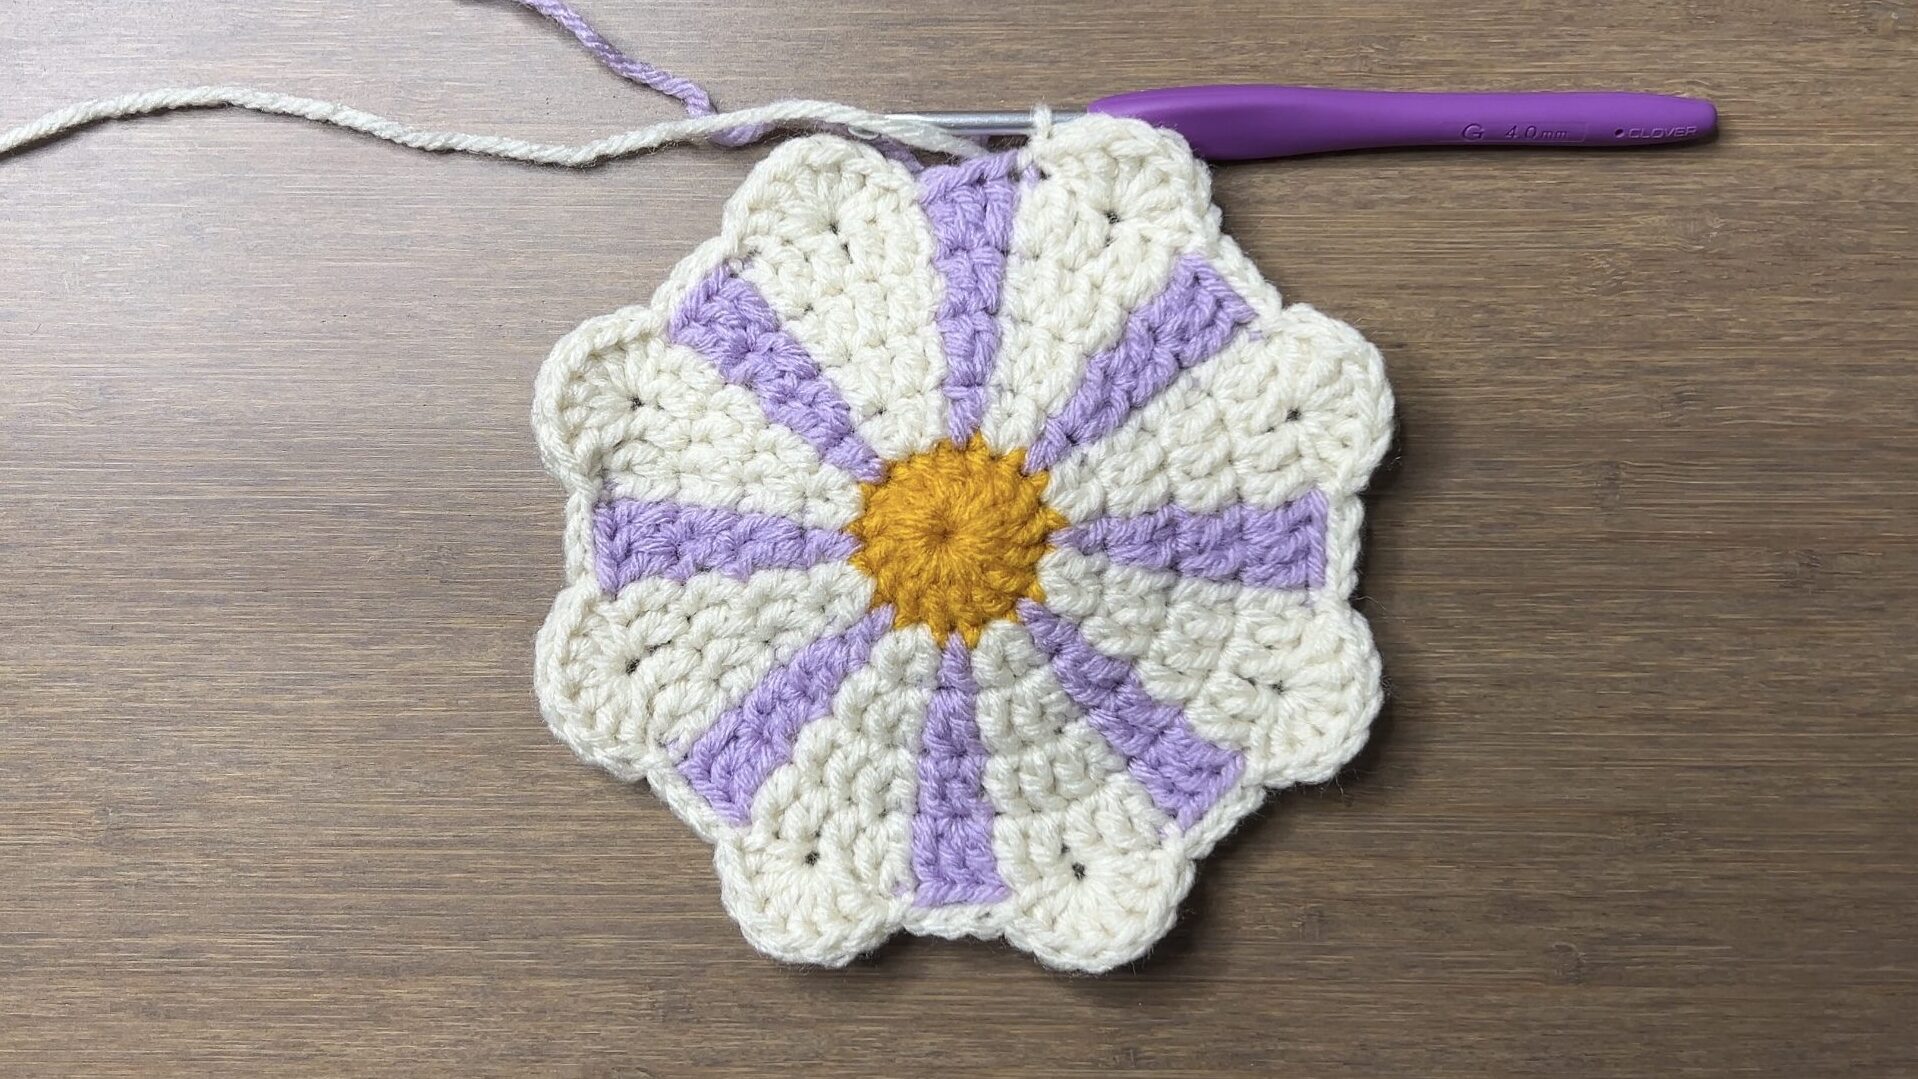
For the next round, make sure to catch the color C ch6 in your stitches when crocheting on top of the 6 stitches of each petal.
Round 7: ch2, rep[dc in next 3 st, tr inc in blo, dc in blo in next 4 st, tr inc in blo] 8 times around, sl st (88)
Working in the back loop only over the petals helps make the curved shaped more prominent.

Round 8: ch2, rep[dc inc, dc in next 10 st] 8 times around, sl st (96)

Round 9: ch2, rep[dc inc, dc in next 7 st] 12 times around, sl st (108)
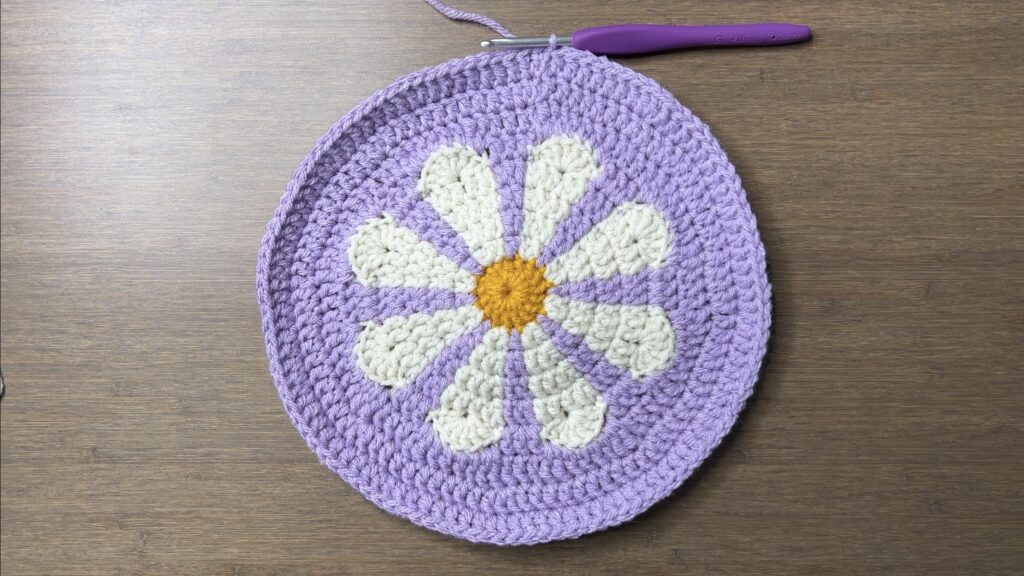
Round 10: ch2, rep[dc inc, dc in next 8 st] 12 times around, sl st (120)
Fasten off or add more rounds to make it bigger. Every new round will have one more dc after the inc in the repeat.
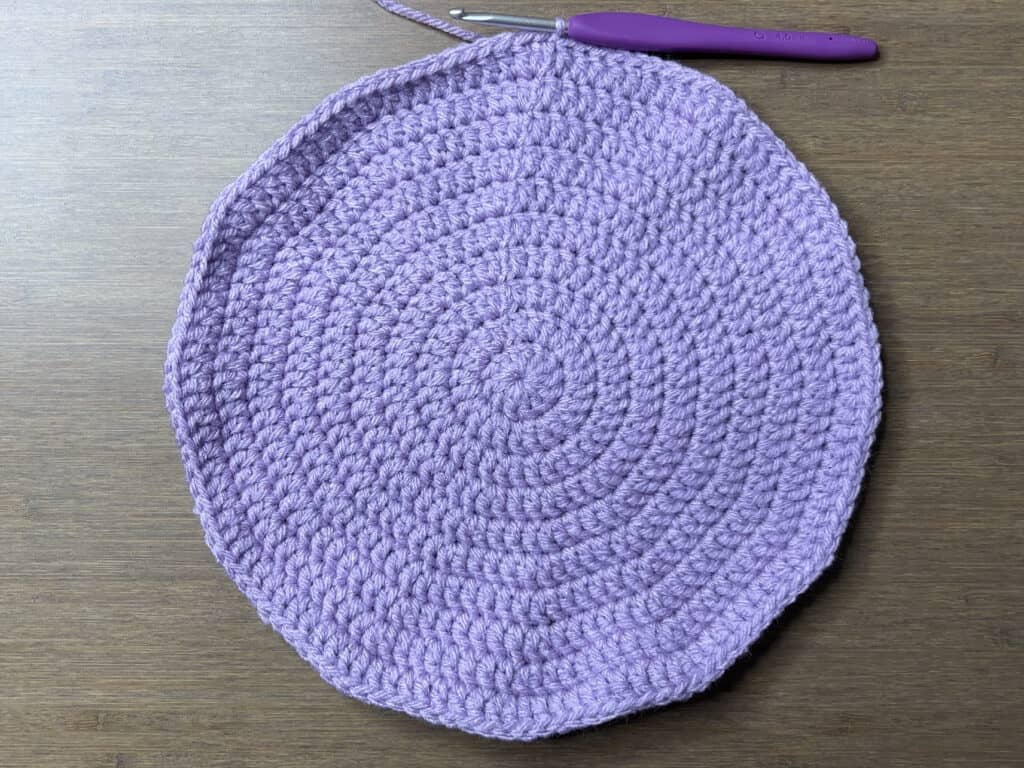
Solid Back Panel
Foundation: With color C, make a slipknot, ch4, sl st to 1st ch [4th from hook] to form a ring
Round 1: ch2, dc12 into ring, sl st (12)

Round 2: ch2, rep[dc inc] 12 times around, sl st (24)
Round 3: ch2, rep[dc inc, dc] 12 times around, sl st (36)
Round 4: ch2, rep[dc inc, dc in next 2 st] 12 times around, sl st (48)
Round 5: ch2, rep[dc inc, dc in next 3 st] 12 times around, sl st (60)
Round 6: ch2, rep[dc inc, dc in next 4 st] 12 times around, sl st (72)
Round 7: ch2, rep[dc inc, dc in next 5 st] 12 times around, sl st (84)
Round 8: ch2, rep[dc inc, dc in next 6 st] 12 times around, sl st (96)
Round 9: ch2, rep[dc inc, dc in next 7 st] 12 times around, sl st (108)
Round 10: ch2, rep[dc inc, dc in next 8 st] 12 times around, sl st (120)
Fasten off with extra long loose end for sewing panels together. I left a little over twice the circumference of the circle and it was the perfect amount!
Assembly
Place the panels back to back, with the right side of each panel facing out. Whip stitch them together, leaving an opening for stuffing.

Stuffing the Pillow
Stuff the pillow with fiberfill until desired thickness. If the pillow appears lumpy, pull apart the fiberfill to separate the clumps before stuffing.

Finish sewing the panels together completely. Shape your pillow by flattening it and moving the stuffing around to get a smoother shape.
Crochet Flower Pillow
And your crochet flower pillow is complete and it’s super cute!