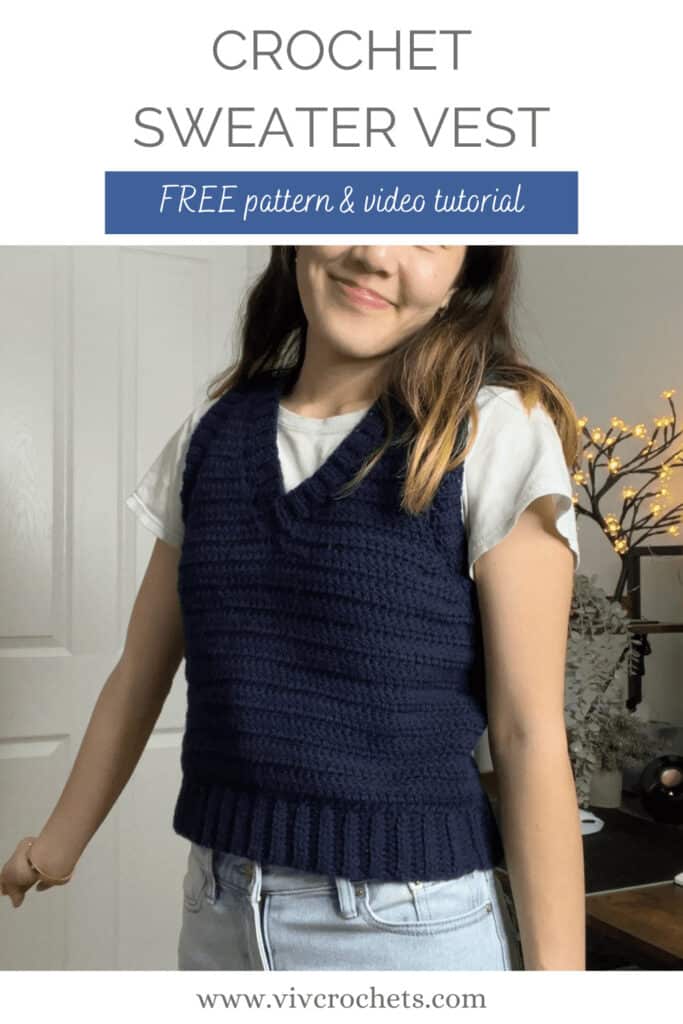
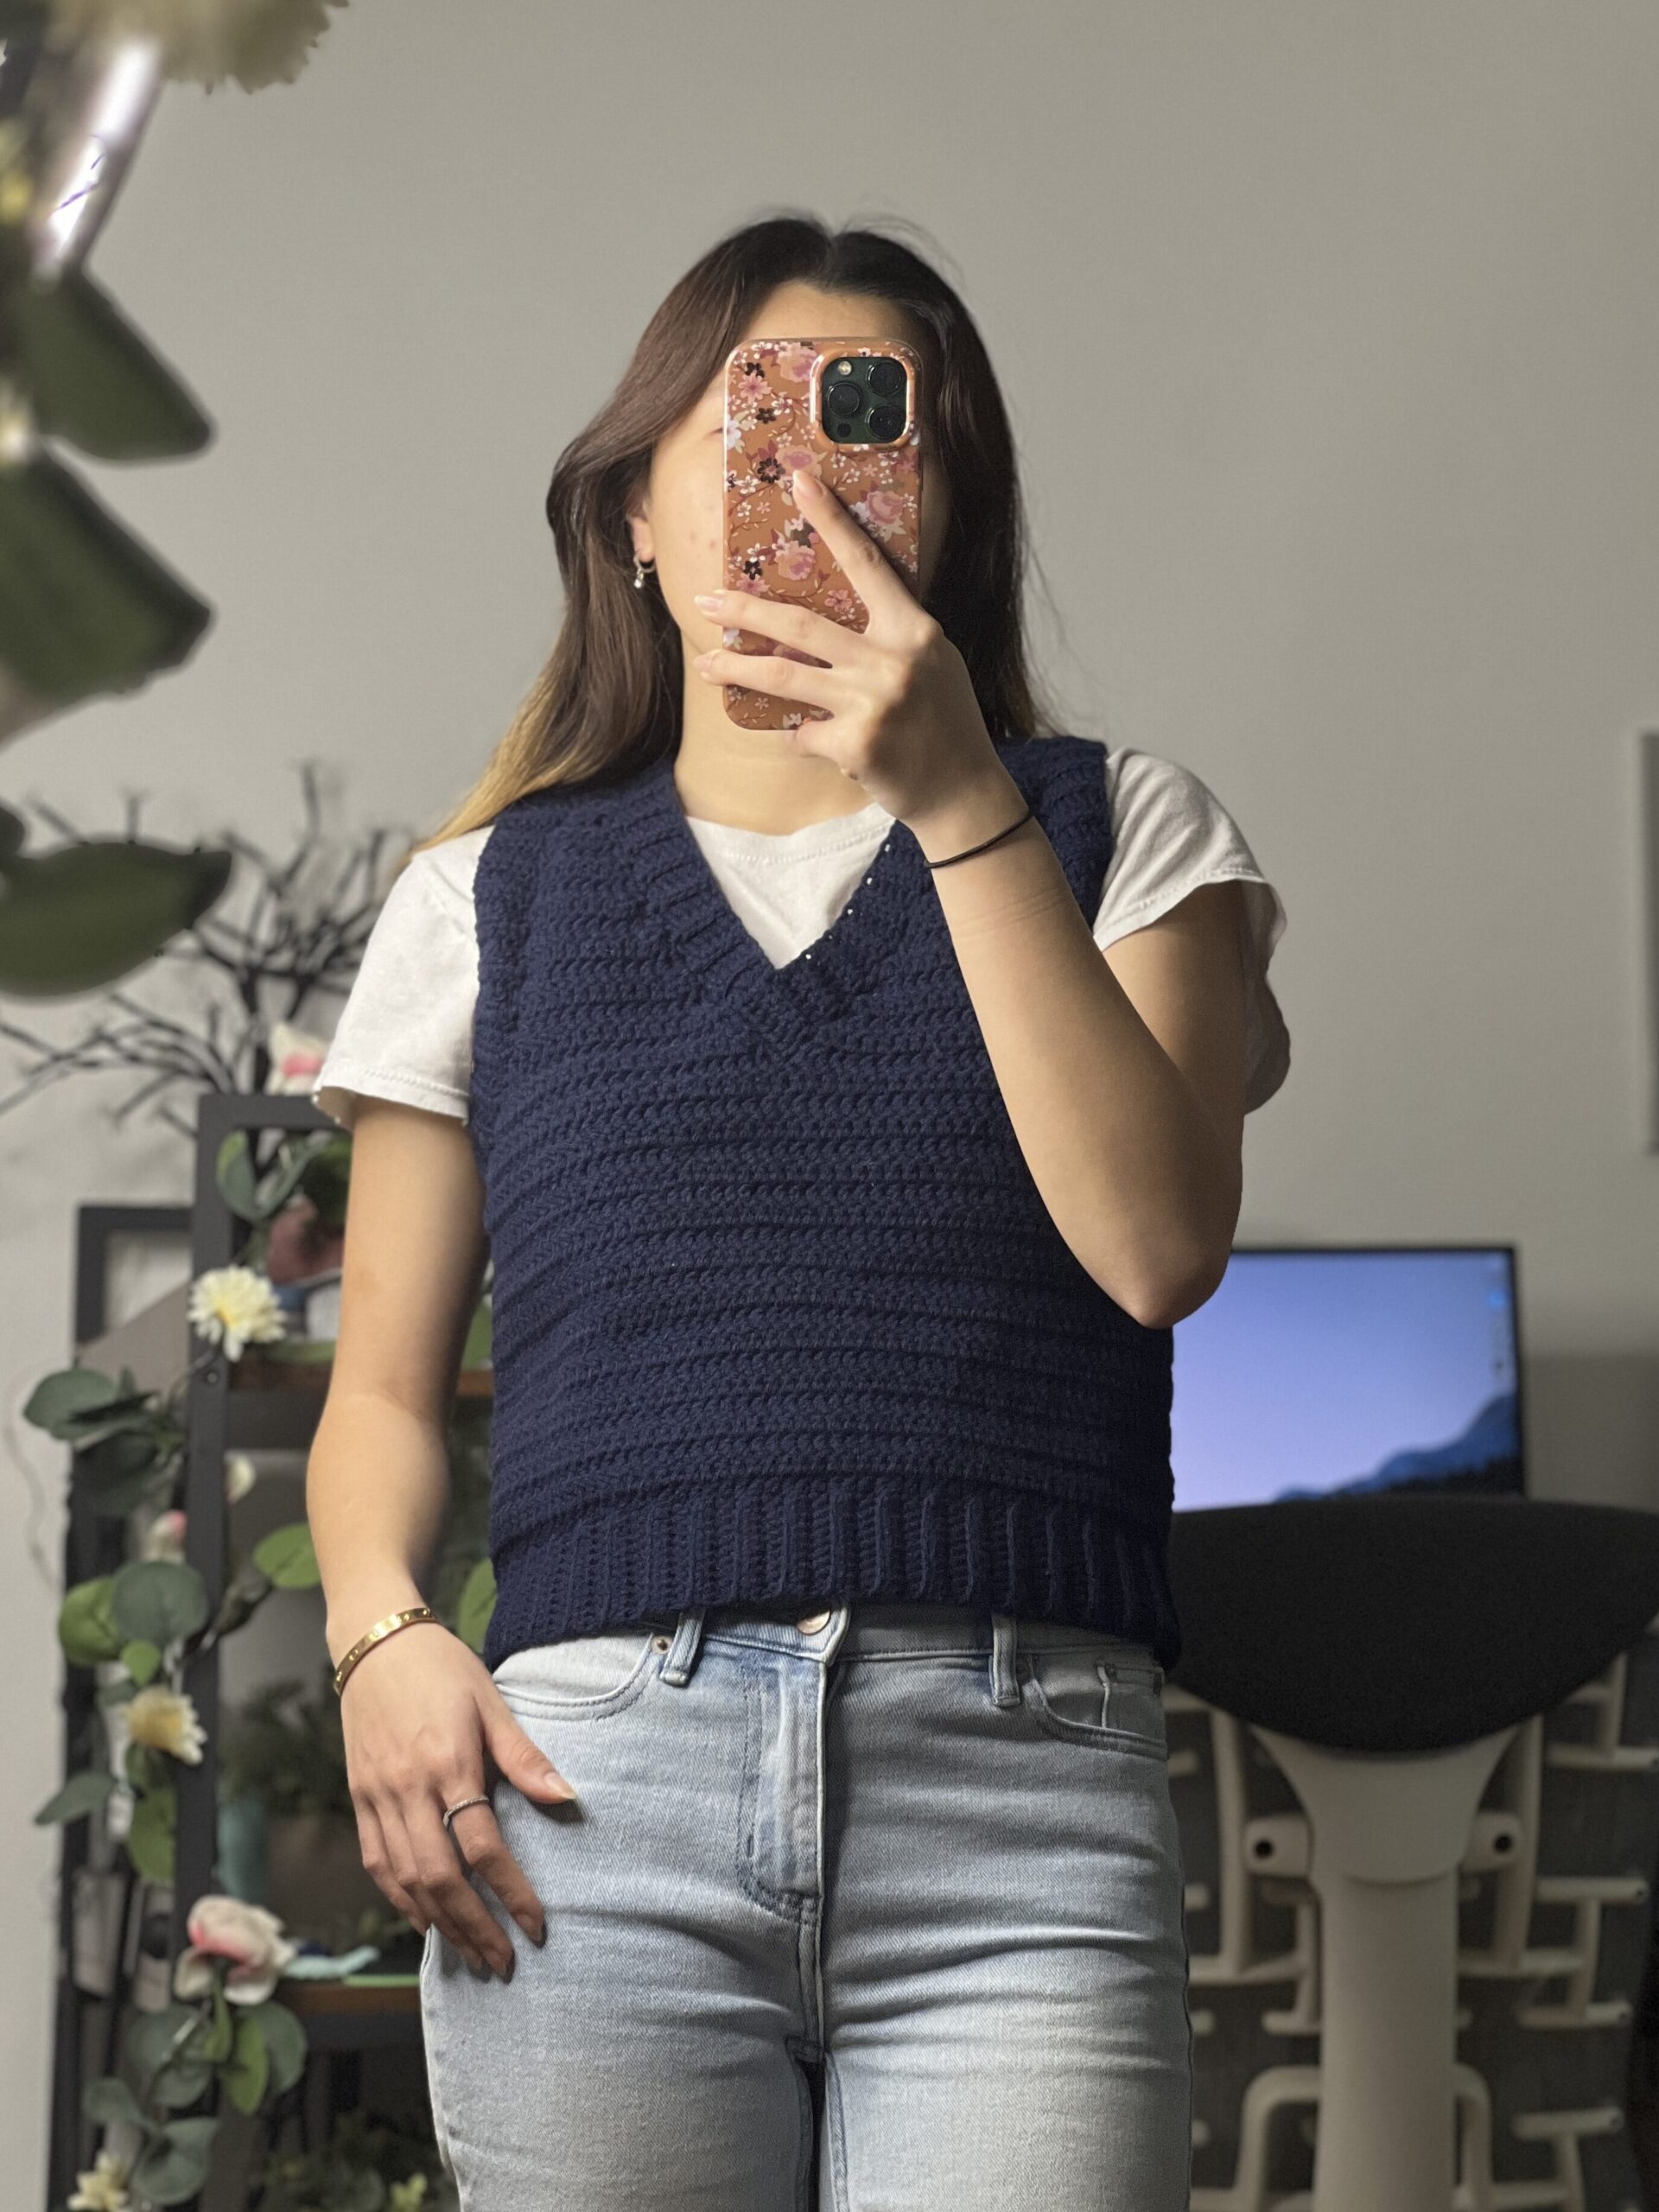
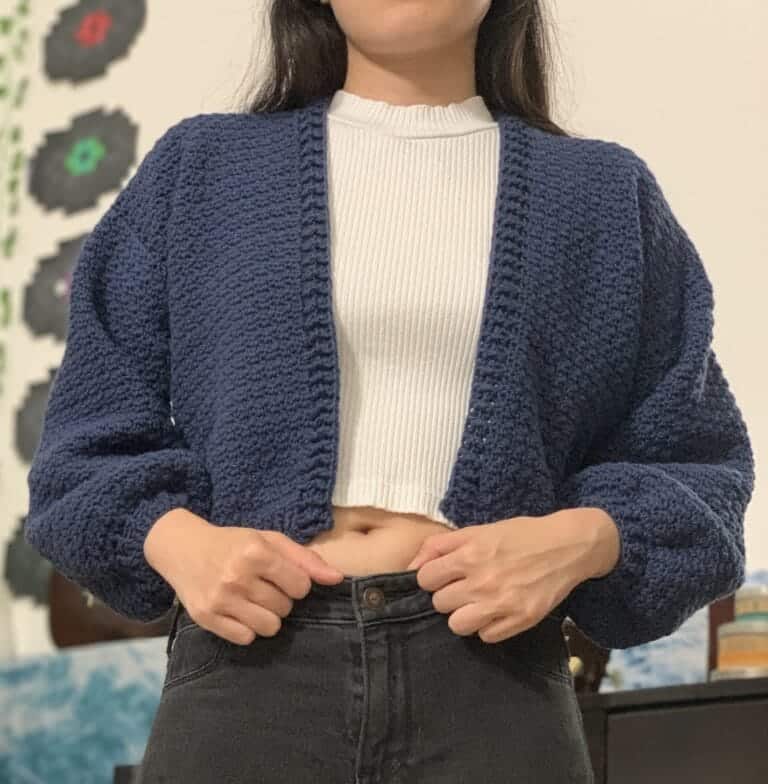
Crochet V-Neck Sweater Vest | Free Pattern & Tutorial
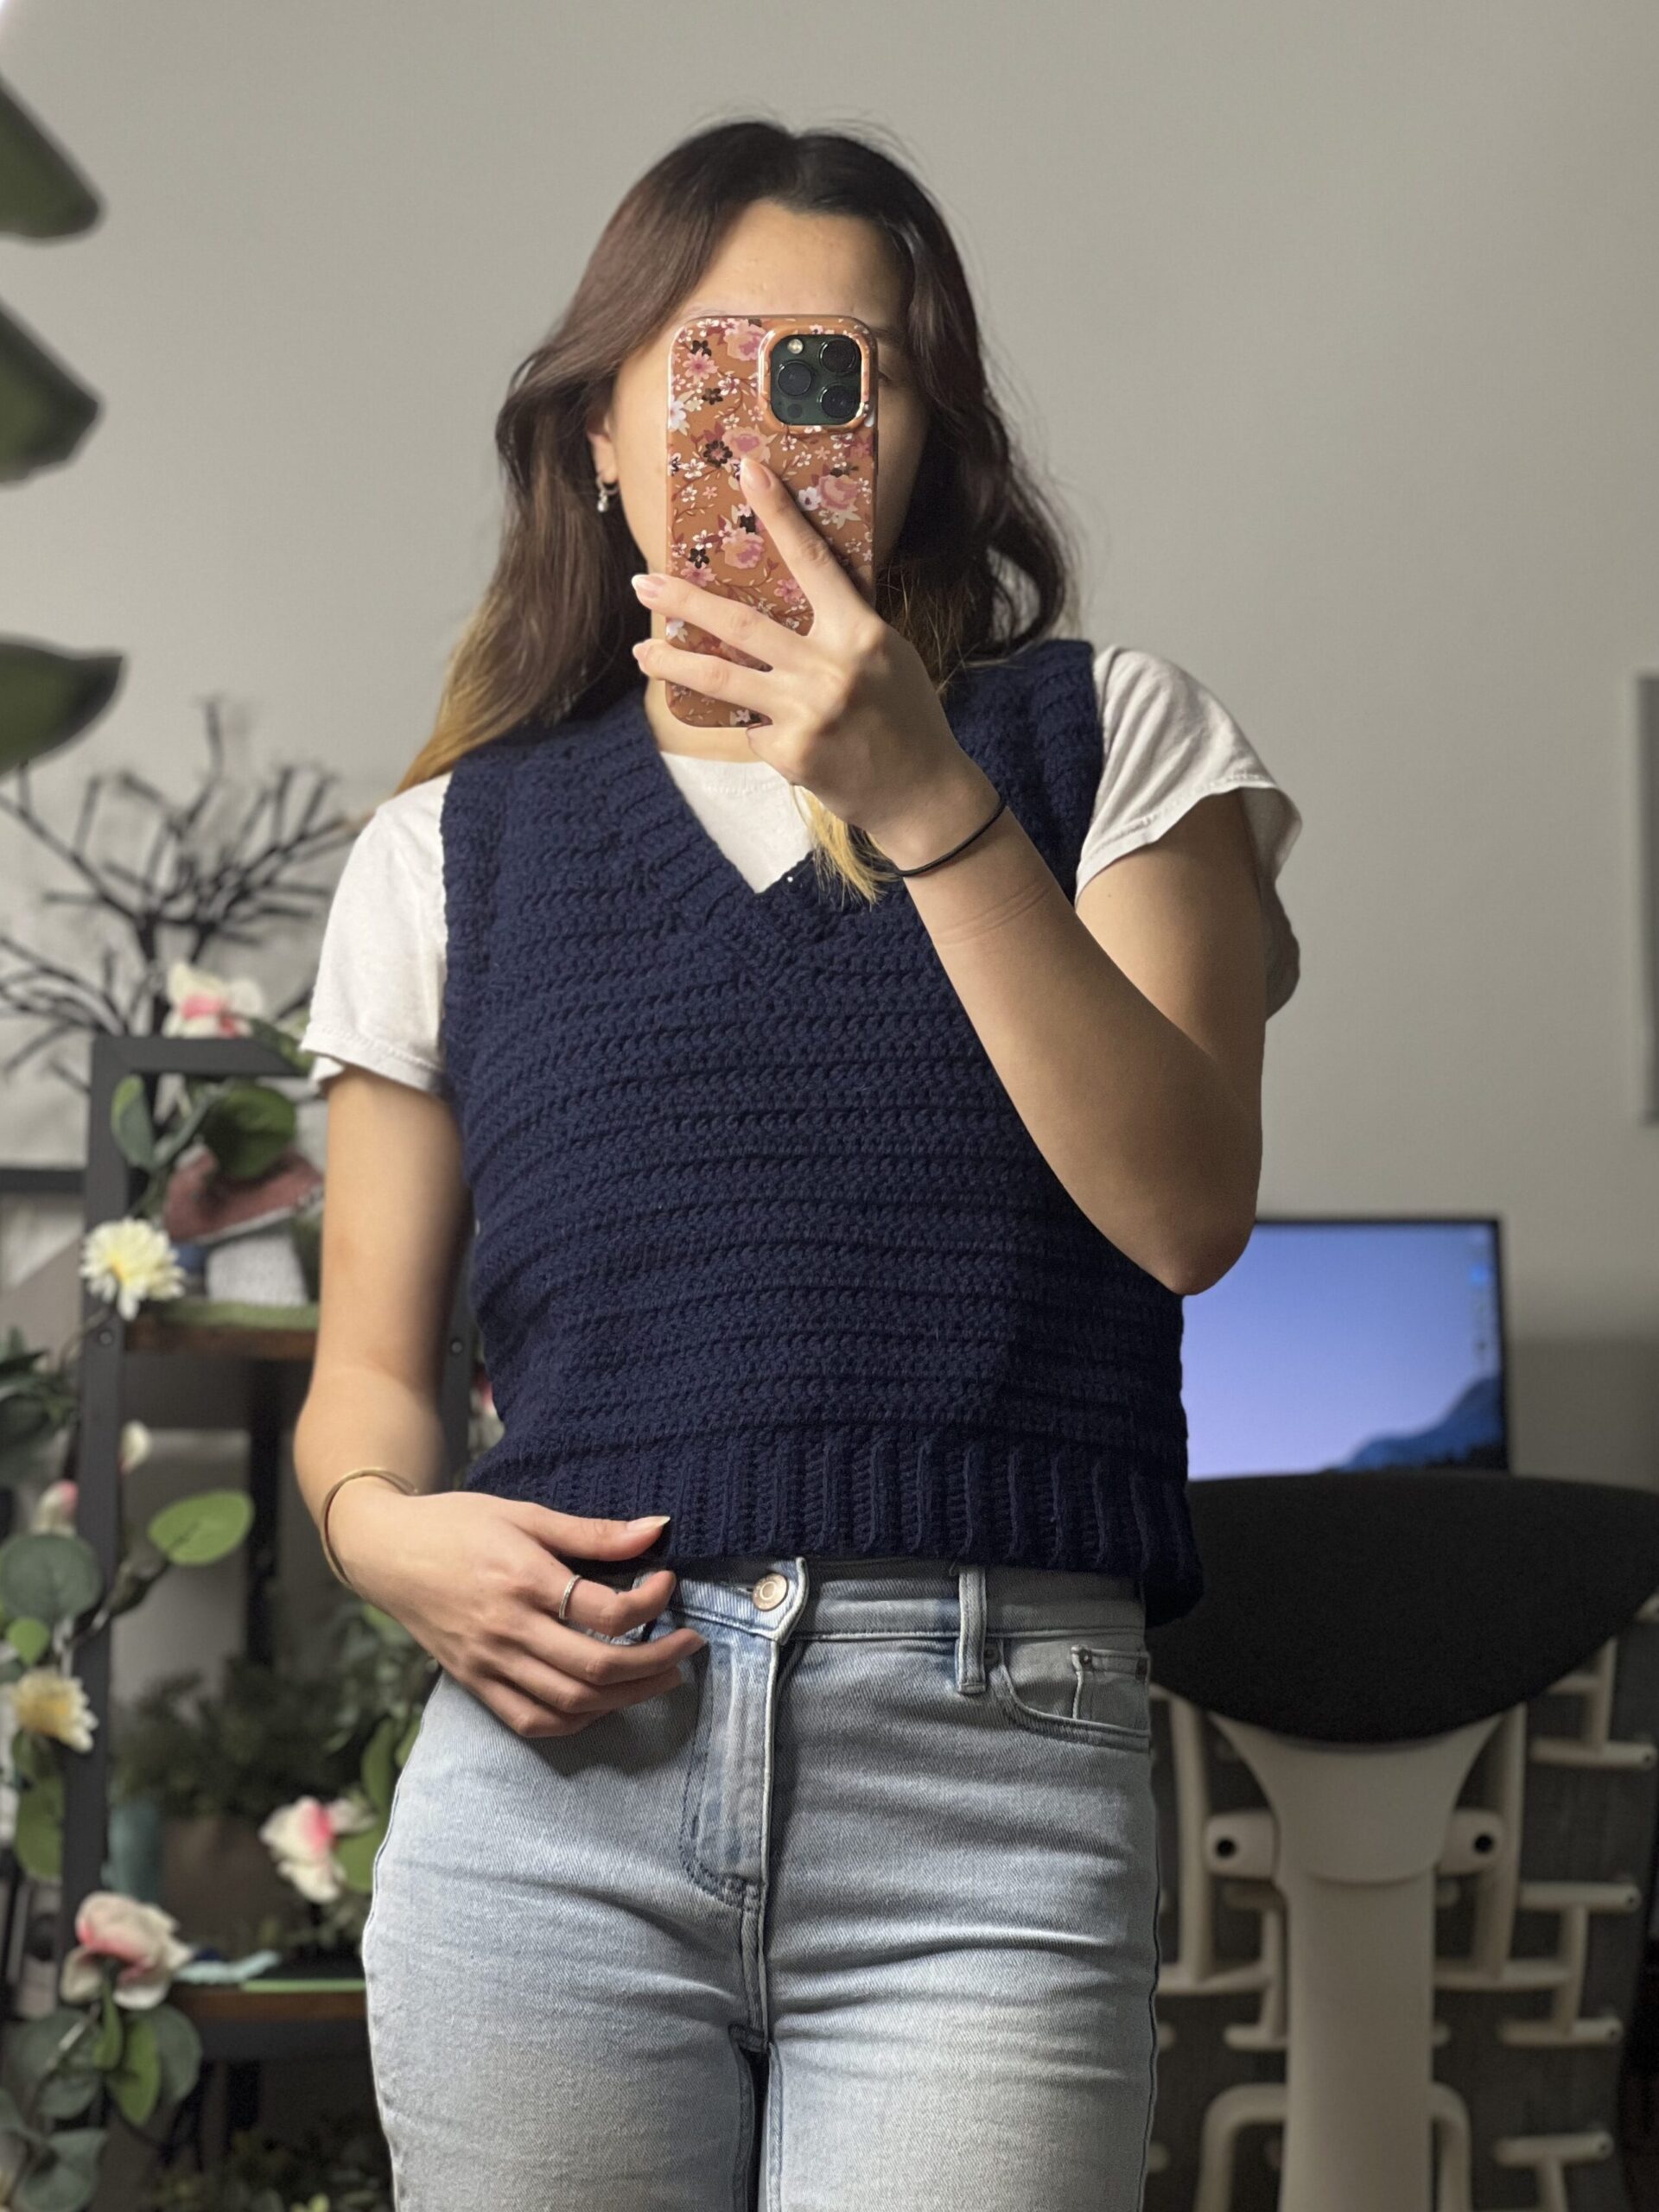
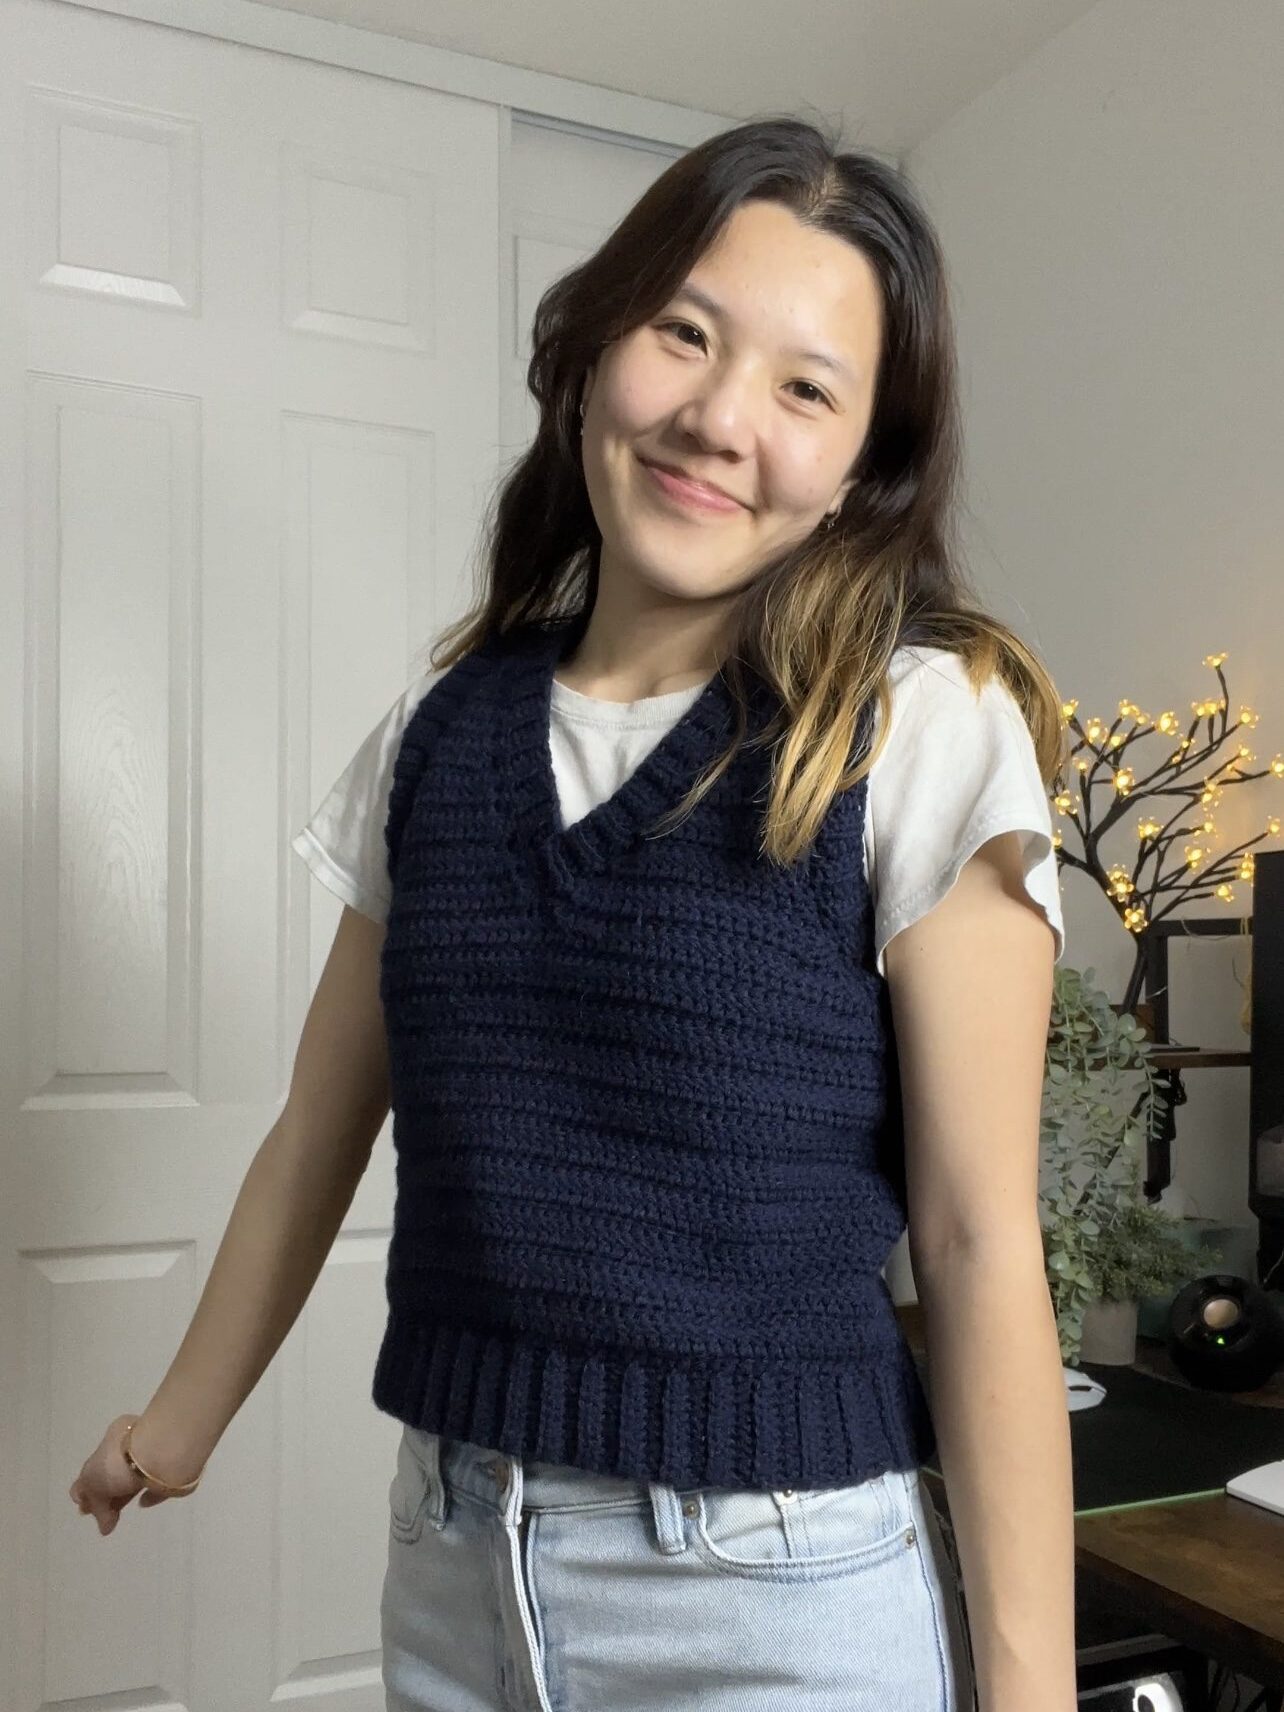
This basic v-neck sweater vest crochet pattern features half double crochet ribbing and double crochet for the main part. Its simple shape and coloring result in this classic wardrobe staple that will work in many different outfits! This pattern is for crocheters who already have at least a little experience crocheting.

V-Neck
In crochet, v-necks are typically more difficult to make than other necklines, at least in my opinion, but it’s definitely worth the extra effort!
V-necks can make the neck area look more flattering by making the neck look longer and slimmer. They are also versatile in dressing both down or up! You can wear it with something more casual for an everyday look or wear it with a collared button up for a more professional look. Lastly, you can easily accessorize with necklaces!

Difficulty
Although not super complicated, it does use simple shaping techniques that an absolute beginner may struggle with. But, by all means, if you’re up for the challenge! In the video tutorial, I go over each new stitch, so it is possible to make this without having any experience crocheting.
If you’d like something a little easier, try this easy ribbed sweater or this two-tone raglan sweater!
Diagram & Overview

This pattern is worked in one piece, from the bottom up. Here is an overview of the process from start to finish:
- Ribbing for both the front and back.
- Body for both the front and back.
- Split and shape the armholes for just the front panel.
- Finish shaping the armholes and start shaping the v-neck for just the front panel.
- Finish shaping v-neck for just the front panel.
- Shape armholes and neckline for the back panel.
- Ribbing for neckline and armholes.
Pin this for later!
Patterns You Might Like


Video Tutorial
You can follow along with my YouTube video to crochet your very own v-neck sweater vest! I have timestamps included to section the video and help you jump to any point you need to!
This post may contain affiliate links. I may earn a small commission on qualifying purchases at no additional cost to you!
Materials
- 226 grams/505 yards of medium weight yarn (Loops & Threads Impeccable Yarn in “Navy”)
- 5mm Clover Amour crochet hook
- Scissors
- Yarn needle
Dimensions
40.5 centimeters wide x 48 centimeters long
Additional dimensions with images will be listed at the end!
Gauge
10 rows of 15 double crochets makes a 10 x 10cm square
Notes and Tips
- This pattern is written using US crochet terms
- The chain 2 at the beginning of each round/row does NOT count as a double crochet
- Leave extra space in the armholes and neck hole for the ribbing
- Pull all loose ends to the inside of the sweater vest and weave them to hide them
Abbreviations
ch = chain
dc = double crochet
dc2tog = double crochet 2 together
dc3tog = double crochet 3 together
blo = back loop only
hdc = half double crochet
rep = repeat
sk = skip
sl st = slip stitch
st = stitch
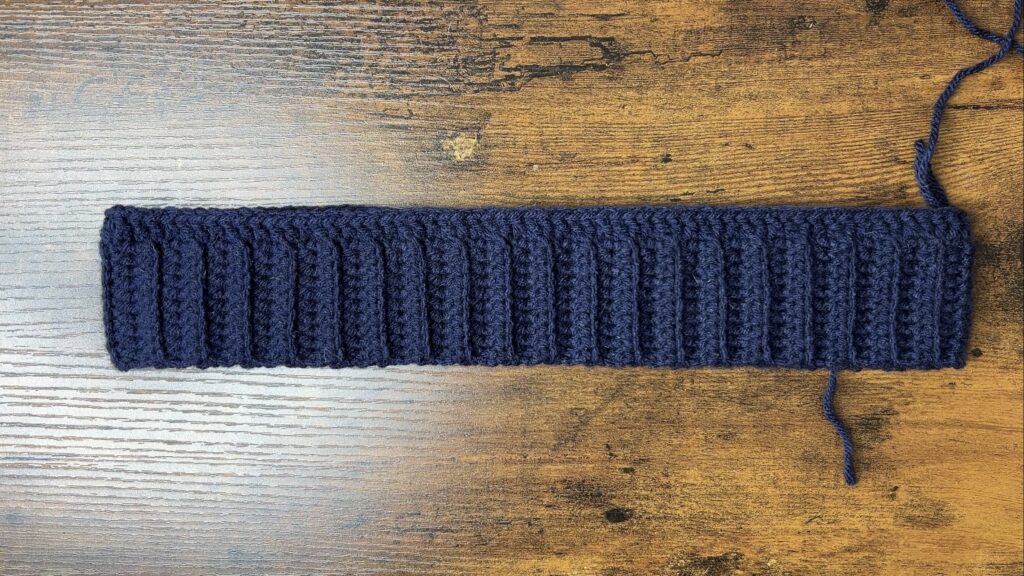
Bottom Ribbing
Foundation: Slipknot, ch10 + 1 turning ch (or however long for ribbing width)
Row 1: hdc across, starting in 2nd ch from the hook (10)
Row 2: ch 1, turn, hdc across in blo
Rows 3 – 80 (must be a multiple of 8): Repeat row 2 until the piece can stretch to fully wrap around the largest part of your upper body
Joining Sides: ch 1, turn
Grab the piece from the middle so the ends lay on top of each other.
Sl st through both layers through the front loop of each hdc on the top layer and through the bottom of each chain on the bottom layer.
Rotate 90 degrees clockwise to work along side of the rows.

Body
Round 1: ch2, dc in the side of each row and each ridge (3 per every 2 rows), sl st (120, must be divisible by 4)
The number of stitches for your first row should be 1.5 times the number of rows of ribbing you did. Since I did 80 rows, and 80*1.5 = 120, I have 120 stitches at the end of the round.
By doing 3 stitches every 2 rows, your first row should lay pretty flat (as long as your tension is not too loose or tight). The ribbing shouldn’t be flared out or stretched out. It should be straight, lining up with your rows on the body.
Round 2 – 17: ch2, turn, dc around, sl st
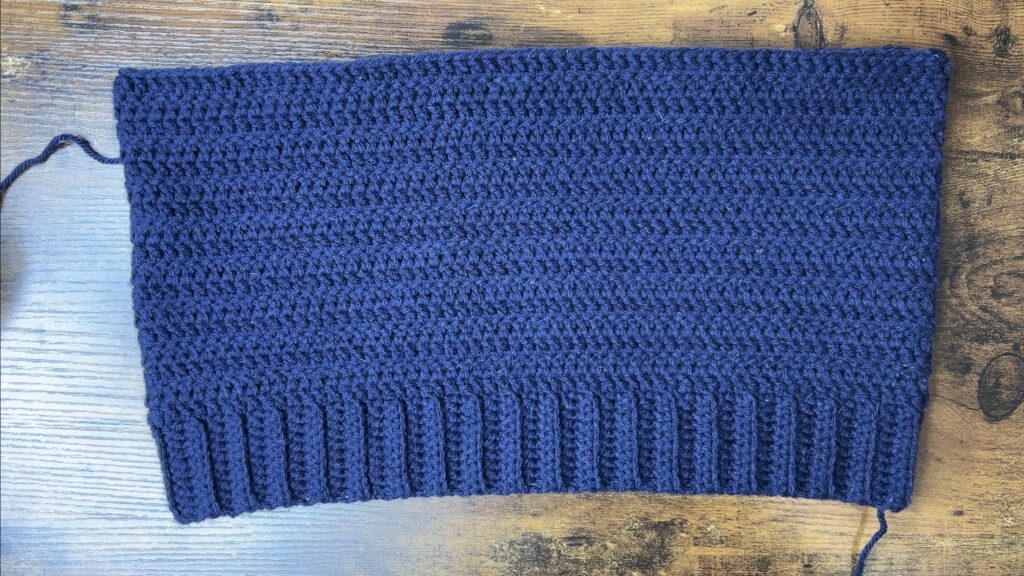
After 17 rounds, the total vertical length is about 21.5 centimeters. If you have a longer torso or just want the sweater vest to be longer, you can add more rows until you’re ready to start the armholes.
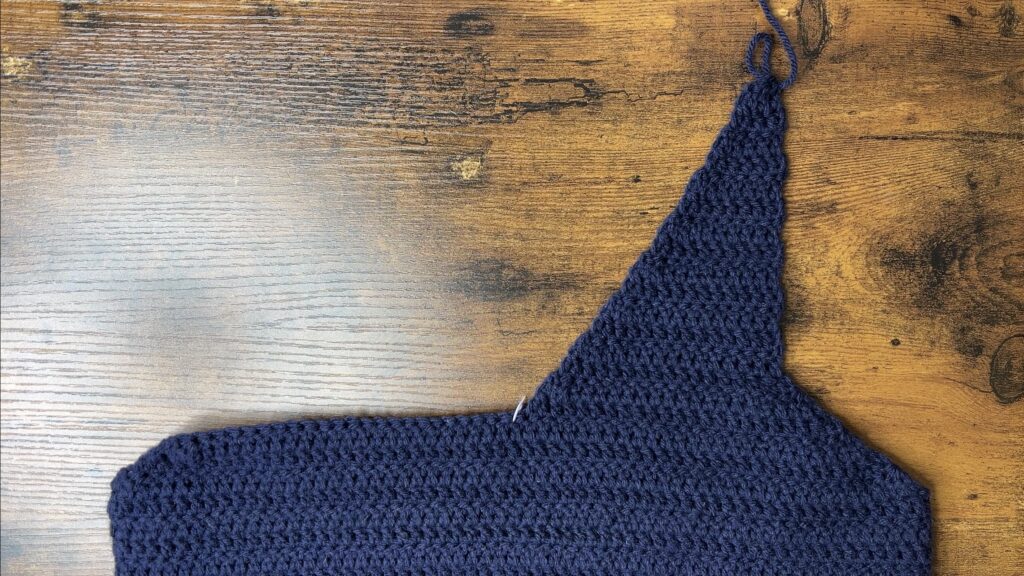
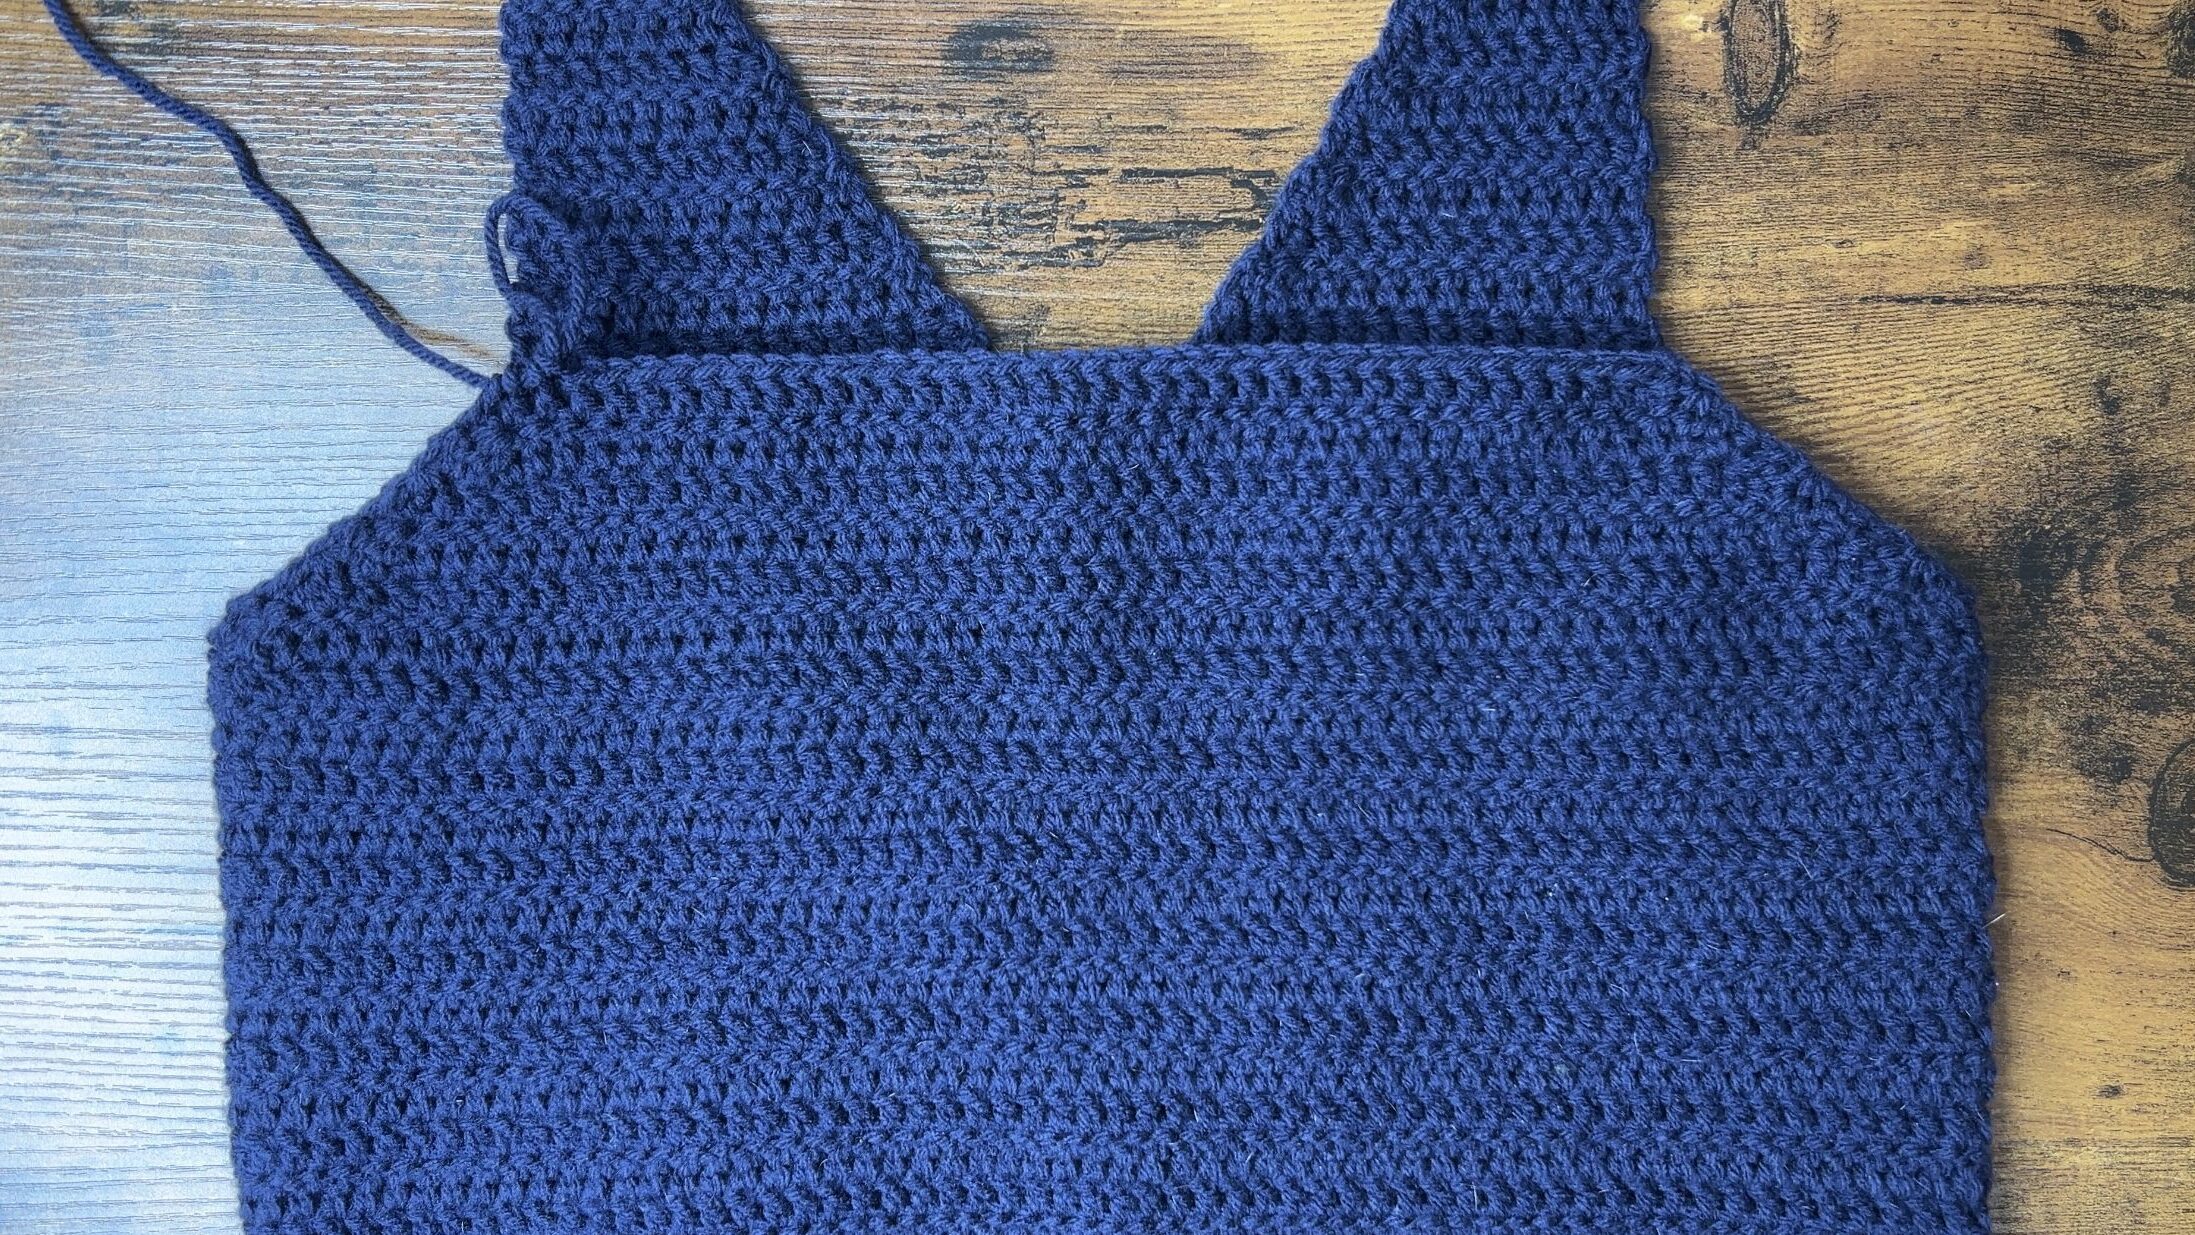
Front Armholes
Now, we’re going to make the space for our armholes and, instead of working in the round, we’re going to work in rows for just the front of the sweater vest. We’ll split the 120 stitches in half and work over 60 stitches for the front panel.
Mark the stitch after the 60th stitch for the next row.
Row 1: ch2, turn, dc3tog, dc across leaving 3 before st marker, dc3tog (56)
Row 2 – 3: ch2, turn, dc3tog, dc across leaving last 3 st, dc3tog (52, 48)

If you want the neckline to be higher, you can add more rows before starting it. And if you bring the armholes in far enough before you start the neckline, you can skip the decreases at the armholes when shaping the neckline.
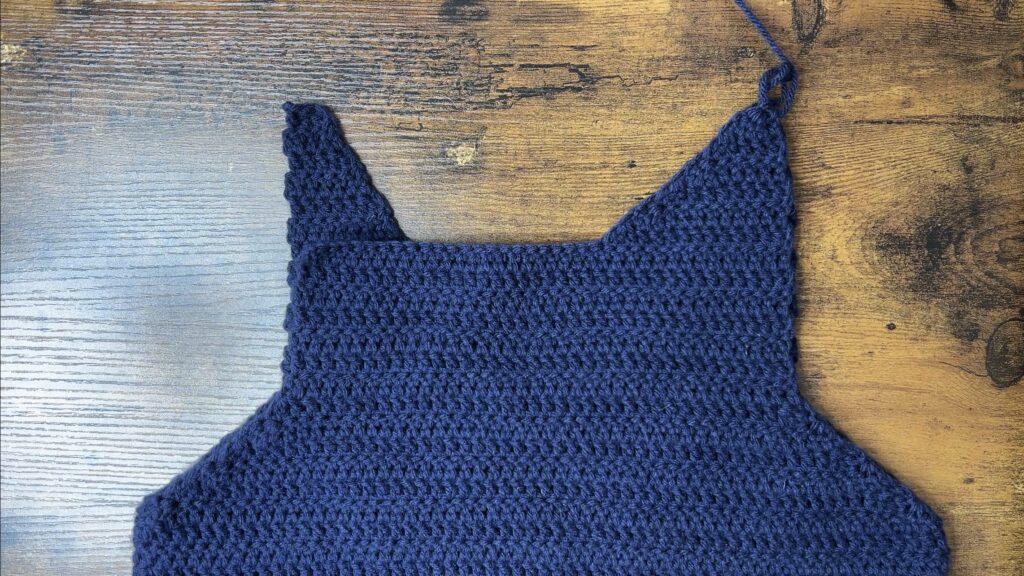
Front Neckline 1
Now, we can start shaping the v-neck. Since our last round has 48 stitches, we’ll divide it in half so each side of the v-neck has 24 stitches.
Mark the stitch after the 24th stitch for the next row.
Row 4: ch2, turn, dc3tog, dc across leaving 2 before st marker, dc2tog (21)
Row 5: ch2, turn, dc2tog, dc across leaving last 3 st, dc3tog (18)
Row 6: ch2, turn, dc3tog, dc across leaving last 2 st, dc2tog (15)

Now, the armhole has been brought in far enough and we can stop decreasing on the side with the armholes. We will continue decreasing at the side with the v-neck.
Row 7: ch2, turn, dc2tog, dc across (14)
Row 8: ch2, turn, dc across leaving last 2 st, dc2tog (13)
Rows 9 – 19: Rep rows 7 – 8 (12, 11,…, 2)
If you want to lower the neckline and make the overall sweater vest longer without making the neckhole bigger, you can do regular rows with no decreases.
And just a note, the sweater vest you see in the beginning of the tutorial and in the thumbnail has 5 of these extra rows with no decreases, so it’s a little longer. The rest of the tutorial is shown without these extra 5 rows, but it doesn’t make much of a difference for the rest of the tutorial.
Row 20 – 24 (not in tutorial): ch2, turn dc across
Fasten off, leaving long tail. We’ll use this tail to sew the shoulder seam.
Front Neckline 2
This portion is just mirroring the other side.
Row 4: Attach yarn to st marker, ch2, dc2tog, dc across leaving last 3 st, dc3tog (21)
Row 5: ch2, turn, dc3tog, dc across leaving last 2 st, dc2tog (18)
Row 6: ch2, turn, dc2tog, dc across leaving last 3 st, dc3tog (15)

Row 7: ch2, turn, dc across leaving last 2 st, dc2tog (14)
Row 8: ch2, turn, dc2tog, dc across (13)
Rows 9 – 19: Rep rows 7 – 8 (12, 11,…, 2)
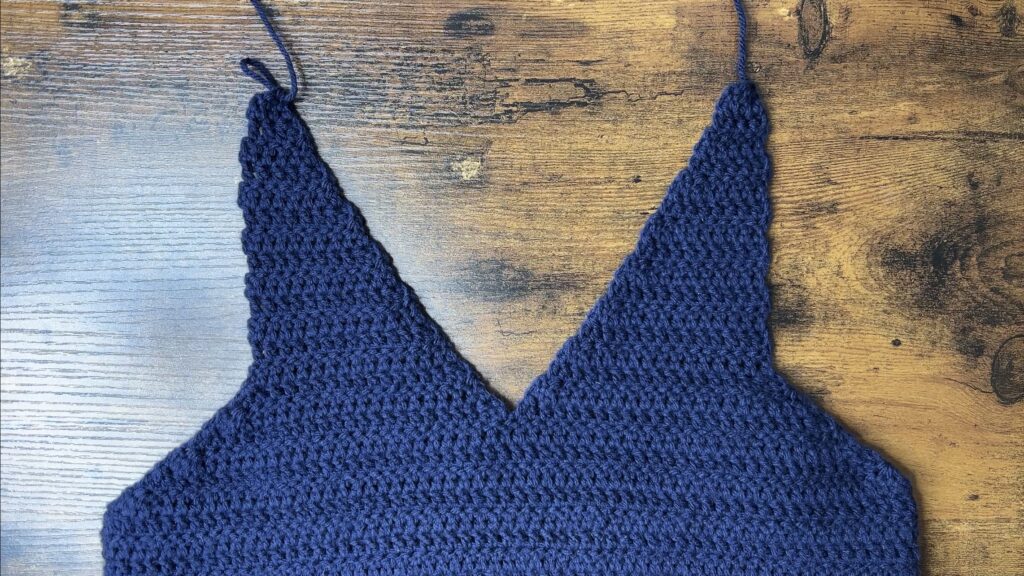
Row 20 – 24 (not in tutorial): ch2, turn dc across
Fasten off, leaving long tail. We’ll use this tail to sew the shoulder seam.
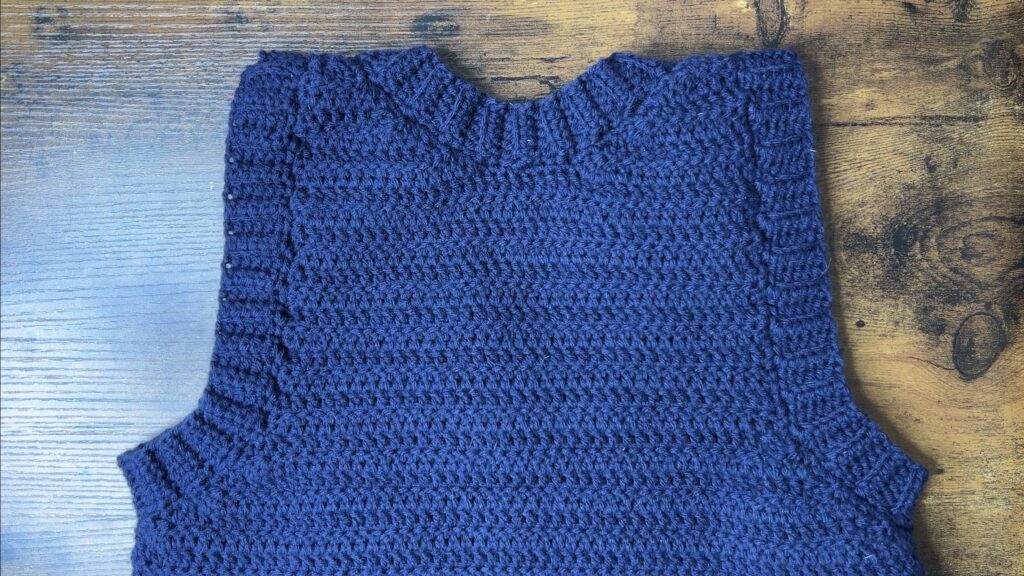
Back Armholes
Row 1: Attach yarn to 61st st, ch2, dc3tog, dc across leaving last 3 st, dc3tog (56)
Row 2 – 6: ch2, turn, dc3tog, dc across leaving last 3 st, dc3tog (52, 48)
Row 7 – 13: ch2, turn, dc across
Note: I did an extra 5 rows for a total of 18 for my final sweater vest (not shown in tutorial)
Back Neckline 1
Now, we can shape the back neckline, and I’ll do it by double crocheting 3 stitches together at the middle. We need to determine how many stitches we need before we do a double crochet 3 together.
Since we have 13 rows so far for this back panel and we have 19 total for the front, we need 6 more rows. And since we ended with 2 stitches on the front panel, we need to end with 2 stitches at the end of the 6 rows. The decrease removes 2 stitches per row, so 6 rows will remove 12 stitches. That means, we need to start with 14 stitches to have 2 at the end.
We’re going to do 11 double crochets, then a double crochet 3 together. Then, we’ll do the 6 rows with the decrease only at the neckline.
Row 14: ch2, turn, dc in each of next 11 st, dc3tog (12)
Row 15: ch2, turn, dc3tog, dc across (10)
Row 16: ch2, turn, dc across leaving last 3 st, dc3tog (8)
Rows 17 – 19: Rep rows 15 – 16 (6, 4, 2)
Row 20 – 24 (not in tutorial): ch2, turn dc across
Do not fasten off. We’ll have less loose ends when we pick this back up later when we do the armhole ribbing. If you prefer 2 extra loose ends over leaving the yarn attached, you can fasten off now and attach is back here later on.
Back Neckline 2
This portion is just mirroring the other side.
Row 14: Attach yarn to 14 st from left, ch2, dc3tog, dc across (12)
Row 15: ch2, turn, dc across leaving last 3 st, dc3tog (10)
Row 16: ch2, turn, dc3tog, dc across (8)
Rows 17 – 19: Rep rows 15 – 16 (6, 4, 2)
Row 20 – 24 (not in tutorial): ch2, turn dc across
Do not fasten off. We’ll have less loose ends when we pick this back up later when we do the armhole ribbing. If you prefer 2 extra loose ends over leaving the yarn attached, you can fasten off now and attach is back here later on.

Sewing Shoulders
With the long tails end from the front side, whip stitch the 2 st on the front panel to the st on the back panel to connect the tops of the shoulders together.
Neckline Ribbing
Before doing the ribbing, we’re going to do a single crochet border to make the ribbing a little easier. This is optional; if you want, you can skip this row and do the ribbing straight into the side of the rows.
Optional: Using yarn still attached along neckline, ch1, sc around neckline, doing 2 per row, sl st, fasten off (128)
Now, we’ll do the ribbing. I chose to do 5 half double crochets in each row of my ribbing, but you can make it shorter or longer if you want.
Row 1: Attach yarn to 5th st to the right of the V-neck point, ch1, hdc across each of the next 5 st, sl st
Row 2: sl st2tog, turn, hdc in blo across
Row 3: ch1, turn, hdc in blo across, sl st
Row 4 – 67: Rep rows 2 – 3 all the way around neckline, doing sl st3tog instead of sl st2tog every 3rd time
I’ve found that alternating in a sl st3tog every 3rd time results in the ribbing being stretched just the right amount. If yours is too loose, you can do slip stitch 3 togethers every 2nd time, and if it’s too tight, you can do the slip stitch 3 togethers every 4th time.
Fasten off with long tail end.
Sew the top of the last row to the side of the first 3 rows.
Armhole Ribbing
Using yarn still attached along armhole:
Optional: ch1, sc around armhole, doing 2 per row, sl st
I made the armhole ribbing the same width as my neckline ribbing (5 hdc), but you can adjust the width by adjusting the number of chains in the first row.
Row 1: ch6, hdc across, starting in 2nd ch from the hook, sl st (5)
Row 2: sl st2tog, turn, hdc in blo across
Row 3: ch1, turn, hdc in blo across, sl st
Row 4 – 56: Rep rows 2 – 3 all the way around armhole, doing sl st3tog instead of sl st2tog every 3rd time
Attach yarn to other armhole and repeat ribbing.

Finishing
Make sure that all loose ends are knotted and pull them to the inside of the sweater vest to hide.
Weave in all loose ends securely.
Now, your crochet sweater vest is complete!
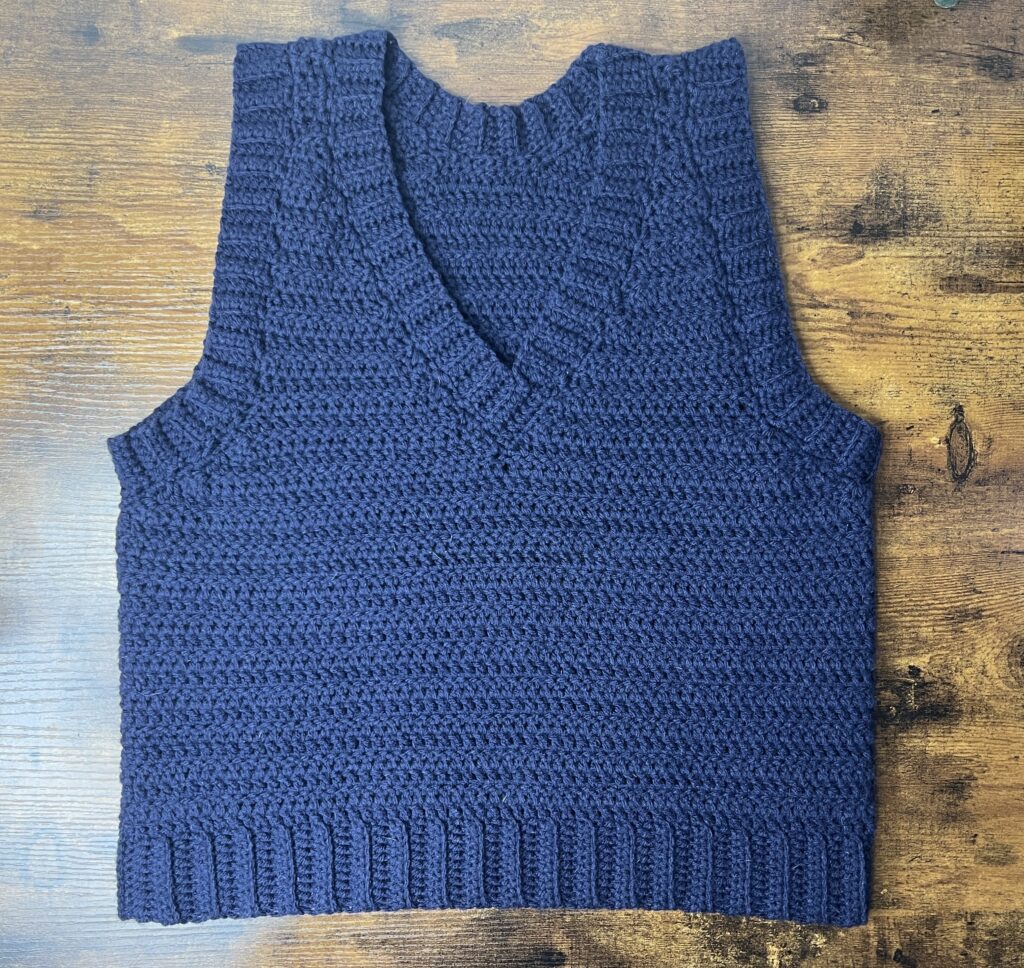
The finished sweater vest with those 5 extra rows measures about 40.5 centimeters wide and 48 centimeters long. With 5 rows less, it is 42 centimeters long.
Additional Dimensions
Width across shoulders: 29 centimeters
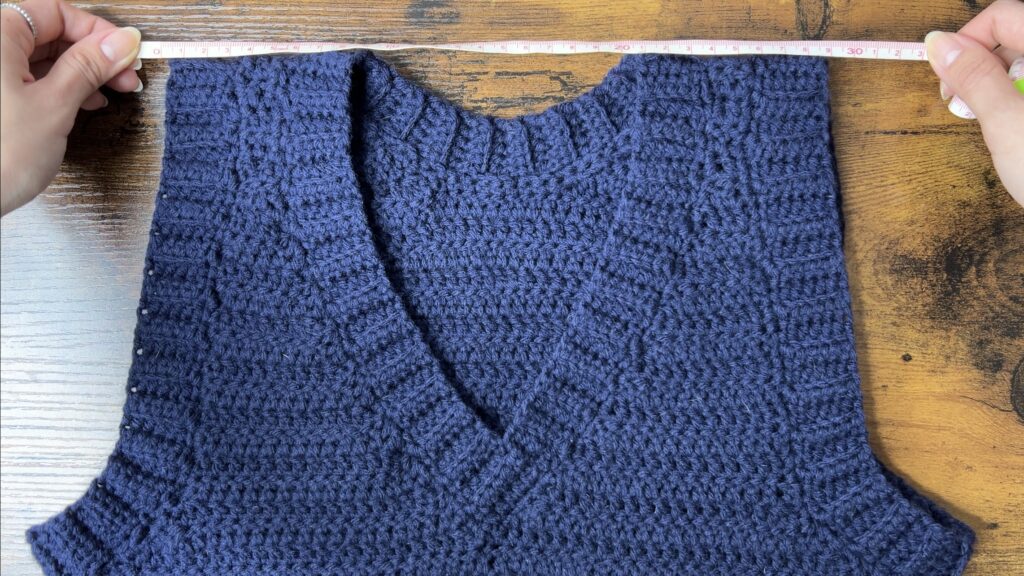
Neck hole width: 13 centimeters

Neck hole length: 17 centimeters
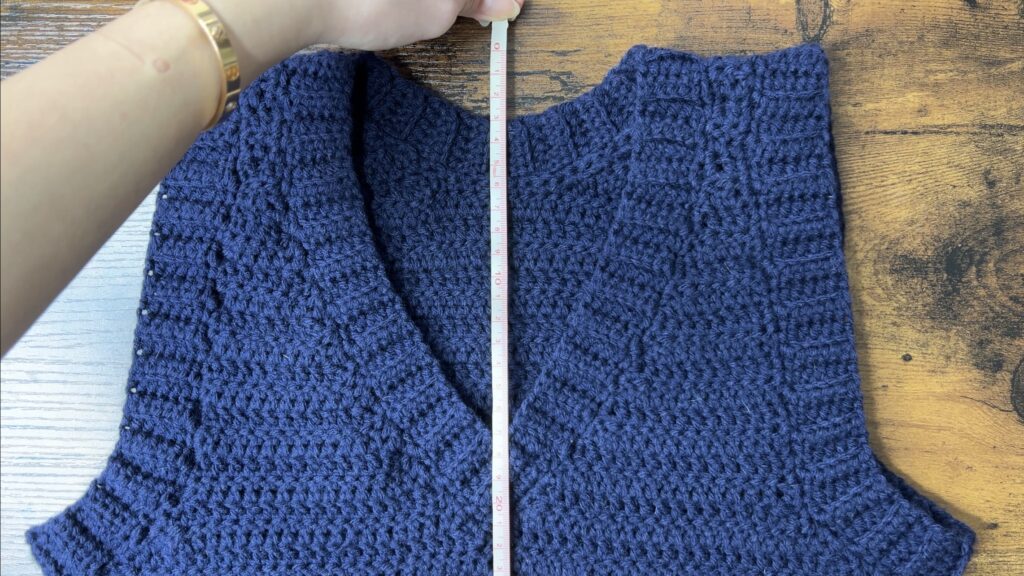
Armhole length: 20.5 centimeters


This pattern was great! I did modify it somewhat because Viv is a size 0 and I most definitely am not but I was pleased with the outcome. I would post a pic but the website isn’t allowing or else I can’t figure out how.
I love this pattern, it is very well written and easy to follow. The video tutorial is a great reference! Looking forward to trying more of you patterns!
How do I obtain a printed pattern? Thank you!
Hi! Just wanted to let you know I featured your awesome V-neck vest pattern on Crafts on Display today, hope you enjoy it – https://craftsondisplay.com/crochet/crochet-vest-patterns-194188/
I’m working on the body of the sweater vest and it’s arching a lot since I’m crocheting directly into the ribbing. Do you have advice on how to straighten it out?
First off, this is a lovely pattern, tysm for sharing it!
A question – I’m currently doing the single crochet border before the ribbing, and you say to put 2 stitches in the side of each row. Do I put 2 single crochets over each double crochet when the “rows” connect back to the body and I reach the lowest part of the back collar? Or do I just put one stitch per for those since I’m working directly the top of them and not the sides? Thank you so much in advance!
hi vivid
love the great pattern.
thank you.
my daughter in law would like this for her daughter.
wondering how I adapt it to fit a 12 month old ? thank you
Merrill
Hi, my piece seems to get wider after the ribbing (in the body). I’m using Loops and Threads with a size H hook. My count is correct of 120 stitches. Any idea what would cause it to get wider ? Ty
Hi Viv! If I am modifying this for size L, I have 96 ribbing at the bottom. How would I change the armhole shaping – if at all? Please let me know. Thanks
Hello, im trying to make one with different color for ribbing, so i did half color change for the sc, but i did one per row instead of two. is it okay? or do i have to redo it? thanks
Hi! Did you switch the hdc to sc for the ribbing? If so, I would do 1 dc into the side of each row. Also, I’m not sure what you mean by half color change. If you want the ribbing to be a different color, you only need to change colors when you start the body.
Do you have any pictures with the 5 extra rows on the neckline?
You can see it at the 15 minute mark in the YouTube video
Lastly, I didn’t realize you said the chain 2 doesn’t count as a double crochet but I have. Will that matter?
If your stitch count is correct, you should be fine.
But, you would usually chain 3 if you’re counting it as a double crochet, so chain 2 means your first stitch is slightly shorter than the rest. That might make it a little uneven in the end.
I’d I have to do less rows will that change other dimensions of the vest?
Yes, but you can change the number of rows you do to match my measurements! The additional measurements are at the bottom of the page
I have done 80 rows for the ribbing and it is way longer than yours. I used a different yarn that is a 4 weight but usually calls for a size 6 hook. I used the size 5 hook anyway. I thought my tension wasn’t that loose. Do you suggest just doing less rows?
Your yarn is probably just thicker than the one I used. Yes, you can just do fewer rows!
That was my thought. I’m using lion brand pound of love.
When you were measuring your ribbing did you have it folded in half or was it the full length? I was watching your video tutorial and couldn’t figure that out.
I measured it to be 33cm folded in half, so total is 66cm. Sorry if it was unclear!
In the end section above where you give dimensions you say width is 40.5 cm but in this response you said 33 cm – I’m confused
Putting stitches into the side of the ribbing will stretch it out. You don’t want to do your ribbing too long or it’ll flare out. Sorry for the confusion!
Thank you sm… I made a small sized sweater vest tht cud fit my huge soft toy. Ur pattern was really clear and helpful.
So happy to hear that! Thank you!
Do u have a tutorial for a child’s size vest?
Hello, I was wondering if added more rows to the body of the vest will have to adjust the instructions for shaping the arms or can I I follow your instructions?
Yes, you can add rows and still follow the rest of the pattern since your stitch count will not change!
Hey, I’ve been really enjoying this pattern and have just finished the neckline ribbing, but it’s come out with lots of bunching. In hindsight I should’ve done the sl st3tog every 2nd row instead of every 3rd, but now that I’ve finished I’d really rather not redo the whole neckline as it took ages! Is there any way I can fix this now, or do I have to redo the neckline ribbing from the start? Thanks!
Hi! I’m sorry, but this type of ribbing technique requires you to undo it.
I already did start doing the neckline and arm holes earlier. Mostly using your measurements as a guide rather than rows. I am thinking of maybe just barely decreasing when I come to the neckline and arm holes. I guess my question is what is the measurement of the body to the top where you are at the shoulders?
Sorry for the late reply! It’s about 25cm from the top of Row 17 to the top of the last row.
hi! I started this but my tension is not as tight as yours so mine ended up being initially 64 rows instead of 80. It still measured similar to yours length wise, actually a little longer. but because my initial rows are smaller, I’m now at the neckline and having a super hard time because I do not have nearly as many rows to work with. would love some guidance!
Hi! It sounds like your tension is much looser than mine, so your total number of rows will be lower. You would have to start shaping the armholes and neckline earlier and do less decrease rows. I’m not sure if that answers your question; if not, can you please elaborate?
is there a print for plus size?
No, sorry! This pattern is made-to-measure. The length of your ribbing will determine the size!
Hey,
I normally wear xs/s and I want it to be oversized (like a M/L) how do I increase it? 🙂
Hi! The size is determined by how many rows you do for the ribbing, so you should do more than 80 rows (if you’re using the same yarn and hook as me). Maybe try 96 rows? Remember it must be a multiple of 8!
Thank you, very much!
Hi, how much yarn did you use for this size? Thank you
Hi! I used 226 grams of yarn!
Hi, first of all, thank you for the great tutorial! I just finished the neckline ribbing but I don’t know how to start the armhole ribbing since the tutorial doesn’t explain that part. My first thought would be to chain five after finishing the single crochet border and then continuing with the hdc, is that correct?
Sorry, I should have specified. I edited the post to include it! It is chain 6, so you have a turning chain
Oh right, thank you so much for the quick reply!
No problem!
What size is this vest? Do you have any suggestions for increasing the size? I wear a women’s medium (size 8 – 10?). I love this pattern but don’t want it to be too snug. Thanks.
It’s an x-small (0-2)! The number of rows you do in the ribbing will determine the size. I would do slightly shorter than the circumference you want since it will stretch slightly once you put in your stitches along the side.