Easy Crochet Ribbed Beanie for Beginners | Free Pattern & Video Tutorial
See the free crochet ribbed beanie pattern and video tutorial down below or purchase an ad-free, printable PDF file of this pattern!
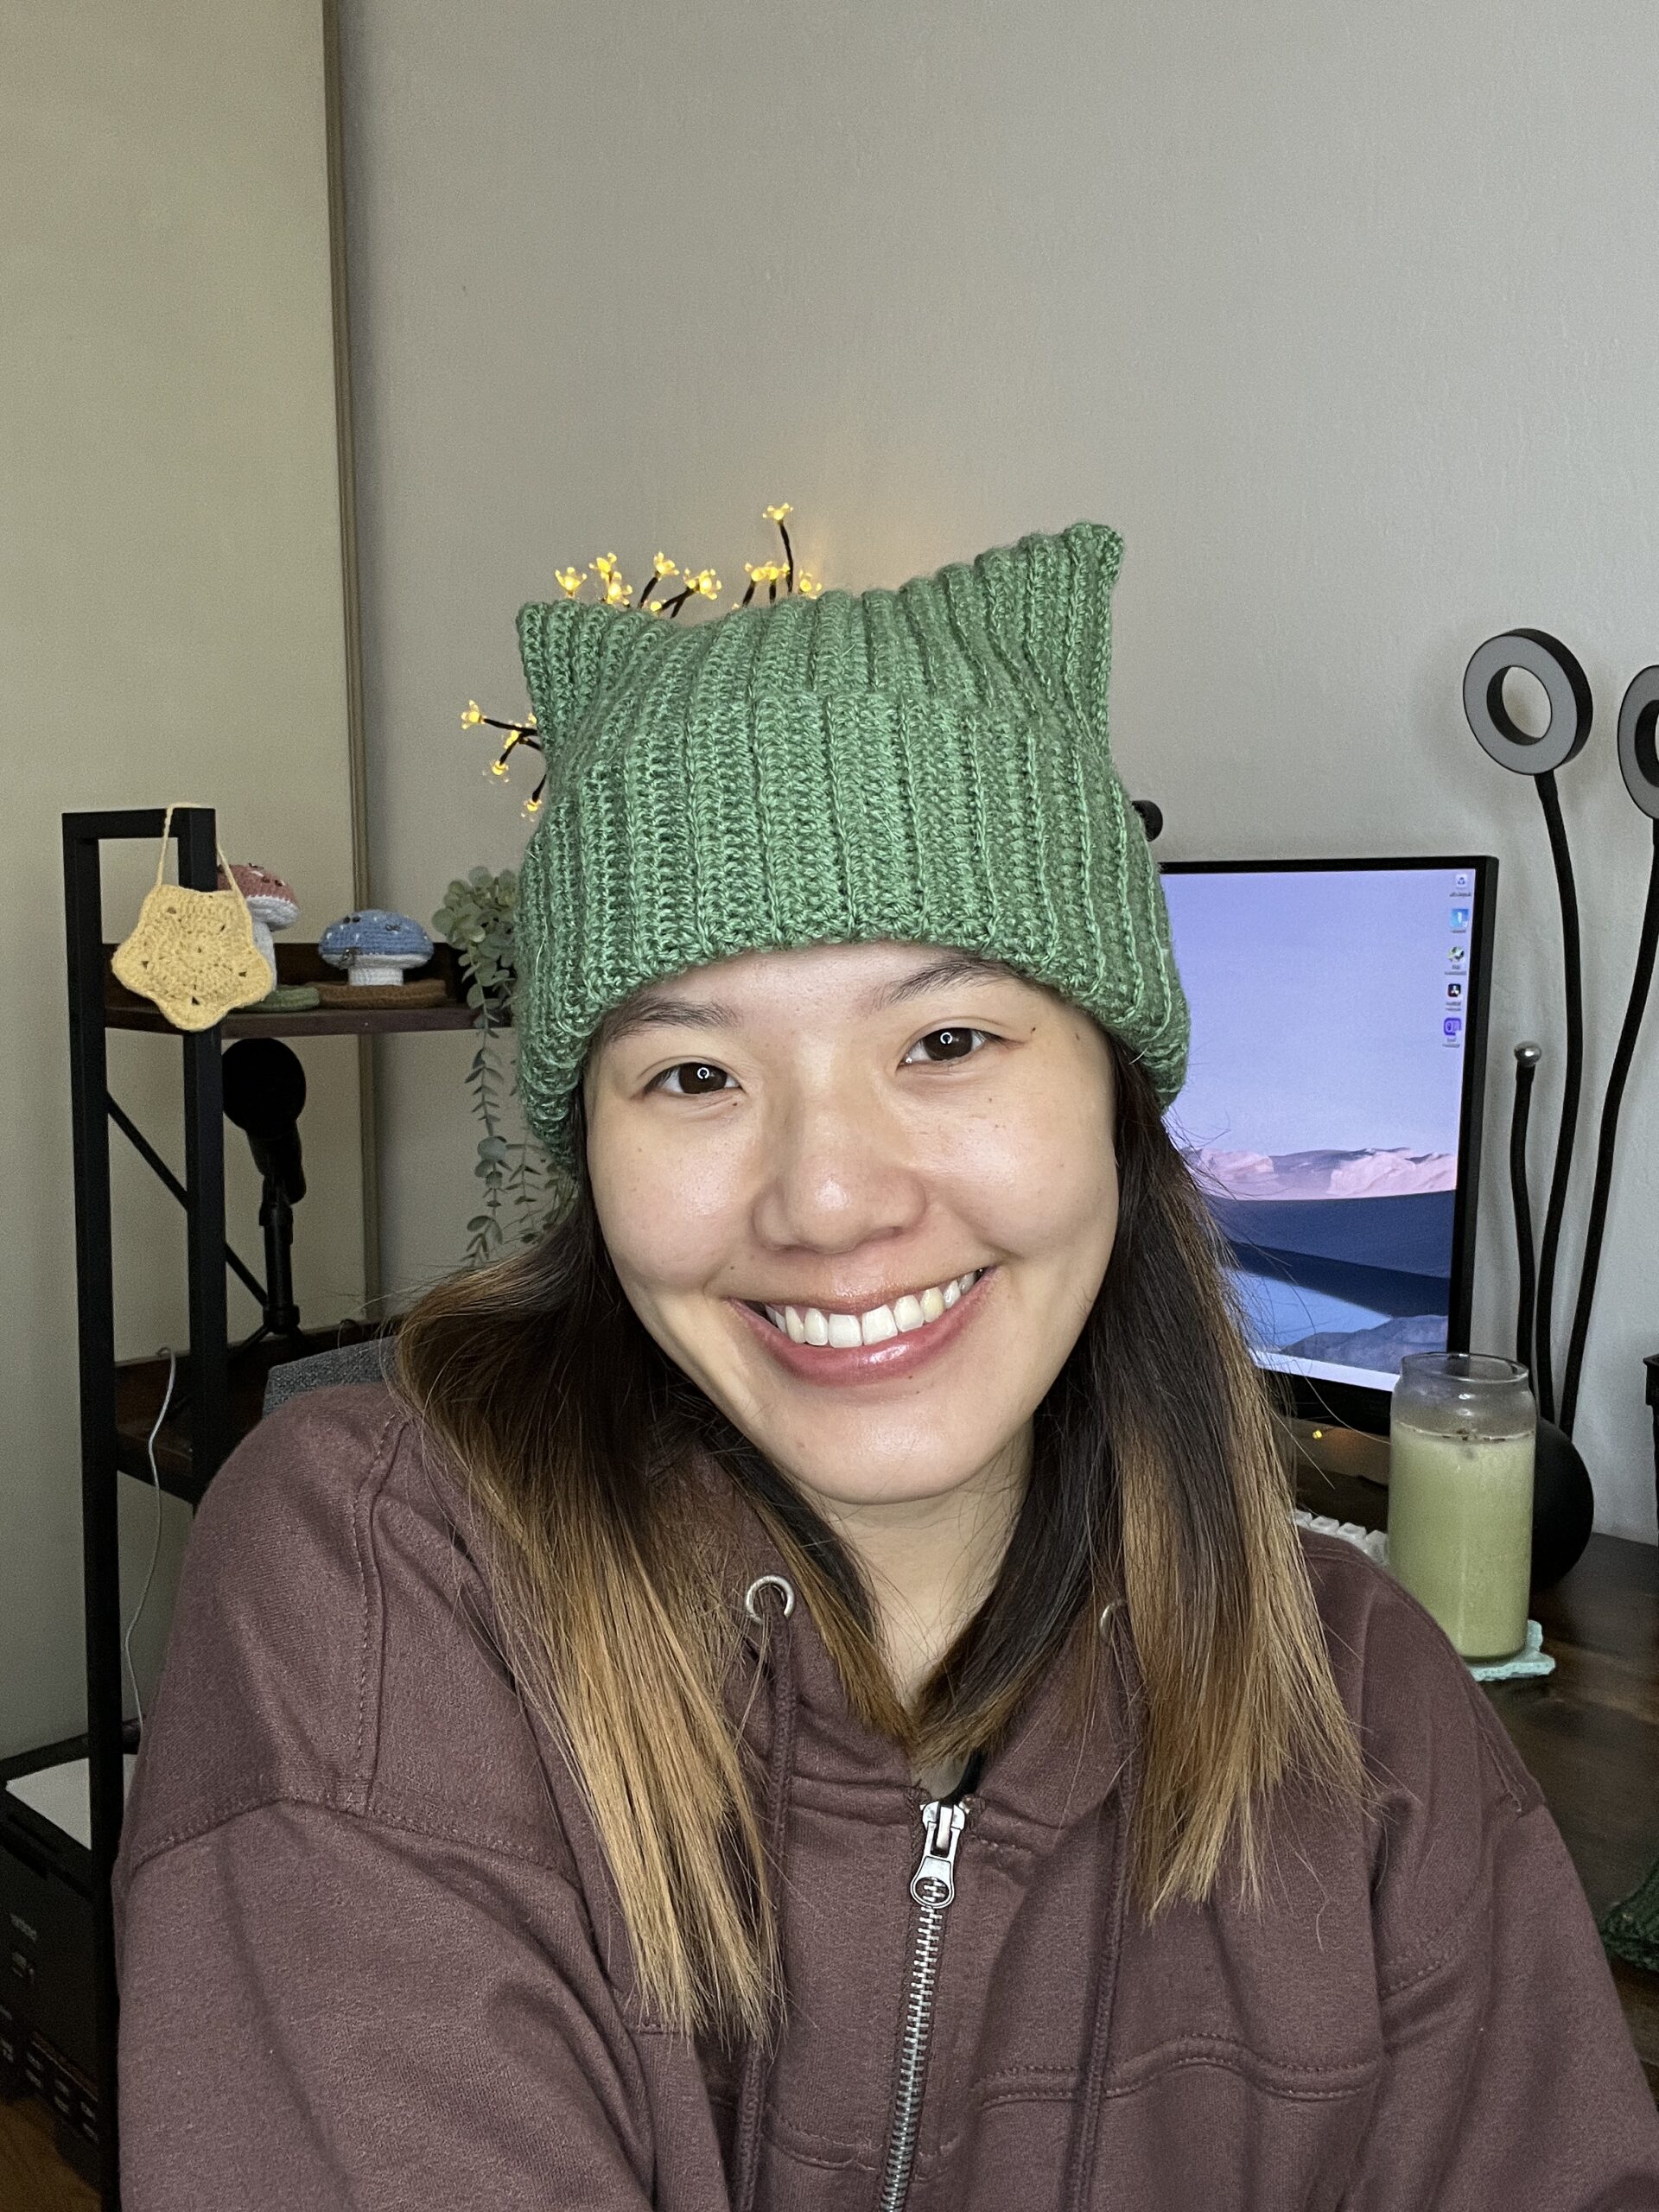
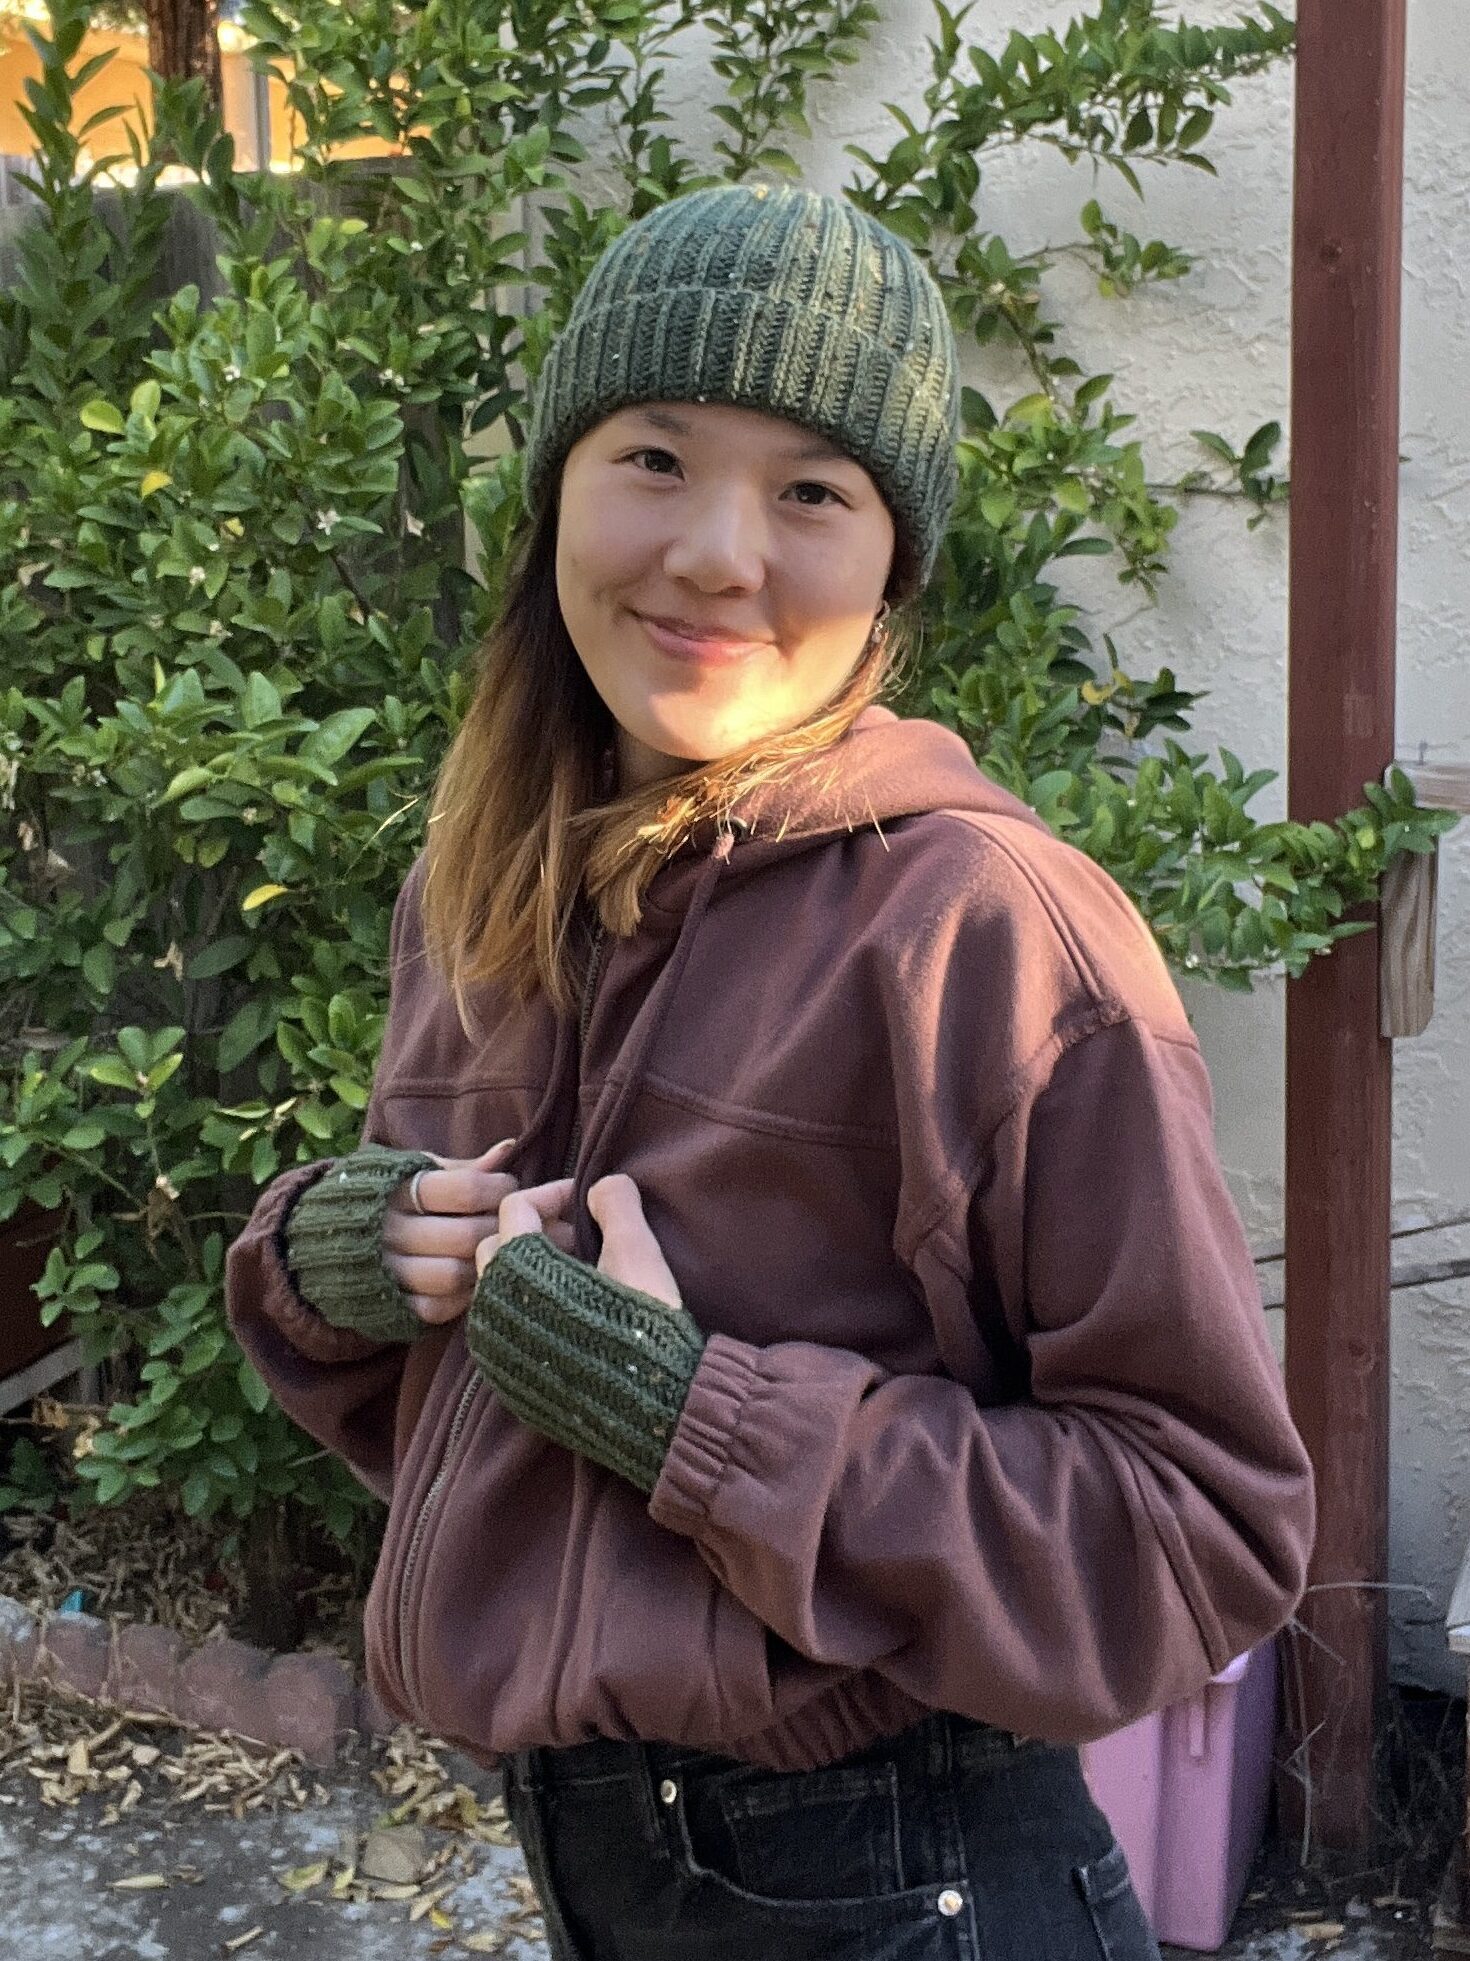
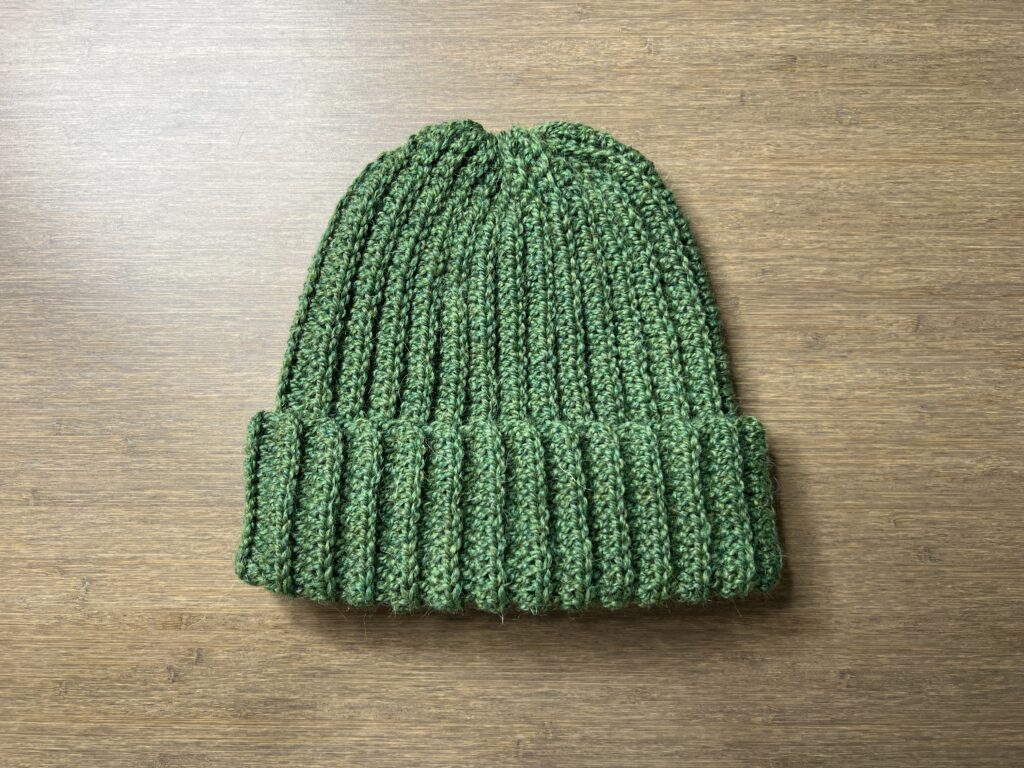
This crochet ribbed beanie is a classic and minimal beanie that looks knit. It doesn’t have that thick bunching at the top that crochet ribbed beanies tend to have and this project is great for all crocheters learning this technique. This short and simple crochet beanie pattern will give you a perfect-fitting, stylish beanie to wear when it’s cold out!

Crochet Beanie Without the Bunching
If you’ve ever crocheted a ribbed beanie without the technique used in this pattern, you might have noticed that the crown of the beanie gets thick and uncomfortable and makes your head look a little longer than it is.
This pattern accounts for that and uses smaller stitches on the crown end to prevent that bulk. This also makes closing up the top of the beanie much easier.

Beginner Crochet Project
This pattern is similar to my no-bunch beanie pattern from over a year ago, but this one is even easier. I received many comments on that video about how the slip stitches were difficult for them, so I removed them completely.
Instead of slip stitches, we’re doing single crochets. And we’re no longer lining the brim with slip stitches to make the pattern easier and to keep beanie stretchy.
If you’re an absolute beginner, make sure to view the tutorial for instructions on how to do each individual stitch. Also, please leave any questions in the comments if you have any!

For another absolute beginner beanie tutorial, check out this cat ear beanie! Or, if you want to try a different stitch, try the camel stitch beanie.
Sizing
There are two things in this pattern you can change to change the size of the beanie: the number of chains in the beginning and the number of rows at the end. The number of chains affects the vertical length of the beanie while the number of rows affects the circumference.
The beanie made in this pattern fits me perfectly! For reference, I have a 53-centimeter circumference head. Remember that using a different yarn, hook, and tension will likely result in a different-sized hat. So, make sure to measure as you go!

This post may contain affiliate links. I may earn a small commission on qualifying purchases at no additional cost to you!
Project Overview


Choosing Yarn & Hook Size
I used Upcycle Alpaca Blend for my yarn, but that has since been discontinued. I would recommend using Wool of the Andes Worsted instead. They are from the same yarn brand!
The yarn I chose for my beanie is a blend of alpaca, wool, and acrylic. This resulted in a very warm and stretchy beanie, which is exactly what I wanted. If that is also your goal, then I recommend sticking with these three fibers. For a cooler, more breathable beanie, then a cotton and acrylic blend will do well.
You probably don’t want your hair to show through the spaces between the stitches or you want a warm hat to wear in the winter. So, I would recommend sticking with the recommended hook size on your yarn label. If you do get spaces, consider sizing down your hook size.

Other Projects You Might Like

Crochet Beanie Video Tutorial
Become a member to get early access to new videos!
You can follow along with my YouTube video to make your own crochet ribbed beanie! I have timestamps included to section the video and help you jump to any point you need to!
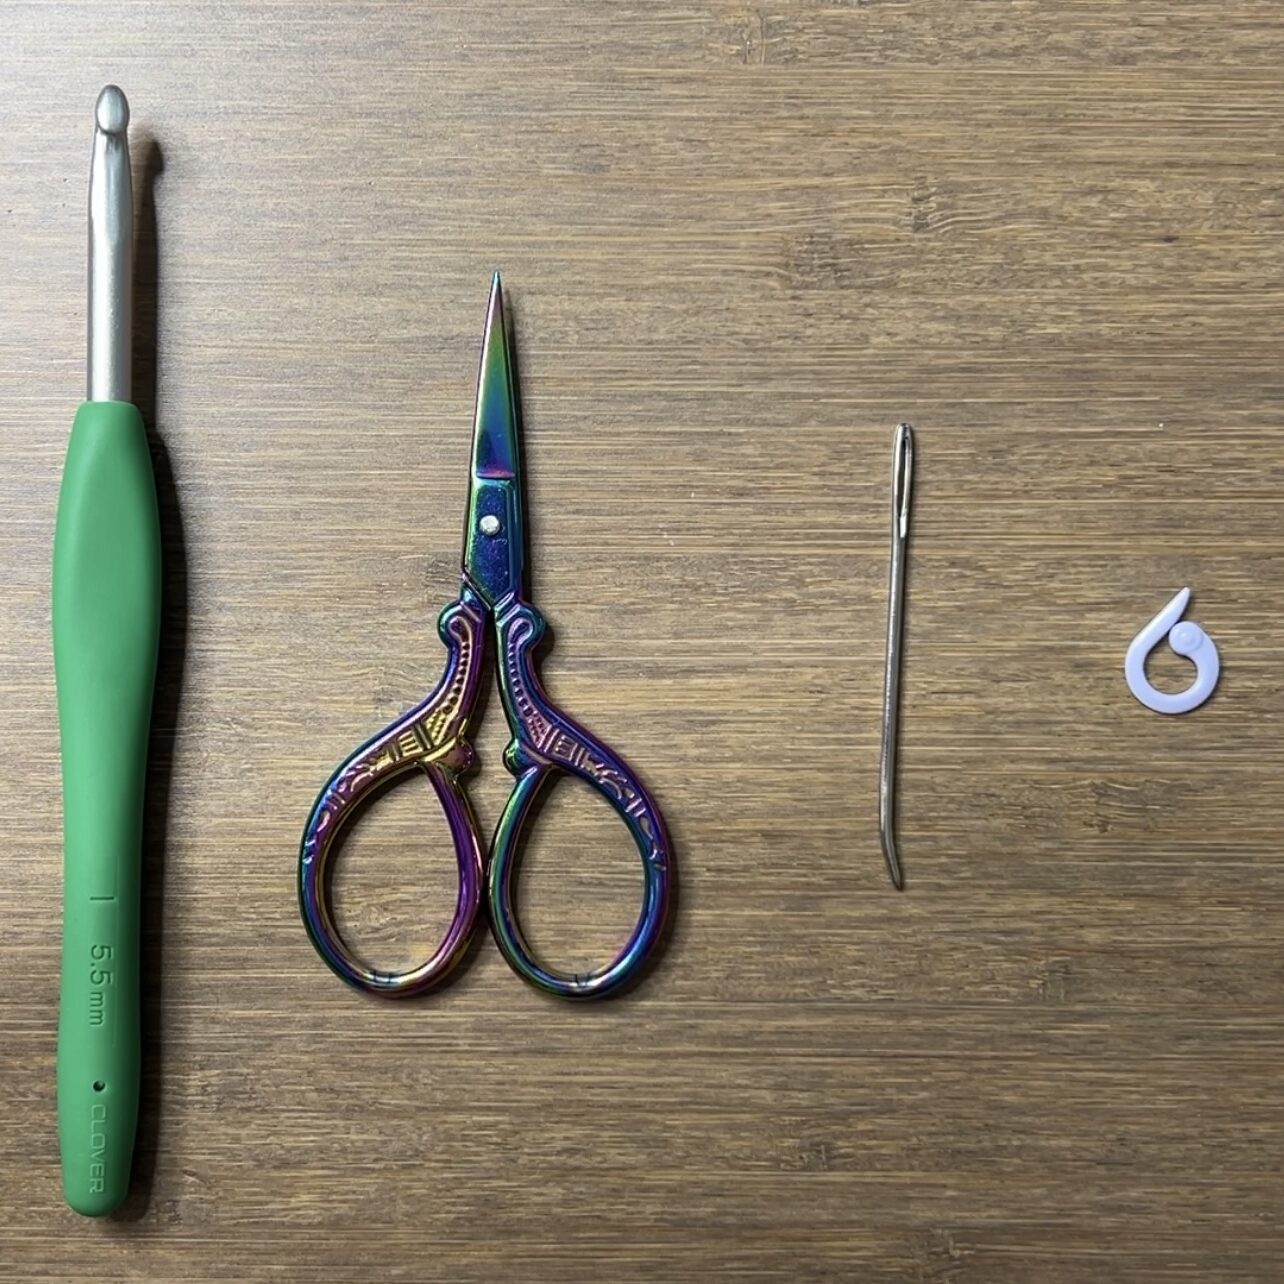
Materials
- 90 grams of worsted weight yarn (Upcycle Alpaca Blend in “Grass”)
- 5.5mm Clover Amour crochet hook
- Scissors
- Yarn needle
- Stitch marker (optional)
- Tension ring (optional)
- Yarn bowl (optional)

Dimensions
Rectangle width (brim side): 34.5 centimeters (13.6 inches)
Rectangle width (crown side): 25 centimeters (9.8 inches)
Rectangle length: 25 centimeters long (9.8 inches)
Fits circumference: 50-55 centimeter (19.7-21.7 inches)
Gauge
14 rows of 20 half double crochets makes a 10 x 10 centimeter square
Notes and Tips
- This pattern is written using US crochet terms
- The chain 1 at the beginning of each row/round does NOT count as a half double crochet or single crochet
- Use a stitch marker to separate the half double crochets from the single crochets
- If you don’t have stitch markers, bobby pins and safety pins work, too!
- Italicized notes tell you what to change to adjust the size
Abbreviations
ch = chain
blo = back loop only
flo = front loop only
hdc = half double crochet
rep = repeat
sc = single crochet
sl st = slip stitch
st = stitch
Crochet Ribbed Beanie Pattern
Foundation: Make a slipknot, ch50+1
Note: For the perfect fit, make your chain the length from the crown of your head, down to your eyebrows, plus the width of the brim that will fold up. Do fewer chains for a shorter beanie or more chains for a longer beanie.


Row 1: hdc in 2nd ch from hook and in next 44 ch, sc in last 5 ch (50)
Note: If you did a different number of chains for the foundation, divide that number by 10 and round to the nearest number. Do that many sc in each row instead of the 5 I do.

Row 2: ch1, turn, sc blo in next 5 st, hdc blo in last 45 st (50)

Row 3: ch1, turn, hdc blo in next 45 st, sc blo in last 5 st (50)
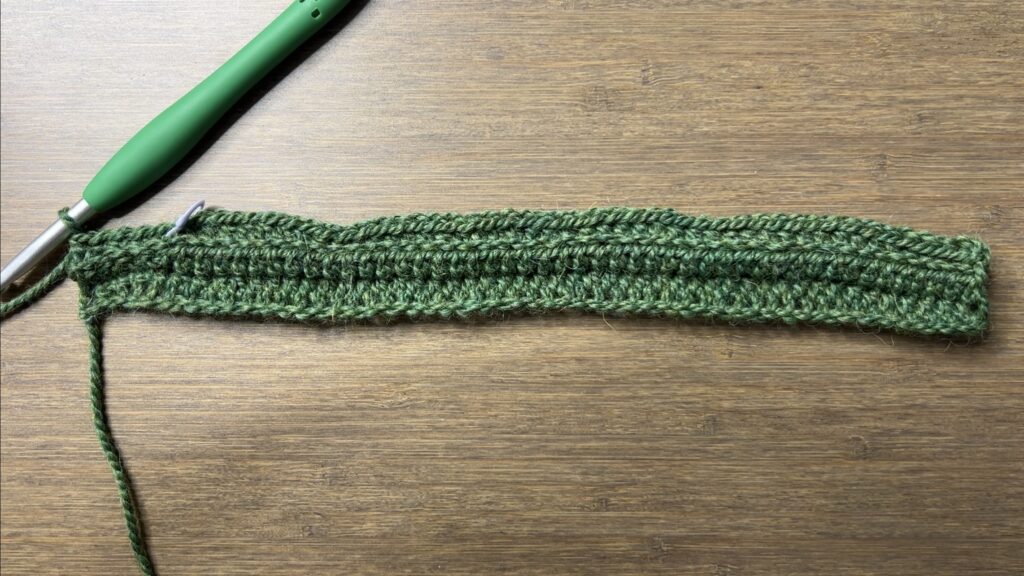
Rows 4-54: rep[Row 2, Row 3]
This means Row 4 is a repeat of Row 2, Row 5 is a repeat of Row 3, Row 6 is a repeat of Row 2, and so on.
Note: To test if the beanie will fit you, fold up the brim on the hdc side and wrap the rows around your head. You should need to stretch it a little to fit. Do fewer rows for a smaller size or more rows for a bigger size. Stop after an even number of rows so you end on the hdc side.

Stitching Ends Together
ch1, turn, sl st in the flo across to connect the last row to the first row, fasten off with a long loose end about 25cm/10in long
If you prefer to sew instead of slip stitch, fasten off with a 75cm/30in long loose end, sew the last row to the first row, lining up the stitches, and tie a double knot at the end.

Gathering the Top
With your loose end, gather the top of the beanie by going under a loop at the sc end of every other row, and pull the yarn tight.
Tie a tight double knot with the two loose ends.

If the hole isn’t closing completely, sew over the hole a few times in different directions, pull it tight, and tie another knot.
Finished Crochet Ribbed Beanie
Weave in your loose ends and your crochet beanie is finished!

Nowhere in the written pattern does it say to work the stitches in the back loop only to create ribbing, it’s only said in the video. A little confusing for someone who did not see the video tutorial. My first few rows came out completely flat before i frogged it and referred back to the video. Small inconvenience but it did annoy me. Other than that it came out pretty good. Thanks
I don’t know how I missed that, I’m so sorry! I edited the pattern. Thank you for letting me know!
Hi,
I just finished this pattern using Berroco lustrations Wool worsted.
It’s got a very nice texture, love the ribbing, but the crown is very bunched, more so than I expected based on the pics of the green hat.
Do you think the yarn as too heavy, or is I made 10 single crochets at the crown, or maybe using slip stitches at the crown is what is needed for heavier yarn?
I’m really unsure. Any advice please.
Chris
Hi Chris!
I don’t think the yarn you used is the problem. I would expect the sizes of the stitches to be proportionate and balance out.
The bunching usually happens if you do a lot of rows. Did you happen to do a lot more rows than I did?
And yes, you should be able to fix it by doing slip stitches instead!
I redid the whole hat. Same yarn, Berroco ultra washable wool, but started with 48 stitches, which made it 10”, and used 8 stitches at top with slip stitch instead of single crochet. Made 54 rows. Now it fits much better.
Nothing like frogging!
It’s a lovely hat, thanks so much for posting it.
Thanks for the update! I’m happy to hear it worked out!!
Hey Viv! I love this pattern! I just finished a hat for my daughter and it’s my new favorite hat pattern!! Thanks for sharing it!
Hi Allison, I’m so happy to hear that! It means a lot!!
Hello! I love the look of this beanie! Advice on where I went wrong is greatly appreciated as I’d like to make more. It’s a fun pattern! I followed along and added 5 ch (so 55 plus 1). My length is 17 inches, so it is way too long, and of course I didn’t measure and just trusted myself. So I’m using a size 4 yarn, and 5.5 hook… I don’t think my tension is too loose…but perhaps that’s it? I’d send a photo if that helps?
I am thinking of double folding the brim and sewing it down, but might look too bulky. Thanks for sharing your pattern!
Hi, thank you! Can I ask what yarn are you using? The yarn I used is more on the thinner side of #4. If the yarn you used is on the thicker side, that may be why it’s so much longer!
It’s Loops and Threads -soft classics
Yes, that yarn is much thicker than what I used! If you don’t mind the double layered brim, then that would be a good idea. Or, you can undo it and do fewer chains in the beginning. Based on 55 stitches being 17”, 33 stitches would be about 10”. Make sure to check after your first row!
Before I make this… how stretchy is this beanie? I am wanting to make a beanie that is stretchy enough to stay on my baldie husband’s head while he’s sleeping. Thanks for your time! Your website is lovely, and your videos are aces!
Thank you!! It’s very stretchy! Just make sure to use the recommended hook size on your yarn or bigger
Thank you for the response and the beautifully documented pattern. I’m going to give this a whirl.
Hi Viv!
I was wondering if it would work with a size 6 yarn? I have Lion Brand Quick and Thick yarn. 😁
Hi! It should work fine, but make sure to follow the notes to edit the pattern. And you can switch out the single crochets for slip stitches!
hello…love the pattern and it turned out very nice. thank you so much. have a happy holiday!!
Thank you! I’m so happy you loved it!! Happy holidays to you, too (:
i didn’t understand the part of “slst” I know i should insert the hook in the FLO but on the other side should i do FLO too? or both loobs??
i didn’t understand the part of “slst” I know i should insert the hook in the FLO but on the other side should i do FLO too? or both loobs??
i crocheted this for my dad as a xmas present! he loved it
That’s so sweet! I’m making one for my dad, too ❤️
Hey Viv! Love the pattern, thank you! Unfortunately, I seem to have made a mistake measuring my insanely big head and now the beanie is quite short. Do you have an idea on how to make the brim longer? I wouldn’t mind adding some rows of a different stitch at the bottom, just unsure what would work…
Hi! Yes, you can do a round of hdc around the brim of the beanie to make it slightly longer. If you need more length, you can add rounds to the crown before cinching it. I would do decreases in single or hald double crochet!
Just watched the video and am excited to make asap . You are so precise in your video easy to follow. Thank you for sharing. Rachel Fabiano
Thank you, Rachel! Let me know if you have any questions!
Hi ! I’m about to make this beanie for a friend bc we both loved it, and so for the first time ever I’m making a gauge swatch to optimise my chances that it’ll fit
I find that I’m way off… I’m using a 5,5mm hook and the yarn linked below (nc I dont think weuse the same weight measurements in France), and it’s already measuring 17cm width for 20 DC ! any advice ?
https://www.happywool.com/p/phil-partner-6-p-12855.html?skuId=42700
Hi Florence, I’m so sorry, but the gauge swatch is meant to be half double crochet, not double crochet. I caught this mistake a while ago and could have sworn I fixed it, but I guess it didn’t save. Again, sorry about that! Hopefully it works out now, and please let me know if you have any more questions!
Thanks for responding quickly !
I’ll try again with half double crochet, but I really had an issue with the width, and not yet the height, I hadn’t completed the square seeing I was way off
Either way, since you supplied the cm length all the way, I think I’ll just measure along as I go ! 🙂
No problem! Yes, your yarn might just be a little thicker than the one I used. You can definitely just match the dimensions instead! Make sure to test out the number of rows you do using the note I have in italics, since not all yarns will stretch the same
Hi Viv! I’m a new crocheter and recently picked up this beanie as my first project 🙂 So far so good your tutorial has been super helpful and informative in helping me complete my first crochet project, I’m super excited to finish (I’m about a 1/3 of the way through.
I was curious is you think this pattern could be adapted to make a horizontal stripe beanie by alternating the colors every 10 stitches for example so that the stitches line up across the beanie. Understand this might be tedious, but I’m trying to go for the knitted beanie look with my meager crochet skills. I saw that you had a striped beanie tutorial but I’m not as big a fan of the “on the round” beanie look
Hi Alexa, happy to hear you found my tutorial helpful! Yes, you could switch colors like that to get horizontal stripes.
Hi! I love this pattern, it is my first project. When I lay it flat before sewing I realize that I have dropped stitches here and there so it is a bit tapered. Is there a way to add stitches to the end of some rows? I saw a few Reddit posts but the tutorials are very confusing. I’d love some help!!
Love this pattern! How would you describe the softness and texture of the beanie you made?
If I want to make a non-itchy, soft wool beanie, do you recommend the Wool of the Andes worsted yarn or another one? Thank you!
Thank you for the pattern! I just finished making one for my dad, who has trouble finding hats that fit! There’s a bit of bunching on the crown, but that was user error I believe. Great pattern!
This is my first project, and wanted to crochet beanies for the whole family. I unfortunately don’t have a 5.5mm hook and I have a 5mm or 6 mm. I bought cloudpaca which is 174yd 1.8 oz, 150m 50g, do you think I should go with the 5 mm or 6mm hook for this project?
Either is fine! I would go with the one closest to what is recommended on the yarn label. Just make sure you follow the notes to adjust the pattern since you’re using different materials!
Thank you Viv! I’m looking forward to making my first crochet project!
Hi! I love all your patterns, including this one. I just made it with the loops and threads classic cotton yarn. I wasn’t sure what type of yarn would be best. I’m having issues with gathering the top. I think I was pulling it too tight because it wouldn’t come together. I ended up sewing it up as you mentioned but I find it has big bumps when I flipped it around, not flat and smooth like yours was. Could this be because of my yarn choice? Any recommendations?
Hey Viv,
I am OBSESSED with this project and have made like 10 of these for my ENTIRE family. It’s amazing and so comfortable. I am thinking of making it with chenille yarn but I don’t know how it’s work. Can you help me.
Love,
Ash
Hi!! I just subscribed, I saw this tutorial and wanted to make this hat. I am making beanies for cancer patients and this pattern is perfect, works up so nicely and quick. Thank you so much for sharing your pattern!! ❤️
If I choose to sew the hat instead of using slip stitches do I still go the
flo?
Loved this pattern. It was my first time crocheting a beanie and the pattern was easy to follow and my beanie came out great.
Viv, Help. Trying to make this for my adult brother his head. Size is 23 and he doesn’t like them tight. How many HDC’s and how many SC’s at the end. I’m not very good at following patterns.
Thank you
Robin